Basic Wordpress - Troubleshooting Guide
Remove WordPress comments
You can remove comments individually or in bulk within WordPress.
- Log in to WordPress
- Go to Comments > All Comments
- Filter comments based on the following:
- All
- Pending
- Approved
- Spam
- Trash
- After filtering comments you can delete them individually or in bulk:
- To remove them individually
- Highlight a comment with your mouse cursor
- Click Trash
- The selected comment will be moved to the trash.
- To remove in bulk
- Place a check in the box next to each comment you wish to remove
- Select "Move to Trash" from the "Bulk Actions" drop down
- Click Apply
- The selected comments will be moved to the trash.
If there are too many comments to remove, you can raise a ticket and have a CRU developer bulk remove directly from your websites database.
How can I change the site Title and Tagline
- Navigate through Appearance → Customise

- Select Site Identity
- Update Site Title for the site title
- Update Tagline for the tagline
- Click the Update button to save your changes
Check the length of my WordPress site title
To help improve SEO for your site, follow these steps to make sure the site title is an optimum length. Google searches typically show the first 50-60 characters in your title tag (about 600 pixels wide). Your title should also include keywords that people will search for.
- Visit your website, right-click on your home page, and click View Page Source.
- Copy the text between the Title tags (<title>).
- Visit this page at Moz.com.
- Paste the text you copied into the Title tag preview tool and click Check
- Make sure text does not get cut off in the preview. If text is cut off in the preview, shorten the title as needed.
Changing the Wordpress Menu
The steps to make changes to your WordPress main navigation menu are:
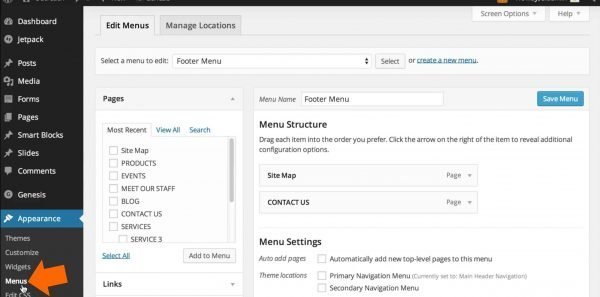
1. Navigate to "Appearance", and then "Menus" underneath Appearance in your WordPress dashboard.
On this screen, you'll be able to see all of the menus that have been set up for your website.
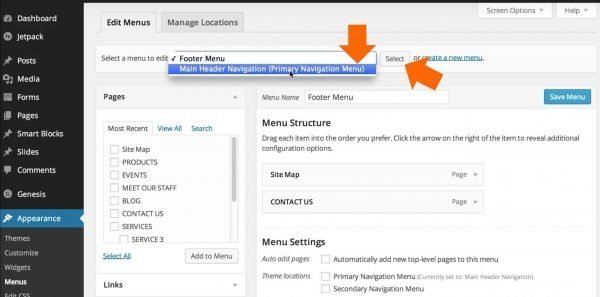
2. Select the main menu from the list of menus, and click 'Select' so that the menu that we're editing is the correct one.
On this screen, you'll see on the right are all of the items that are currently in the menu. The hierarchy of the subpages is indicated by the indentation of the item.

3. Add a new menu item, rearrange items, or edit the navigation button labels as needed.
On the left side, click the checkbox next to the item you want to add to your menu, and then click the 'Add to Menu' button. This is a drag and drop interface so it's very easy to just rearrange all of the items in your menu. Every time you add something to your menu, it adds it to the bottom of the current menu. So, you need to go 'grab' it and pick it up and drag it where you would like it to be in the navigation.

4. Click the 'Save Menu' button to save the menu items that you have added, edited or rearranged.
After you click the Save Menu button, it's always a good idea to go check that the menu updated as expected on the live website.
Adding a link to an external website in your Wordpress Menu
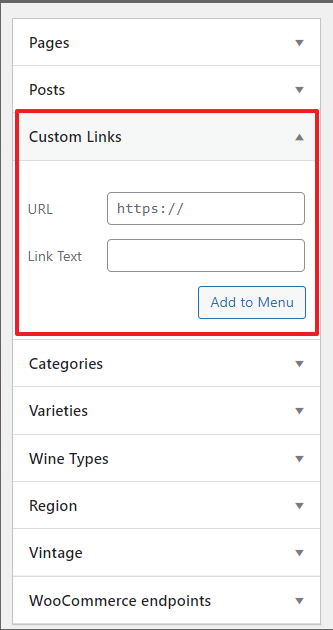
Sometimes you want to create a link to another website in your menu. For instance, a login button linking to a login page outside of the website. You create a link like this as follows. Click on ‘Custom links’:
At ‘URL’ you add the web address and at ‘Link text’ you enter the name you want on the menu button. Then you click on ‘Add to menu’. You can then drag it into place where you want it located in your menu.
How to Add a Product as a Menu Item
Sometimes, you wanted to direct the customers to the product page from the menu, it simple to implement.
1) On the Appearance > Menu Page, select the Custom Links and input the link of the product to the URL field and then the title of the menu you wanted to show on the menu under Link Text.
2) Click "Add to Menu" button to add them to the menu.
Changing a Page Title
Sometimes you may find the need to change your page titles. Below are two ways to do so and some considerations that go along with changing a page title.
Option 1:
When in the WordPress dashboard, navigate to Pages>All Pages in the menu, scroll to the page you want to edit and hover over the title, then click on 'edit'
Once on the page, you will see the title of the page at the top of the screen:
Here you can edit the title of the page. Once you are finished, click on the Update button.
Under the title you will see 'Permalink', it is best practice to update this as well, this will change the URL of the page. For example, www.example.com/contact-us if changed to Contact (removing the Us part of the title) would then need to change the Permalink from /contact-us/ to /contact/. This is also known as the 'slug'.
Option 2:
You can cut down the steps by using the 'Quick Edit' option:
It will reveal a section that has multiple 'quick edit' options (you can also do this on Posts and Products)
Change the title to your new title and change the 'slug' located under the title to match your new title. The slug is the end point on your URL example a page titled Contact Us would be www.example.com/contact-us. Slugs are always lowercase and spaces are replaced with a hyphen.
Once you have updated the title click update.
How to auto optimise your images
CRU is now using a new tool to automate the optimisation of images! The more optimised (less file size but retaining image quality) your site is, the faster load speeds will occur!
Along with this automation, whenever you upload new images or product images, you can optimise them directly from your Media Library!
Navigate to your Media Library in the dashboard:
Switch to the List view to see the optimisation details:
Notice the top image is ready to optimise, simply click on the blue optimise button and away you go!
Some images will show "WELL DONE. This media file is already optimized, no further optimization is required." "try again" these have already been optimised, so no need to try again.
Other images that have been optimised, will show the sats on the optimisation.
When you are loading in new images, feel free to use this tool to optimise them and keep your site nice and fast!
Some other ways to reduce the load on your website to increase speeds are to delete any files in the Media Library that you are not using. It's not an easy task as this is manual and WordPress doesn't tell you which are in use and which are not, but it's worth the work!
Adding a favicon in WordPress
If your WordPress theme has an option for installing a favicon, it is a good idea to use the theme's functionality to install the favicon so that the favicon will be contained in the content folder of WordPress and will not require reinstalling if you move your content to another location.
- Log into the WordPress
- Under the Appearance tab, click Customize
- Click Site Identity
- Choose the image you wish to use for the favicon and click Select
- Crop the image to how you would like to it to appear
- Click on Crop Image
- Click Save & Publish at the top left
Favicons should be 16x16 pixels.
Troubleshoot a media upload error in WordPress
The WordPress Dashboard can give several errors when trying to upload media files, and there are multiple possible causes of these errors. There is one main error that users can fix themselves and that is the file size of the image. If the image exceeds the recommended 1MB then it will not upload. Please resize the image then try reuploading.
If you are still experiencing other errors, please raise a ticket with CRU Support
Add image descriptions in WordPress
Screen readers and search engine crawlers rely on alternative text to obtain information about an image. To help improve SEO and accessibility for your WordPress site, follow these steps to add or edit image descriptions.
- Log in to WordPress.
- In the left-hand menu, select Media > Library.
- Select the grid view.
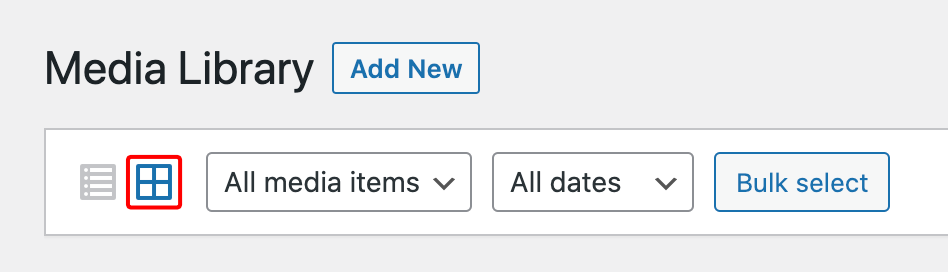
- Select the image you want to edit.
- In the pop-up window, you can enter values for Alternative Text, Caption, and Description.
Reset your WordPress password
You can recover your WordPress password from the login screen. If you know the email address and your username, you can request a reset email be sent to you.
- Navigate to your WordPress login page.
- Click on the Lost your password? link.
- Enter your username or email address into the field.
- Click Get New Password.
- Check the email account for the password recovery email.
- Open the email, and click the password recovery link.
- Enter your new password, and click Reset Password.
You can now log in with your new password.
Change your WordPress password in the Dashboard
You can update your WordPress password from within the Dashboard. You must know your current password to use these steps.
- Log in to your WordPress Dashboard.
- Select Users then All Users from the main menu.
- Locate your username in the list and click on it.
- On the Profile page, click on Generate Password.
- Enter your new password, or make note of the automatically generated one.
Note: Please remember that your website's security is only as good as your password strength.
- Click the Update Profile button.
Your new password should work immediately.
Screen Options
Screen Options are there to provide you, the user, with as much control as possible. They change from one admin screen to another and allow you to customize sections on the screen.
The Screen Options menu features options for the configuration of the view of the particular page in your admin area. You will see several checkboxes that enable you to hide and show different elements on an admin screen. Simply put, you can organize your admin view of a specific page by your priorities, and manage it accordingly. For example, you can choose not to see the discussion meta box or custom fields in the WP post edit screen.
In this article, we will show you how to use the Screen Options in WordPress:
The screen options are available both on the page and on the post as well as Products. And they often go unnoticed. Look for them in the upper right corner.
These options differ on Pages, Posts and Products. Below is a screenshot of a Posts Page.
.
Toggling some options on or off will make dramatic changes to your admin pages. For example, some add-ons have options that may break your screen due to the site of their inclusion on that specific page, or there are too many options to display on that particular page.
If you see that your admin pages look broken, first click on Screen Options and toggle anything you don't need off. This will allow you to customise your screens to suit your needs.
Identify broken links in WordPress
If you are trying to identify if your website has any broken links after a migration or domain name change, you can follow these instructions. A broken link is a link that resolves to a 404 Not Found error. These steps include the use of a third-party website.
- Navigate to the Broken Link Checker
- In the open field type in your website address ( ex. https://example.com ).
- Select the whole website option.
- Click on the check button.
- Allow time for the tool to run.
- Once the tool has been completed you can click on the Full report button to get a complete list of broken links.

Note: As a courtesy, we provide information about how to use certain third-party products, but we do not endorse or directly support third-party products and we are not responsible for the functions or reliability of such products. Third-party marks and logos are registered trademarks of their respective owners. All rights reserved.
Check if Google is blocking my website
You can use the following steps to make sure your website is not blocklisted by Google. Being blocklisted will affect your SEO ranking. For more information, see safebrowsing.google.com.
- Visit the Google Transparency Report.
- Enter your website URL into the Check site status search field.
- Submit your search to view the report.
If it states there is no unsafe content, Google is not blocking your website and no further action is required.
How to check email logs
If you are not sure that emails are sent from the website, you might want to check the logs to confirm.
- Navigate through Tools → CRU MU → WP Mail Logging
- Make sure you are in the Email log tab
- You can search the email address and the email subject on the search bar
- You can also view the contents of the email by clicking View button
How to clear your browser's cache
Every time you visit a website you store parts of it on your computer so that the next time you visit that website, it loads just a little quicker than the first time.
Your browser could re-download the logo every single time you visit a different page on this site, but that would be wasteful. So, instead, your browser stores the logo, and all sorts of other things, on your computer. In the cache.
That's all the cache is - the place where your browser stores images, code, and other files to avoid re-downloading them repeatedly. Your browser would run a lot slower without this feature because every site you opened would require re-downloading tons of files. The logo, yes, but also background images, fonts, and a bunch of other technical sounding things like CSS, HTML, and JavaScript. The cache stores all of these locally, to save bandwidth and speed up your browsing.
On some occasions, a website may look broken especially after an update or changes that may have been made. In this case, we always recommend clearing your cache so you are viewing the latest version of the website.
Keyboard Shortcut for Most Browsers
- If you are using Internet Explorer, Edge, Google Chrome, or Mozilla Firefox you can quickly clear cache with a keyboard shortcut. While in your browser, press Ctrl + Shift + Delete simultaneously on the keyboard to open the appropriate window. Or Command + Shift + Delete for mac
- You can also use Ctrl + Shift + R or Command + Shift + R for mac
- Shift + F5 can also be used
 IMPORTANT: Be sure and close/quit the browser and restart it after clearing the cache and cookies.
Google Chrome or Brave:
- Click the Tools menu (three dotted lines in the upper-right corner).
- Select History.
- Select Clear Browsing Data from the left-hand side. Set the Time Range set to All Time. Check-mark Cookies and other site data and Cached images and files and select Clear Data.
- If on a Windows computer, close and re-open Chrome to save your changes. If on an Apple computer, go to the Chrome menu on the top menu bar and select Quit for the changes to take effect.
Mozilla Firefox
- Click on the Tools bar.
- Click on Options (On Mac, it's labeled Preferences).
- On the menu to the left, select Privacy & Security.
- Under the Cookies and Site Data option, click the "Clear Data..." button.
- Select only the two options and hit clear now.
- If on a Windows computer, close and re-open Firefox to save your changes. If on an Apple computer, go to the Firefox menu on the top menu bar and select Quit for the changes to take effect.
Safari
- Click on Safari on the top menu bar.
- Click Preferences.
- Click the Privacy tab.
- Click Manage Website Data...
- Click Remove All.
- Click Remove Now
- Go to the Safari menu on the top menu bar.
- Select Quit to close Safari and save your changes.
Microsoft Edge
- Click the Tools menu (three dotted lines in the upper-right corner), and open the Settings menu.
- Click Privacy, search, and services on the left-side menu.
- Under the section Clear browsing data, Click Choose what to clear.
- Select Cookies and other site data and Cached images and files.
- Click Clear Now.
- Close Microsoft Edge completely for your changes to take effect.
Why is shipping address not showing on the invoice and packing list?
Shipping address won’t show if:
- The product/s purchased is/are virtual product/s
- There is no shipping rate on the order or subscription. See in the image that there is no shipping rate available or added on this subscription. When this renews, invoice and packing list will not show shipping address. It is advisable to add shipping when creating subscription via admin
- There is no shipping address provided on order or subscription
Update Username
Go to the user's page and view the user you wanted to update.
Scroll down to Username and click the "Edit" button.
This prompt should show with a field.
Enter the new username and click the "Update Username" button.

Best to always check if the new username does not exist on the system to avoid any issues.
Email Authentication – Don’t Let Your Emails End Up in Spam
You may spend hours or even days crafting the perfect email as a marketer. However, if your message winds up in the spam folder, then your latest campaign is almost certainly dead in the water.
What Email Authentication Is (and How It Works)
Nobody likes spam. ISPs are constantly working to reduce the number of unwanted messages we receive in our inboxes. They do this by examining the source of the email and verifying whether it’s from a legitimate sender – or a potential spammer.
That’s where email authentication comes in. It’s a set of methods that the receiving server can use to verify that the message isn’t forged.
As part of this check, the server will verify that the message came from the person listed in the From field. In this way, email authentication can prevent spoofing and phishing scams, where an email appears to be from a legitimate domain but is sent by a malicious third party.
The recipient server will also determine whether the email has changed during transit. This can protect your contacts from machine-in-the-middle attacks.
There are various ways to implement email authentication. Each approach has its setup process and puts a unique spin on authentication. However, you’ll typically establish rules for authenticating emails sent from your domain. You’ll then configure your servers and email infrastructure to implement these rules, and then publish them in your Domain Name System (DNS) records for each sending domain.
The receiving email servers can refer to these rules when authenticating incoming emails. If your message appears legitimate, the server will deliver it to the recipient’s inbox. However, if your message fails this check, it may be rejected, quarantined, or sent straight to spam.
Why Email Authentication Is Important
For the recipient, email authentication serves a clear purpose. It helps protect the person from spam, phishing scams, and other malicious emails.
Without authentication, third parties can easily change the source of emails to bypass the spam filters. They might even copy your unique branding to trick your customers into believing this is legitimate communication.
Any attack that impersonates your business is a massive threat to customer trust. For this reason, email authentication is a critical tool for protecting your reputation and retaining your audience.
Authentication increases the chance that the receiving server will trust your emails. By contrast, if your messages appear to originate from an unknown or unexpected domain, there’s a high chance that they will wind up in spam folders.
Poor email deliverability rates almost inevitably translate to a poor Return On Investment (ROI) from your content marketing. By implementing email authentication, you should notice a positive impact on your email conversion rates.
Today, many businesses send their emails using a third-party platform, such as Mailchimp, Constant Contact, or other alternative tools. You can use these platforms to create automated campaigns and perform segmentation.
By authenticating your domain and email, these platforms can send messages on your behalf from your website’s domain. For example, Mailchimp will remove the default authentication information (via mcsv.net or on behalf of mcsv.net) that appears alongside your campaign’s From field. This improves your brand visibility and may encourage your contacts to open your emails.
You may be concerned about adding lots of complex content to your emails. However, most authentication information is transmitted in the message header, so it isn’t visible. This means that authentication shouldn’t impact the quality of your email content.
5 Primary Email Authentication Methods
Email authentication requires the sending and receiving servers to coordinate and cooperate. Fortunately, email authentication standards ensure that all email clients and providers speak the same language. Before we show you how to implement authentication, let’s look at these underlying standards.
1. DomainKeys Identified Mail (DKIM)
DomainKeys Identified Mail (DKIM) provides a unique public key that pairs with a private key. This DKIM signature is a header added to the message and secured with encryption.
In this way, DKIM can verify that the email is from a legitimate sender. A DKIM signature can also prevent hackers from tampering with an email while it’s in transit as part of a machine-in-the-middle attack.
Here’s an example of a DKIM record that Mailchimp uses for authentication:
CNAME record: k1._domainkey.yourdomain.com
Value (resolves to): dkim.mcsv.net
Meanwhile, here’s an example of a DKIM record with MailerLite, using a TXT record:
TXT Name: ml._domainkey.yourdomain.com
TXT Value: k=rsa; p=MIGfMA0GCSqGSIb3DQEBAQUAA4GNADCBiQKBgQDdgIGns7EFVltvAkNNdbXD9KYSzAUNQky8POXwH6
Usually, DKIM signatures are not visible to the recipient, as the validation is performed on the server level. This means adding DKIM records can improve your deliverability rates without impacting the quality of your emails.
Sender Policy Framework (SPF) is an authentication standard that verifies your identity as the email’s sender. This policy compares the sending mail server’s IP address to a list of IP addresses authorized to send mail from that domain. The SPF record is added to the sender’s DNS.
Whenever a server receives an email, your ISP will use the SPF record to check the sender’s IP address. Assuming that this value matches the SPF record, the email will be delivered successfully.
If you don’t provide SPF authentication, the recipient server may reject your messages since they appear from an unverified sender address. Here’s an example of an SPF TXT record that Mailchimp uses to perform email authentication:
v=spf1 include:servers.mcsv.net ?all
Some of the biggest companies in the world use SFP, including Google, Comcast, Verizon, Live.com, and Cox.net.
3. Sender ID
Developed by Microsoft, Sender ID is often lumped together with SPF. Both Sender ID and SPF check the sender’s IP address against the domain’s registered owner. However, their approaches are slightly different.
Sender ID uses the Purported Responsible Address (PRA) algorithm to examine the visible sender address in the message. Let’s take a look at an example of a Sender ID record:
v=spf1 include:servers.mcsv.net ?all spf2.0/pra include:servers.mcsv.net ?all
Sender ID was primarily used by Hotmail and Windows Live Mail, both of which no longer exist. Since it wasn’t widely adopted, Microsoft has removed the official Sender ID website.
While it’s easy to consider Sender ID obsolete, it’s still used in a few solutions, particularly on-premise Microsoft Exchange servers. Some ISPs such as Comcast and AT&T also utilize Sender ID.
4. Domain Message Authentication Reporting and Conformance (DMARC)
Domain Message Authentication Reporting and Conformance (DMARC) is a policy for handling emails that fail SPF or DKIM authentication. This gives you more control over your email authentication system and helps protect the recipient against phishing and spoofing attacks.
Using DMARC, you can tell the receiving email server how it should react when it receives a message that appears to be from your domain but doesn’t pass the SPF or DKIM authentication requirements. Here’s an example of a DMARC record using a TXT record:
v=DMARC1;p=reject;pct=100;rua=mailto:yourdomain.com
You can also use DMARC to request reports from email servers regarding failed messages and potential spoofing of your domain. These reports can help you identify any authentication issues and malicious activity relating to messages sent from your domain.
5. Brand Indicators for Message Identification (BIMI)
The Brand Indicators for Message Identification (BIMI) standard attaches your brand’s logo to your authenticated emails. Behind the scenes, BIMI is a text record stored in your DNS records and contains the location of your company’s logo.
The email provider will retrieve your BIMI text record using a DNS lookup whenever it receives a message. Once the provider finds your logo, it will attach this graphic to the email in the recipient’s inbox.
This simple visual verification helps recipients spot your message and verify its authenticity. If they ever receive a message that doesn’t contain your logo, your contacts will immediately know it is a suspicious message.
Unlike the other verification methods we’ve explored, BMI is the only approach that provides a visual clue to recipients. This should also lead to fewer people incorrectly flagging your messages as spam, which can boost your deliverability rates.
The typical internet user receives dozens or even hundreds of emails every day. By displaying your logo in the recipient’s inbox, BIMI can help you capture the recipient’s attention and encourage them to interact with your emails.
BIMI can also be a way to market your brand, regardless of whether the individual chooses to interact with your messages. Even if the person never opens your email, they will still see your subject line, sender address, and logo. This is a great way to establish brand recognition.
Related Articles
Basic Wordpress - User Guide
Permalinks Overview Permalink is short for “permanent link.” Permalinks are permanent URL structures used to help organise the content of your website (pages, posts, products, etc.) so it can be efficiently navigated, shared, and referenced by users ...Google Product Feed - User Guide
For pricing and how to add to your website see at the bottom of the page. Setting up your feed in Google Merchant Centre Configure your Google Merchant Centre account The first thing to do, before you import your feed for the first time is to make ...Google Listings & Ads - User Guide
For pricing and how to add to your website see at the bottom of the page. Setup and configuration Sync your store with Google and configure your free product listings 1.1 Set up your accounts. Connect your WordPress.com account, Google account, and ...Testing Reset Password in My Account
This is a document guide to help you test the 'Reset Password' feature and verify that the feature is working. Steps Go to https://your-domain.com/my-account/ as a guest and click the forgot password link. Enter the email or username of the account ...Page Builders
Over the years CRU has used different page builders across our sites. With the more recent changes to Wordpress and the way we develop websites, we move into using the newer Gutenberg Blocks as well as our favourite, Advanced Custom Fields. As it is ...