Checkout add-ons - User Guide
Configure
You can decide where your add-on fields will appear on the checkout page – before or after the billing details section or before the order summary (default) – by adjusting the display setting:
- Go to Appearance > Customize.
- Select WooCommerce > Checkout.
- Select the desired display setting from the Checkout Add-Ons display menu.
- Click Publish.

On the same Customize tab, you can choose if you want to apply percentage adjustments based on the total or subtotal of the order.
Creating Checkout Add-ons
To create a checkout add-on, go to WooCommerce > Checkout Add-Ons and click Add add-on.
You can now begin creating your checkout field! On the General tab, you can modify the following fields:
- Enabled: Add-ons are enabled by default, but can be disabled if you want to temporarily remove them without completely deleting them from your site.
- Checkout Label: Optional. Customer-facing label for this add-on. If left blank, the add-on Title will be used.
- Description: Optional. Customer-facing field where you can provide additional context about the add-on. Supports limited HTML.
- Add-on Type: Choose the add-on field type.
- Default value: Optional. The value that should be prepopulated for the field on the checkout page.
- Price adjustment: Optional. Determine the fee or discount associated with this add-on, as either a fixed amount or a percentage.
- Taxable?: Determines if tax rates should apply to the add-on. This setting will only appear if taxes are enabled for your store.
- Tax Rate: If taxable, determines which tax rate will apply to the add-on.
- Attributes: Optional. These settings impact whether the add-on field is required and if/how it should be displayed on the Orders page.
Add-on Types
| TYPE | DESCRIPTION | EXAMPLE USE CASE |
|---|---|---|
| Text | Customer can enter a short string of text. | Gift recipient’s name |
| Text Area | Customer can enter a long string of text. | Gift messages |
| Select | Customer can select one option from a drop-down menu. | Gift wrapping options |
| Multiselect | Customer can select one, several, or all options from a drop-down menu. | Shipping and handling add-ons (e.g. Add Insurance, Add Rush Handling, etc.) |
| Radio | Customer can select one option from a list of radio buttons. | Choosing whether or not the order contains a gift. |
| Checkbox | Customers can select a single checkbox. | Adding a fixed-amount donation |
| Multi-checkbox | Customer can select one, several, or all options from a list of checkboxes. | Gift wrapping add-ons (e.g. Add a bow, Add tissue paper, etc.) |
| File | Customer can upload a file to include in their order, which you can access from your Media Library or when viewing the order. | Custom card cover |
Here’s an example of how each field appears on the checkout page: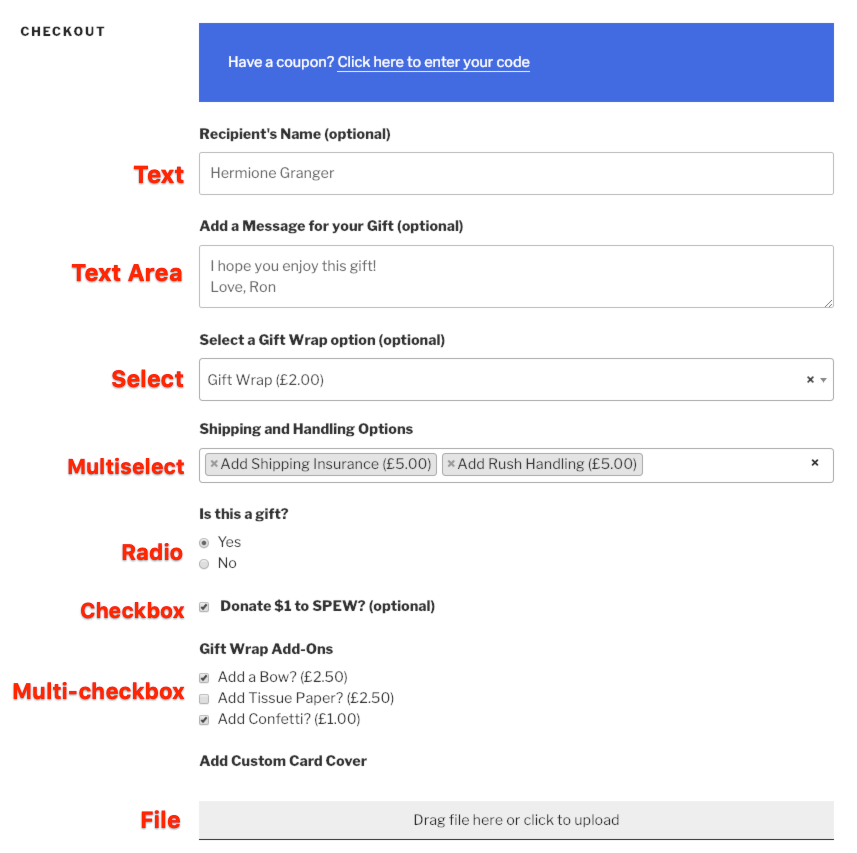
Options
You can set default values for all add-on types except “File”.
For the “Text” and “Text Area” add-on types, you can define the default on the General tab: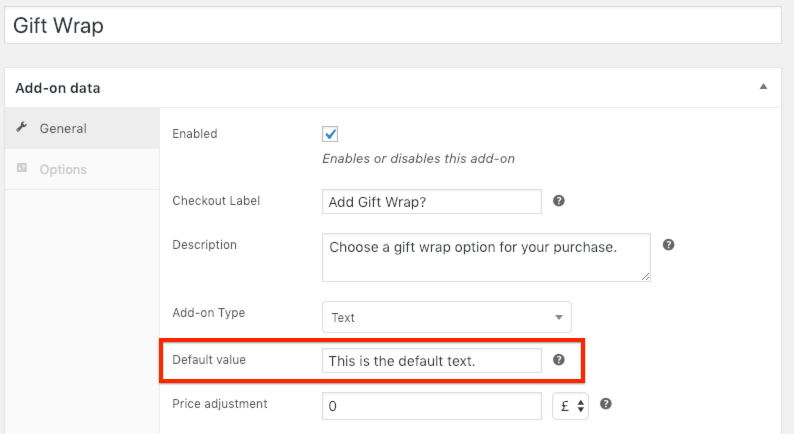
For all other eligible add-on types, you must navigate to the Options tab to set the default. For the “Multiselect” and “Multi-checkbox” add-on types, which let customers select more than one option, you can also set multiple defaults: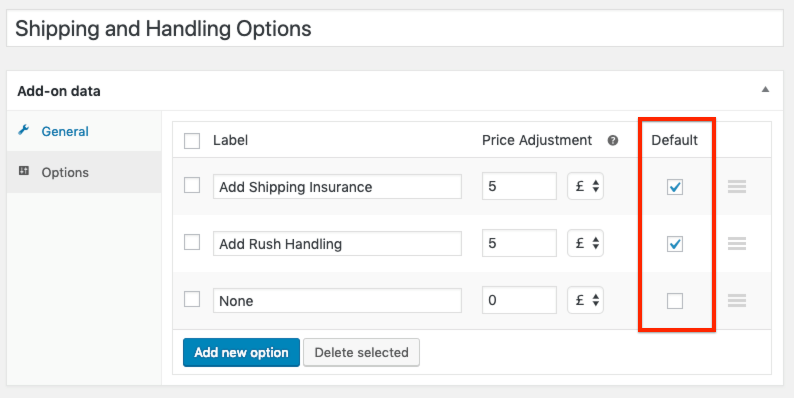
Price Adjustments
You can choose to associate fees or discounts in either fixed amounts or percentages for all add-on types.
To add a fee, enter the price adjustment as a positive value, such as 2.50. To add a discount, enter the price adjustment as a negative value, such as -2.50.
When setting the price adjustment as a percentage, the adjustment will be calculated based on the order’s subtotal.
For the “Text”, “Text Area”, and “File” add-on types, you can set the price adjustment on the General tab: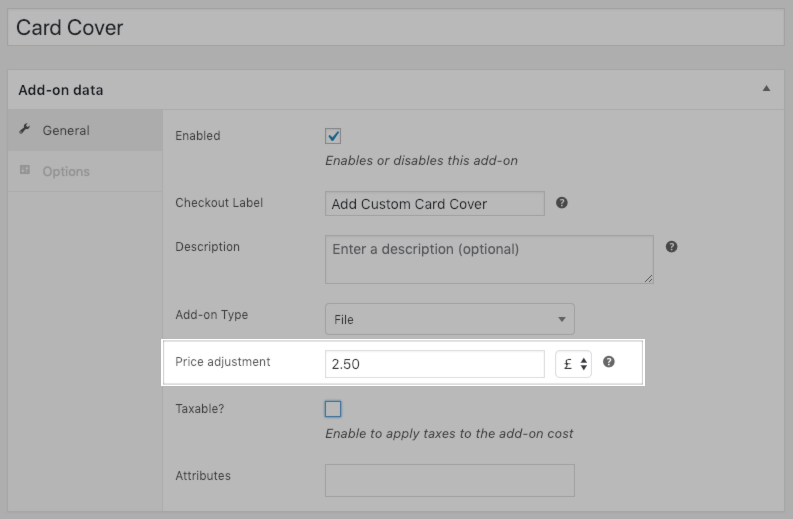
For all other add-on types, price adjustments can be set on the Options tab: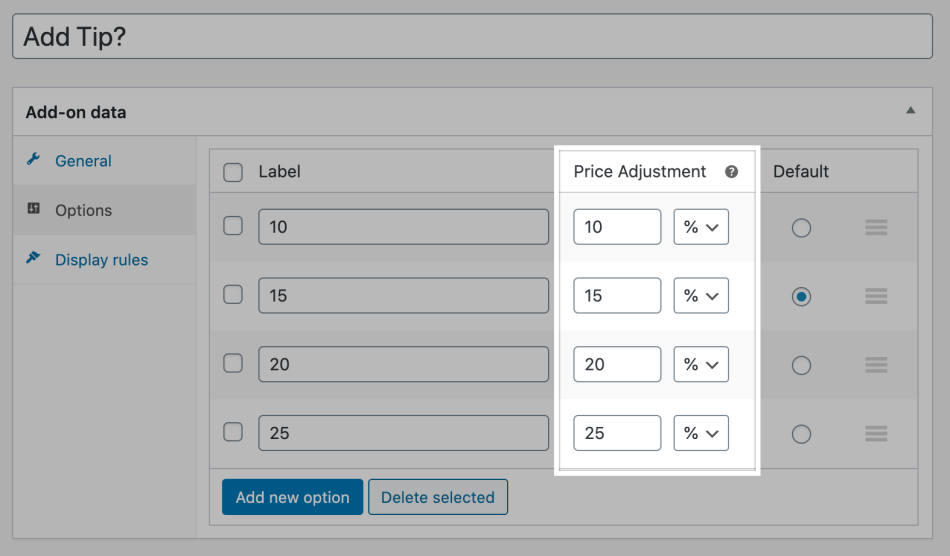
Display rules
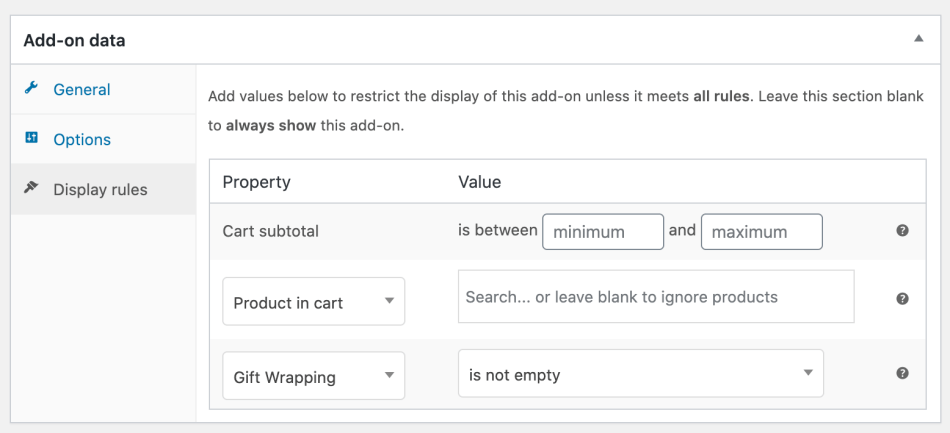
You can customise add-ons so they’ll only appear when certain conditions are met:
- Cart subtotal: add-on will only appear when the cart subtotal is within the indicated range
- Product or category in cart: add-on will only appear when any of the listed products or product categories are in the cart.
- Add-on value: this add-on will appear based on the value of another add-on. This is great for gift options – if someone has indicated that the purchase is a gift, you can then offer options like gift wrapping or a custom card.
Attributes
There are five attributes you can set for checkout add-ons:
- Required: If selected, the customer cannot place the order until the field is populated or selected. Adds a red asterisk to the field to denote its requirement.
- Display in View Orders screen: Adds the add-on field to the Orders list so you can view its values across orders in one screen.
- Allow Sorting on View Orders screen: Lets you sort the Orders list alphabetically/numerically by the add-on field’s value. Cannot be set for “Multiselect”, “Multi-checkbox”, or “File” add-on types.
- Allow Filtering on View Orders screen: Lets you filter the Orders list to display only the orders with a particular value in the add-on field. Cannot be set for the “Text Area” add-on type.
- Renew with Subscriptions: If using WooCommerce Subscriptions, lets you include the add-on in renewal orders.
Administrator View
Administrators can view all selected add-on fields in the Edit Order page: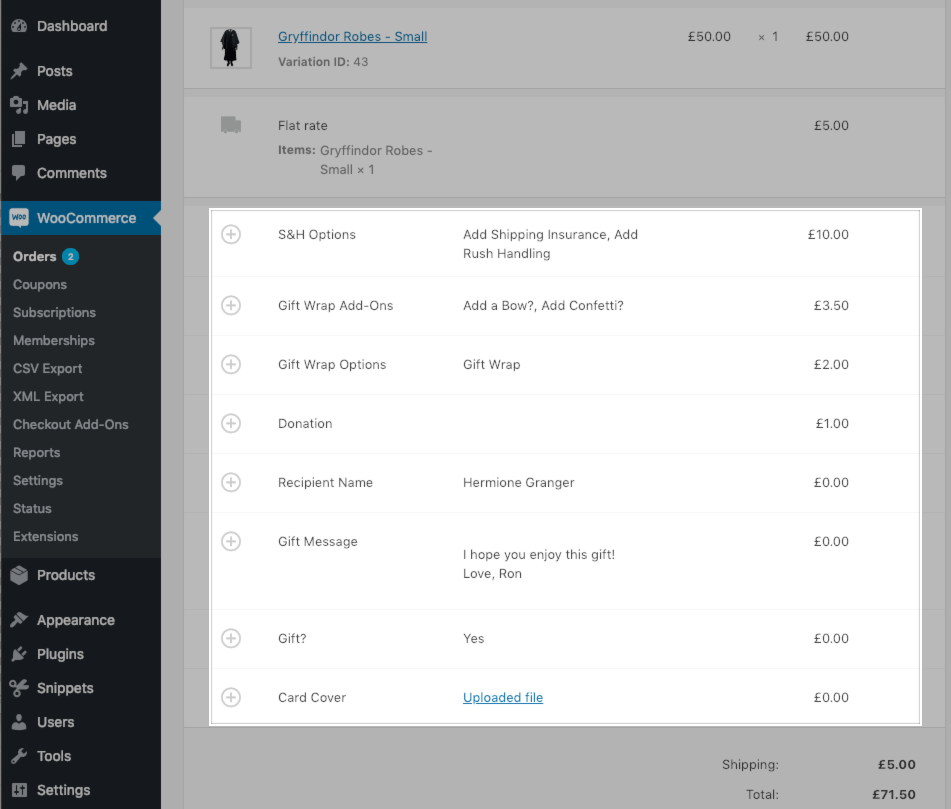
Depending on the selected attributes, administrators can also view add-on fields from the Orders list.
Viewing File Uploads
The “File” add-on type lets customers upload a file with their order. When uploaded, files are given a unique suffix to prevent duplicate names. Uploaded files are available in your Media Library and the order itself.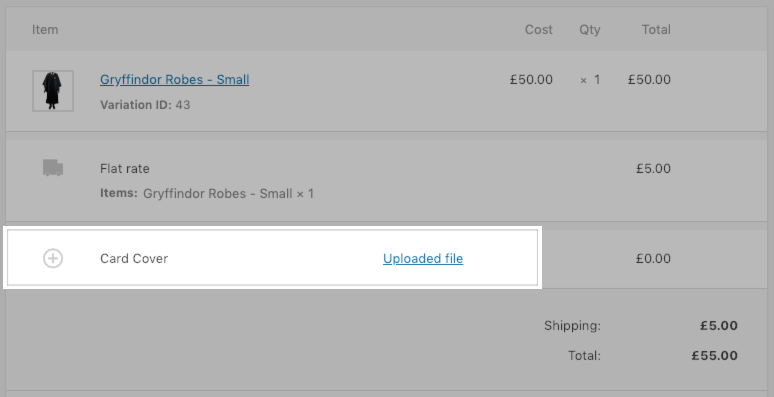
If you have enabled the attribute to display the “File” add-on in the Orders list, you can also access files by selecting the link in the associated column.
Customer View
The customer can view any selected/populated add-on fields and any associated price adjustments in the order details.

 Overview and pricing of this feature. Click here

 Troubleshooting this feature? Click here

Related Articles
Checkout add-ons - Features
View Guide Links at the bottom of the page Installation 1 CRU CREDIT Setup (optional) 1 CRU CREDIT Ease Of Use Easy Want this feature? Request Here Purchase CREDITS Here Offer free or paid add-ons and service at checkout The WooCommerce core ...Checkout add-ons - Troubleshoot Guide
Can't see any Troubleshooting Guides on this page? This means we don't have any, please raise a ticket here if you have an issue and help us build out our guides! Overview and pricing of this feature. Click here Looking for the user guide for this ...AutomateWoo - User Guide
For pricing and how to add to your website see at the bottom of the page. AutomateWoo is a marketing automation plugin which integrates directly with your WooCommerce store. Using automated marketing campaigns and a unique set of tools, AutomateWoo ...Basic Wordpress - User Guide
Permalinks Overview Permalink is short for “permanent link.” Permalinks are permanent URL structures used to help organise the content of your website (pages, posts, products, etc.) so it can be efficiently navigated, shared, and referenced by users ...Custom Checkout Fields
This is a custom coded feature and not a plugin Installation 1 CRU CREDIT Setup (optional) N/A Ease Of Use Easy Want this feature? Request Here Purchase CREDITS Here Add custom Fields on checkout for additional information, This will also be added ...
