- Go to Products > Add Product in the main menu
- Complete the title, body, description, tags, categories, featured image and gallery as needed
- Go to the Product Data tabs and select ‘Event Settings’
- To activate event functionality set the ‘Is this product an event?’ drop-down to ‘yes’.
- Complete the event tab fields by entering your events information
- Create different ticket types using WooCommerce variations (optional)
- Setup custom attendee fields and capture of attendee information at checkout (optional)
- Generate seating charts and allow customers to select their seats (optional)
- Create events that run over multiple days (optional)
- Setup an event calendar (optional)
- Override some of the default FooEvents terminology (optional)
- Once done, publish the event. You will now be able to see the event on the front end of your website
Fooevents for Woocommerce - User Guide
Events
Creating an event #
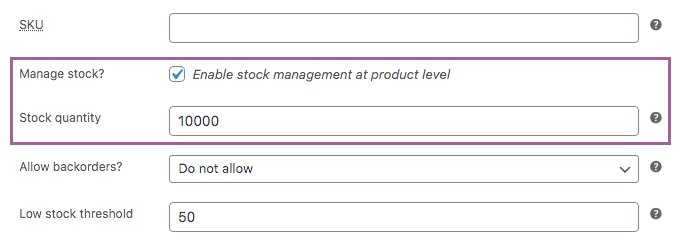
FooEvents adds event functionality to WooCommerce products. As such, the number of tickets sold for an event is determined using the products stock management capabilities. You can set a specific number of tickets for an event by specifying the number of stock. Each stock item is equal to 1 ticket.
- Go to Products > Add/Edit Product in the main menu
- Go to the Product Data tabs and select ‘Inventory’
- Select the Manage stock option
- Set the stock quantity field to set the number of tickets available for the event
You can sell an unlimited number of tickets by disabling the Manage stock option.
FooEvents also supports the use of WooCommerce variations and stock management on a variation level. This is ideal for events that have different ticket types that each have limited stock.
Variable Product for Events
FooEvents supports the use of WooCommerce Variable products to create different ticket types. This is ideal for events that provide different types of access (ticket types) or access to different workshops, sessions and groups.
- Go to the Attributes tab in the Product Data panel
- Create a new attribute ( e.g Ticket Type, Access Level, Workshop, Conference Room, Slot etc.
- Add the name of each variation under values and separate them with the pipe symbol ‘|’ e.g. VIP | General | Early Bird
- Make sure that you select Visible on the product page and Used for variations
- Save the attributes
- Click on the Variations tab in the Product Data panel
- Add a variation for each attribute and specify the relevant ticket criteria (price, stock etc.)
- Make sure that you select Enabled
- Select Virtual and Downloadable. This will ensure the orders are completed automatically when payment is received. It will also ensure shipping information is not displayed on the checkout screen
- Save/update the post once all variations have been added
- The variations will now display as ticket options when purchasing a ticket
Once your product is published, it will appear in your WooCommerce store and users will be able to purchase tickets for your event.
Event Expiration
Events can be set to automatically expire on a specified date which saves a lot of time and effort, especially if you manage multiple events.
There are two different options for expiring an event on a specified date:
- Ticket sales will be disabled for the event but remain visible on your website
- The event will be completely hidden on your website

- Go to FooEvents > Settings in the main menu
- Select the General tab
- Scroll down to the Event expiration method option
- Selecting the Disable Purchases option will disable the ability for your customers to add an expired event to their cart. The event will still display on your site and a customizable message will be shown at the top of the individual product page.
- Selecting the Hide Product option will completely hide the product on your site. It will not display in listings, search, calendar and the individual product page will be removed.
In order for an event to expire automatically, the event expiry option will need to be activated in the event settings:

- Go to Products > Add/Edit Product in the main menu
- Go to the Product Data tabs and select ‘Event Expiration’
- Set the Event expiration date field
Tickets
When an order is completed and the order status is completed, FooEvents will generate a ticket for each attendee. Depending on how your tickets have been configured, FooEvents will either send an HTML ticket, PDF ticket as an attachment, or both to the relevant attendee or purchaser.

There are various settings that determine the behavior of your tickets. In this section we will outline each setting and discuss how it can be used to achieve the desired effect.
Ticket Settings
When creating an event, there are various settings that can be applied which will change the display and behavior of the ticket sent for that particular event. Please follow these instructions to set the ticket settings:
- Go to Products > Add Product in the main menu
- Complete the title, body, description, tags, categories, featured image and gallery as needed
- Go to the Product Data tabs (you may need to click to expand this section if it’s not visible on the page) and select ‘Ticket Settings’
- Scroll down to the follow settings:
| HTML ticket theme | You can select the ticket theme that will be used to style the embedded HTML tickets within ticket emails. Find out more about Ticket Themes. |
| PDF ticket theme | This option will only be displayed if the FooEvents PDF Tickets plugin is activated. Select the PDF compatible ticket theme that will be used to style the PDF tickets that are attached to ticket emails. |
| Ticket logo | Full URL that links to the logo that will be used in the ticket (JPG or PNG format). |
| Ticket header image | Full URL that links to the image that will be used as the ticket header (JPG or PNG format). |
| Ticket email subject | The subject line used in ticket emails. Refer to Ticket Email Variables for the list of dynamic variables that can be used in the subject line. |
| Email copy of tickets to other recipients | Sends a copy when a ticket is generated for this event to the specified email address. Use a comma separated list to send to multiple email addresses. Note: This setting overrides the global recipients if entered in General settings for this event only. |
| Ticket email body | The copy that will be displayed in the main body of the ticket email. Refer to Ticket Email Variables for the list of dynamic variables that can be used in the email body. |
| Ticket accent | This color is used for the ticket border or background. |
| Ticket button | Color of the ticket button. |
| Ticket button text | Color of the ticket button text. |
| Display purchaser or attendee details on ticket? | Display the purchaser/attendee’s name and details on the ticket. |
| Display custom attendee details on ticket? | This will display custom attendee fields on the ticket. |
| Display “Add to calendar” option on ticket? | Display an Add to calendar button on the ticket. Clicking this button will generate an ICS file that contains basic event information such as event name, date and time which the attendee can save and add to their preferred calendar. This file is generated as soon as the attendee or ticket purchaser clicks the “Add to calendar” button in their ticket email and the entry will not be automatically updated in the calendar if the event information changes. |
| “Add to calendar” reminder alerts | Add calendar alerts at specified intervals to remind attendees about the event. These alerts will automatically appear in the attendee’s calendar client after clicking the “Add to calendar” button on the ticket. |
| Attach calendar ICS file to the ticket email? | Attach an ICS file to the ticket email so that the event details automatically appear in certain calendar clients. The entry will not be automatically updated in the calendar if the event information changes. |
| Display date and time on ticket? | Display the time and date of the event on the ticket. |
| Display barcode on ticket? | Display a barcode on the ticket which is used for check-ins. |
| Display price on ticket? | Display the ticket price on the ticket. |
| Display booking details on ticket? | Display the booking details on the ticket. |
| Display Zoom meeting/webinar details on ticket? | Display all the Zoom meeting/webinar details such as the Meeting ID and Join link on the ticket. |
| Display multi-day details on ticket? | Display multi-day details on the ticket. |
| Email ticket to attendee rather than purchaser? | This will email the ticket to the attendee instead of the ticket purchaser. |
| Email tickets? | This will email the event tickets to the attendee or purchaser once the order has been completed. |
| PDF settings | These settings will only be displayed if the FooEvents PDF Tickets plugin is activated. |
| Email text | Enter the text that will be displayed in the main body of the ticket email. |
| Ticket footer text | Enter the text that will be displayed in the footer of the PDF ticket. |
Ticket Email Variables
Here is a list of variables that can be used to output dynamic data in the ticket email body and subject line:
- {OrderNumber}
- {OrderNumberOnly}
- {EventName}
- {EventVenue}
- {EventDate}
- {EventHour}
- {EventMinute}
- {EventPeriod}
- {EventEndDate}
- {EventHourEnd}
- {EventMinuteEnd}
- {EventPeriodEnd}
- {CustomerFirstName}
- {CustomerLastName}
- {CustomerEmail}
- {AttendeeFName}
- {AttendeeLName}
- {AttendeeEmail}
- {TicketID}
- {BookingsSlot}
- {BookingsDate}
- {SeatingRow}
- {SeatingSeat}
Global Settings
There are a number of Global settings that effect the behavior and appearance of tickets for all your events.
Tickets can be set to automatically expire on a fixed date or after a specific amount of time has elapsed since the ticket was purchased which is useful for many different scenarios.
- Go to Products > Add/Edit Product in the main menu
- Go to the Product Data tabs and select ‘Event Expiration’
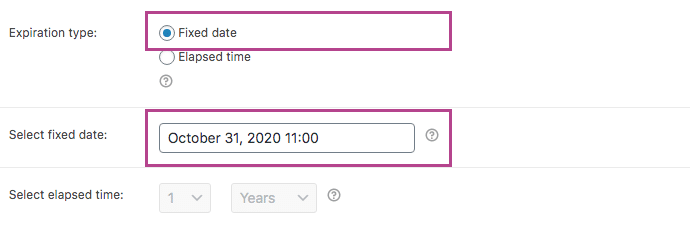
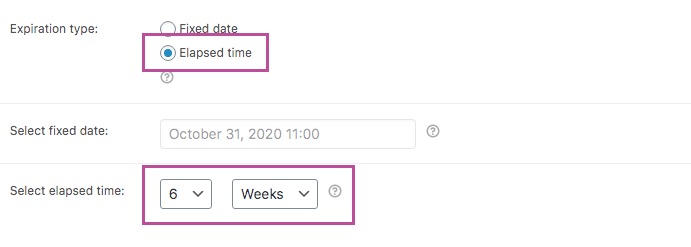
- Under the Ticket Expiration settings, select the Expiration type
- Using the Fixed date option you can set the exact time a ticket should expire:
- The Elapsed time option will expire the ticket once the specified amount of time has elapsed since the ticket was purchased:
- Using the Fixed date option you can set the exact time a ticket should expire:
When a customer purchases a ticket, a WooCommerce order is generated. All information needed for the ticket is stored in a custom field that is associated with the order. The stored data is formatted as a JSON string. When the status of the order is changed to ‘Completed‘ using the JSON string, FooEvents will create an individual ticket for each attendee. Tickets can be viewed in your WordPress admin area by navigating to FooEvents > Tickets in the main menu.
Sending tickets automatically
By default, WooCommerce orders do not automatically complete when payment is received. In the case of physical products, the order would only be completed when delivery of the product is made. As tickets are digital products, the order status can be completed as soon as payment is received as no further action is required. To do so, set your product to “Virtual” and “Downloadable” in the Product Data settings when editing a product. Once this is done, as soon as the relevant payment gateway sends back confirmation to your site that the payment has been successful, the order will automatically be set to ‘Completed‘ and FooEvents will generate the tickets.
Sending tickets on different order statuses
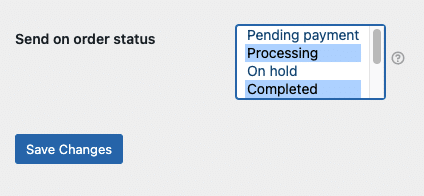
By default, FooEvents will generate a ticket for each attendee when the order status in WooCommerce is changed to “Completed”. You may need tickets to be generated when the order status is changed to a different order status.
Please follow these steps to do so:
- Navigate to FooEvents > Settings in the left sidebar of your WordPress admin area
- Select the General tab and scroll down to the Send on order status option
- Select the relevant status/es using the multi-select box and click Save Changes
Tickets will not be generated unless the status of the order is set to the specified status/es.
Creating custom order statuses
There are a number of plugins and code snippets available that make it possible to register custom order statuses. Provided that they make use of the standard WooCommerce hooks, they should reflect in the Send on order status selection field and trigger ticket generation when selected.
Tickets are initially sent out when the order status is changed to ‘Complete‘ in WooCommerce. You can manually resend individual tickets or bulk send a group of tickets at any time.
Resending tickets to attendees in bulk
- Login to your WordPress Admin Area
- Go to FooEvents > Tickets
- Select the tickets that you would like to resend
- Select Resend Tickets from the Bulk Actions drop-down
- Click the Apply button
Resending individual tickets
- Login to your WordPress Admin Area
- Go to FooEvents > Tickets
- Open the relevant ticket and find the Resend Ticket box in the side panel of the screen
- Specify the email address that the ticket should be resent to in the resend text box
- Click the Resend button
Resending ticket orders
- Login to your WordPress Admin Area
- Go to WooCommerce > Orders
- Open the relevant order and find the Resend Tickets box in the side panel of the screen
- Specify the email address that the tickets should be resent to in the resend text box
- Click the Resend button
When editing a ticket, you can delete the ticket using the Move to trash option in the publish settings.
Alternatively you can delete tickets in bulk following these steps:
- Go to FooEvents > Tickets in the main menu
- Select all the tickets that you would like to delete
- Click on Bulk Actions > Move to trash > Apply
If you are experience difficulty deleting tickets in bulk, please try the following:
- Go to FooEvents > Tickets in the main menu
- Select all the tickets that you would like to delete
- Click on Bulk Actions > Edit > Apply
- Set the Status to Draft and Update
- Select them again and move them to the trash
Deleting an order #
Deleting an order does not automatically delete and deactivate the tickets that were created for the customer. This means that even if the order was refunded or deleted the customer will still be able to use the ticket i.e. when scanning the ticket barcode using the FooEvents Check-ins app the ticket will still show up as valid. You will need to refund the order and then delete the ticket and update the stock number manually if you are managing this through WooCommerce. This is in-line with the standard WooCommerce functionality, where you might want to refund someone but still let them keep/use stock.
Canceling an order, however, will set the ticket status to “Canceled”.
Ticket barcodes
A barcode is a machine-readable code in the form of numbers and a pattern of parallel lines of varying widths, printed on a commodity and used especially for stock control.
Every ticket that is generated by FooEvents contains a unique barcode that can either be rendered using the code 128 standard (1D barcode) or QR code. If you own an external barcode scanner that can read barcodes then you have the option of scanning tickets to find them quickly.
We created the FooEvents Express Check-in plugin which runs within your WordPress Admin Area to provide a better experience when using an external barcode scanner. The FooEvents Check-ins apps can also be used to check-in people at events on your mobile device and it also supports pairing with Bluetooth barcode scanners.
The barcode can be read directly from a tablet, mobile phone or print out, however, phone cameras appear to work best with printed barcodes. The performance of phone to phone scanning varies between different screens and cameras, but we have not experienced any issues with phone to phone scanning using our test devices (iPhones, Samsung Galaxy, Nexus etc).
By default, FooEvents displays 1D barcodes on tickets, however, you can choose to use QR codes instead by enabling this option via the FooEvents settings. QR codes work much the same as barcodes and can be scanned using the FooEvents Check-ins apps. The QR code stores the unique ticket ID, which is scanned by the app and is used to identify and check-in each attendee.
To enable QR codes for your tickets:
- Go to FooEvents > Settings in the main menu
- Select the Ticket Design tab
- Check the Enable QR Codes checkbox

Scanning tickets
Scanning using the Check-ins apps
The barcode scanner uses the mobile device’s built-in camera and operating system libraries to scan ticket barcodes.
Follow these steps to scan a ticket using the FooEvents Check-ins apps:
- Open the app and connect to your store
- Navigate to the event
- Select the barcode icon
- A camera view will display, hold the device approximately 10cm – 30cm (4″ – 12″) above the barcode
- Scan the ticket and check-in the attendee
- Enable the Auto check-ins feature to speed up check-ins
In addition to using the built-in camera, you can also connect a handheld Bluetooth barcode scanner to the FooEvents Check-ins apps for the best accuracy and scanning speed.
To do so, please follow these instructions:
- Connect the Bluetooth scanner to your device.
- Open the FooEvents Check-ins app and login
- Go to the app Settings
- Enable the Bluetooth barcode scanner setting
- Navigate to the event listing and select the relevant event
- Select the barcode icon at the bottom of the screen and start scanning tickets
Scanning using FooEvents Express Check-in
These instructions will outline how to use a barcode scanner with the FooEvents Express Check-in extension.
- Connect a USB or Bluetooth scanner to your desktop computer
- Go to your WordPress Admin Area > FooEvents > Express Check-in in your desktop browser
- Enable Auto Search – The search box will automatically display data as you type
- Enable Auto Check-in – The attendee will automatically be marked as “Checked In” if a ticket ID is found that matches the search criteria. This is intended to save time, especially when using a barcode scanner
- Place the cursor in the text box
- Scan a ticket and the ticket ID will display in the text box
Manually create tickets
Create tickets from the WordPress dashboard
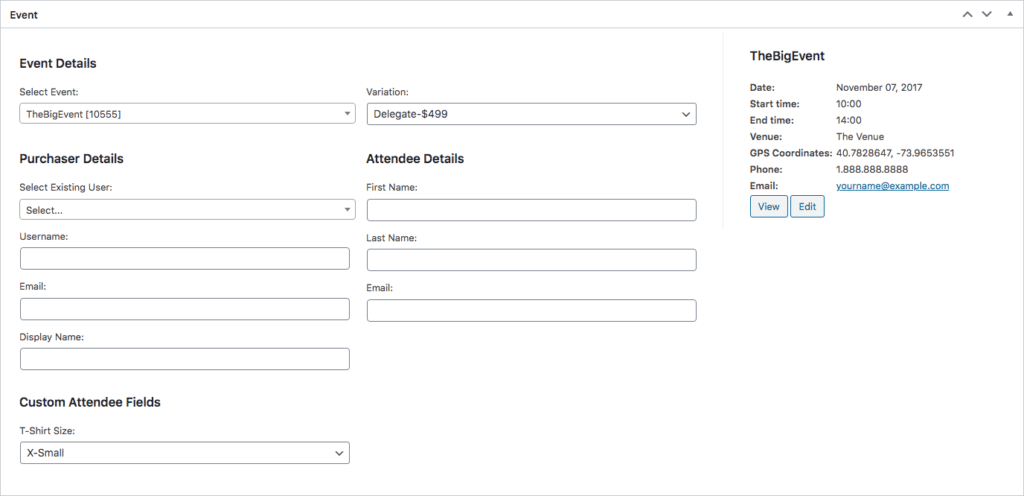
- Go to FooEvents > Tickets in the main menu
- Click on the “Add new” button which you will find under “Tickets”
- Select the event name for the specified event
- Fill out the rest of the ticket form and click the “Publish” button to create the new ticket. A corresponding order in WooCommerce will automatically be generated. By default, WooCommerce will send the customer a new order email, however, you can disable this for manually created tickets by going to FooEvents > Settings > General and enabling the Disable completed order email notification option.
- Please Note: Tickets are NOT automatically sent out after creating the ticket. If you would like to email the ticket to the attendee, click on the “Resend” button on the ticket information screen.
Create tickets from your website front-end
- Go to the front-end of your website and book a ticket from your event product similar to how a customer would do it.
- Complete the checkout process by clicking the Place Order button on the Checkout page.
- Once you reach the payment screen (for payment gateways such as PayPal) after the page loads, DO NOT make payment, instead go to the WooCommerce Orders screen and mark the order as Completed. Alternatively, you can apply a 100% discount coupon code when completing the purchase on the Checkout page, so you don’t have to select a payment method.
- Tickets will be sent out using this method depending on your event settings.
Variable Product for Events
Attendees
Each ticket contains details of the person attending the event. This person is referred to as the ‘attendee’.
Attendee check-ins
Tickets will have one of the following ticket statuses:
- Not checked in
- Checked in
- Canceled
- Unpaid
You can change an attendee’s ticket status in various ways.
Edit the ticket to change the check-in status
You can check someone in by changing the status of the ticket when viewing the ticket in the WordPress Admin Area. Go to FooEvents > Tickets > Edit Ticket > Ticket Status box and change the status of the ticket. The Canceled status can also be used to mark tickets that are no longer valid.
FooEvents Check-ins apps
The free FooEvents Check-ins apps are designed to speed up attendee validation by providing a streamlined and intuitive interface for changing the status of tickets. Using the apps, you can search for attendees by name or ticket ID. You can either manually enter the ticket ID or you can scan the 1D barcode or QR code on the ticket using the mobile devices built-in camera.
Visit the FooEvents Check-ins apps help section for more information
FooEvents Express Check-in
One of the fastest and most reliable ways to scan a barcode is to scan the ticket using a handheld barcode scanner with the FooEvents Express Check-in extension. Much like the app, the FooEvents Express Check-in interface offers an auto check-in option. When enabled, the interface will auto check-in an attendee if a ticket ID is found in the system.
- Go to your WordPress dashboard > FooEvents -> Express Check-in
- There are two options that can be set:
- Auto Search – The search box will automatically display data as you type
- Auto Check-in – The attendee will automatically be marked as “Checked In” if a ticket ID is found that matches the search criteria. This is intended to save time, especially when using a barcode scanner
Editing attendee details
It is possible to modify the attendee’s details on a ticket.
Here are the steps for how to do this:
- Click on FooEvents > Tickets in your WordPress Admin Area
- Open the ticket that you want to modify
- Change the values of the fields as needed
- Click “Update“
- Click the “Resend ticket” box so that the ticket is regenerated and re-sent via email
Alternatively, you can also delete the ticket and issue a new ticket.
Export event and attendee information
You can export a CSV file for each event which includes all ticket numbers, custom attendee fields, check-in data, booking information, purchaser and attendee details.
The CSV file can be opened using any spreadsheet program such as Microsoft Excel or Google Sheets where the data can be sorted, filtered and analyzed.
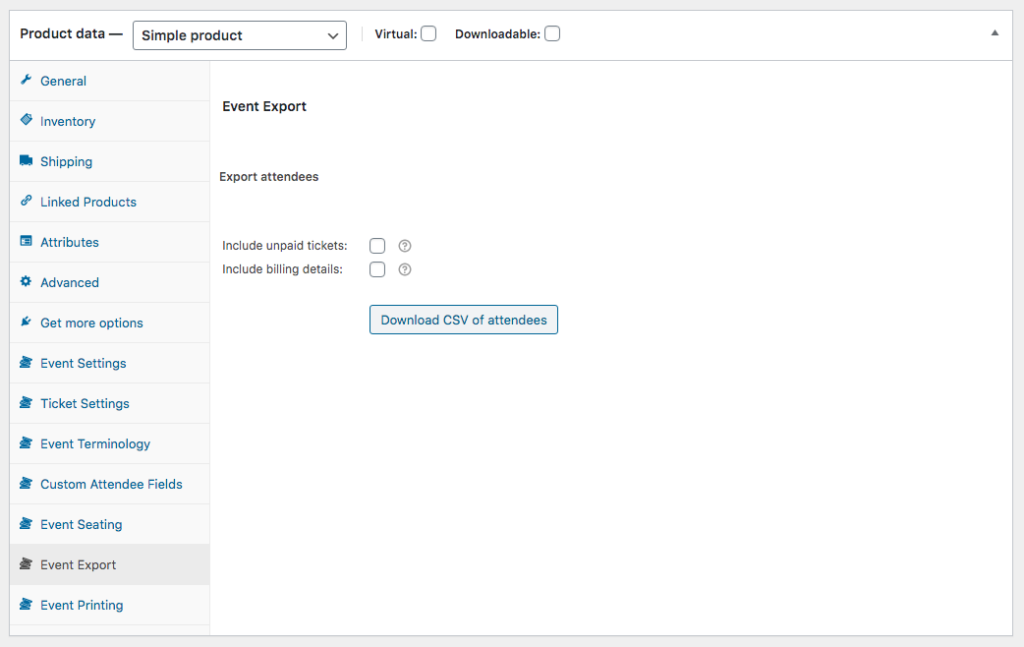
Here are the instructions for how to do this:
- Login to your WordPress Admin Area
- Go to Products in the main menu
- Edit the relevant event product
- Scroll down to the Product Data tabs
- Select the Event Export tab
- Check the optional boxes if you would like to include unpaid tickets and billing details in the export
- Click the Download CSV of attendees button
Related Articles
Fooevents for Woocommerce - Feature
View Guide Links at the bottom of the page Installation 1 CRU CREDIT Setup (optional) 1 CRU CREDIT Ease Of Use Easy Want this feature? Request Here Purchase CREDITS Here FooEvents adds powerful event and ticketing functionality to WooCommerce and ...FooEvents PDF Tickets - Troubleshooting Guide
How to scan ticket barcodes and QR codes using FooEvents and WooCommerce One of the biggest challenges experienced by most event organizers is managing attendee access. Ensuring an organized and steady flow of attendee check-ins is critical, and if ...FooEvents PDF Tickets - User Guide
For pricing and how to add to your website see at the bottom of the page. Setting up FooEvents PDF Tickets Go to FooEvents > Settings > PDF Tickets Enable PDF tickets – Adds PDF ticket attachments to ticket emails Enable PDF ticket downloads – Allows ...FooEvents Multi-day - User Guide
For pricing and how to add to your website see at the bottom of the page. The FooEvents Multi-day plugin makes it possible to sell tickets that will give your attendees access to the event over multiple calendar or sequential days. What makes this ...FooEvents Multi-day - Features
View Guide Links at the bottom of the page Installation 1 CRU CREDIT Setup (optional) 1 CRU CREDIT Ease Of Use Easy Want this feature? Request Here Purchase CREDITS Here Sell tickets to events that run over multiple calendar or sequential days. This ...

