Product Feed PRO for WooCommerce - User Guide
For pricing and how to add to your website see at the bottom of the page.
Setting-up your first Facebook catalog / Instagram product feed
navigate to the ‘Create feed’ section:

1. The File name, format and channel page
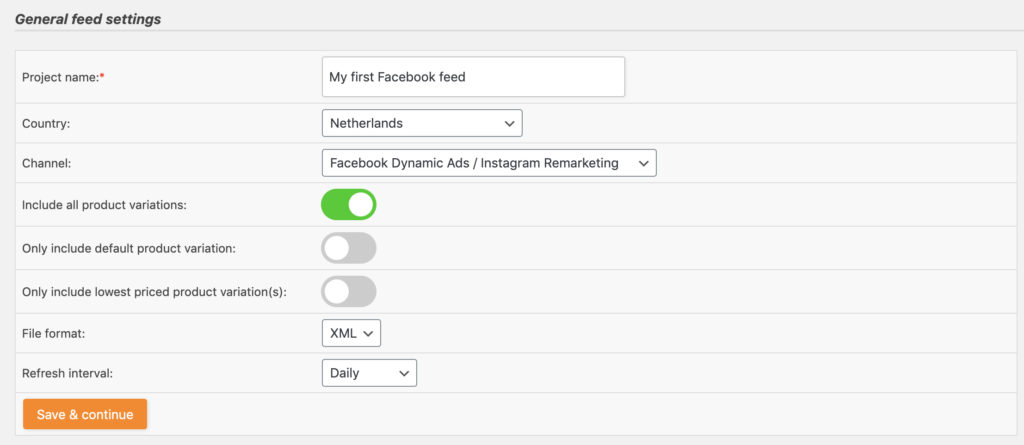
Project name:
Make sure you create an unique project name, especially when you will create multiple feeds you should make sure your project is easily recognisable;
WPML Language:
Select the language you want the product feed to be set-up for. The plugin will then use the translated product title’s, descriptions and other translated attributes. WPML, and its currency switcher WCML, are paid Elite features of our plugin.
Country name:
Select the country for which you will be creating a Facebook catalog product feed. Once you selected a country the channel drop-down will automatically populate with marketing channels that are active in the specific country and for which we have created a default template.
Channel:
Select the channel for which you want to create a product feed. Make sure you select the “Facebook Dynamic Ads / Instagram” channel.
Include product variations:
There are two types of products in WooCommerce: simple and variation products. Enable this option when you want both simple and variations products in your product feed.
Only include default product variations:
When you do not want to have all product variations in your feed and you have set default product variations for your parent variable products then you can enable this feature so only the default variation will make it to your feed. Make sure you’ll also keep the “Include product variations” option enabled. This, how to include only the default product variations tutorial, shows how you can best use this feature.
Only include lowest priced product variation(s):
When you do not want to have all product variations in your feed but have not set default product variations for your parent variable products you can opt to only include the lowest priced variation in your feed.
File format:
You can create product feeds in multiple formats: CSV, TXT and XML. As XML is least prone to errors we strongly advise you to put the file format on XML when you are creating a product feed for Facebook.
Refresh interval:
You can tell the plugin to update your product feed for Facebook on a daily, twicedaily or hourly interval. The one you select all depends on how often your product data is changing. Are you selling lots of products and/or changing prices multiple times a day than we advise you to update the product feed on an hourly interval.
Hit the ‘Save & continue’ button when you have filled in all fields and are ready to move on to the field mapping page.
2. The field mapping page
On the field mapping page, you need to map Facebook’s fields to your WooCommerce attributes. By default, the plugin tries to pre-map as much fields as possible, that is why some of the mappings have already be done when you open the field mapping page. Mapping your attributes to Facebook’s fields is of upmost importance because when you make mistakes in mapping or leave required fields empty Facebook will disapprove your products in their business manager.
The default fields shown on the mapping page are Facebook’s required fields or we strongly advise you to add them to your feed so please don’t delete any. You can add extra optional fields by hitting the “+ Add field mapping” button.
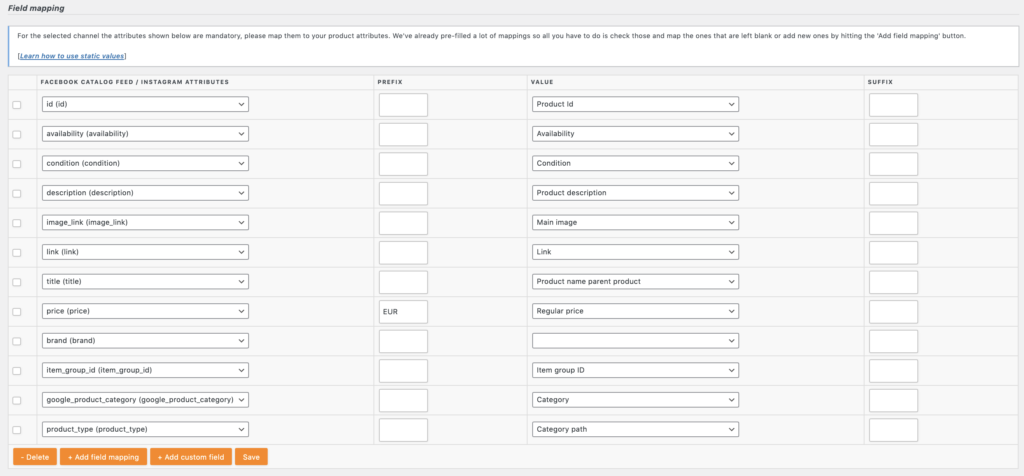
Product ID (g:id)
Even though Facebook advises you to map this field to your SKU attribute we strongly advise you not to do so and leave the default mapping (to Product Id) in place. This field needs to remain the same for the entire lifetime of a product. Since the SKU field is not always filled by our plugin users we have chosen to map Facebook’s Product ID(id) to the static Product Id which will never change either. Some of the other functionality of our plugin actually depends on this mapping so we strongly advise you to leave this pre-filled mapping in place.
Product title (g:title)
The plugin pre-mapped Facebook’s product title to your Product name parent product. For simple products the plugin will just use the Product name, for variation products the plugin will use the product name of the parent variable product so all your variations get nicely grouped into one product in your Facebook catalog.
Product description (g:description)
The plugin pre-mapped Facebook’s description field to your Product description. Please bear in mind that the pre-mapping has been made to the long description attribute. When you fill in your product description in WooCommerce short description field you need to change this mapping to the Product Short Description.
Product URL (g:link)
The plugin pre-mapped Facebook’s link field to the link of your products. The plugin will automatically put in the correct link for simple and variation products. Should you decide to enable the Google Analytics tracking parameters during configuration of the product feed the plugin will also automatically concatenate these parameters to the URL. We strongly advise you to leave this pre-filled mapping in place.
Main image URL (g:image_link)
The plugin pre-mapped Facebook’s image link field to the main image of your products. Facebook will actually disapprove your products when there are no product images in your product feed so we strongly advise you to leave this pre-filled mapping in place.
Availability (g:availability)
The plugin pre-mapped Facebook’s availability field to the stock status of your products. Allowed values for Google are “in stock”, “out of stock” and “preorder”. The plugin will automatically determine if your product is in stock or out of stock so leave this pre-filled mapping in place.
Price (g:price)
The plugin pre-mapped Facebook’s price field to your price attribute. In most cases this will be the correct mapping, however in some instances you will have to change this default mapping.
When you have set a sale price:
Map Facebook’s price field to your “Regular Price” attribute. The plugin will put the normal (non sale price) price in the product feed. Make sure to also put in Facebook’s sale price in your feed.
When inserting prices ex. VAT in the back-end and showing them including VAT on your website:
Map Facebook’s price field to your the “Price incl. VAT front end” attribute. The plugin will add the VAT to your product price.
Google product category (g:google_product_category)
The plugin pre-mapped Facebook’s category field to your category attribute. In the next step of the configuration process you will be asked to map your categories to Google’s category taxonomy so make sure you leave this pre-defined mapping in place with “Category” selected in the dropdown otherwise your product feed will not contain Google’s category ID’s, resulting in Facebook disapproving all of your products.
Brand (g:brand)
You will find that the plugin has not been able to pre-map Facebook’s brand field to one of your attributes. This is because WooCommerce doesn’t have a brand attribute out-of-the-box. Meaning you, most-likely, created your own brand (custom) attribute. You will need to map that custom brand attribute to Facebook’s brand field.
Alternatively, when you have enabled the paid Elite extra fields option of this plugin you will need to map Facebook’s brand field to the ‘woosea brand’ attribute:
![]()
Gtin (g:gtin)
The GTIN field required by Facebook is actually one of the most-complex required fields you need to add. We strongly advise you to read Google’s help page on their GTIN field. In practice we find that, by far, most products are disapproved by Facebook due to incorrectly added GTIN values.
You will find that the plugin has not been able to pre-map Facebook’s GTIN field to one of your attributes. This is because WooCommerce doesn’t have a GTIN attribute out-of-the-box. Meaning you, most-likely, created your own GTIN (custom) attribute. You will need to map that custom GTIN attribute to Facebook’s GTIN field.
Alternatively, when you have enabled the extra fields option of this plugin you will need to map Google’s GTIN field to the ‘woosea gtin’ attribute:
![]()
When your product has no GTIN than try filling at least the MPN field (see below). Do NOT map Google’s GTIN field to your SKU as the SKU does not meet Google’s GTIN requirements and it will disapprove your products because of it.
MPN (g:mpn)
When your products do not have a GTIN than make sure you provide Google with a MPN. Read more on Google’s g:mpn field.
You will find that the plugin has not been able to pre-map Google’s MPN field to one of your attributes. This is because WooCommerce doesn’t have a MPN attribute out-of-the-box. Meaning you, most-likely, created your own MPN (custom) attribute. You will need to map that custom MPN attribute to Google’s MPN field.
Alternatively, when you have enabled the paid Elite extra fields option of this plugin you will need to map Facebook’s MPN field to the ‘woosea mpn’ attribute:
![]()
Condition (g:condition)
You will find that the plugin has pre-mapped Facebook’s condition field to a condition attribute. However, WooCommerce doesn’t have a condition attribute out-of-the-box so when you leave this pre-defined mapping in place all of your products will get the condition ‘New’ in your product feed.
Alternatively, when you have enabled the paid Elite extra fields option of this plugin you will need to map Facebook’s condition field to the ‘woosea condition’ attribute:
![]()
Item group ID (g:item_group_id)
When you include product variations in your product feed the Item Group ID field is a required field. Read all about Google’s Item Group ID field on their help pages. The plugin pre-mapped this field, we strongly advise you to leave this mapping in place.
Extra fields
Ofcourse there are lots of optional fields you can to your product feeds. All you need to do is hit the ‘+ Add field mapping’ button to start adding those fields to your feeds:

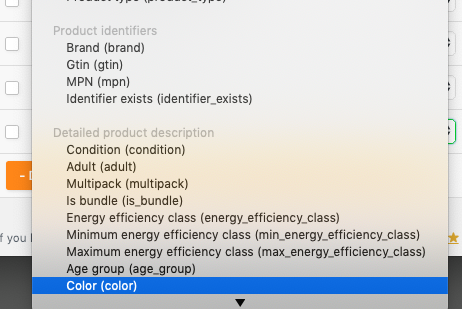
Adding static values to your feed:
You would like to add a product specification to your product feed that is the same for all products. In those cases you can add a ‘static value’ field to you feed. Let’s imagine all our products are ‘blue velvet’ coloured and we would like to add that colour to our product feed.
All you need to do is select the Facebook field (color) and select ‘static value’ from the drop-down.

You will find that the drop-down changes into an input field where you can put in ‘blue velvet’.
![]()
When you are done mapping all of your attributes to Facebook’s fields you hit the save button to continue to the category mapping feature.
3. Category mapping page
You will need to inform Facebook in what product categories your products belong. As your categorisation most likely is not identical to Google’s taxonomy (Facebook is using Google’s category taxonomy) you need to map your categories to Facebook’s.
On the left side of this screen you will find a list of your categories. On the right side of the screen you can map those to Facebook’s categories. All you have to do is start typing at least 4 characters and the plugin will auto-suggest to what Facebook category you need to map your category:
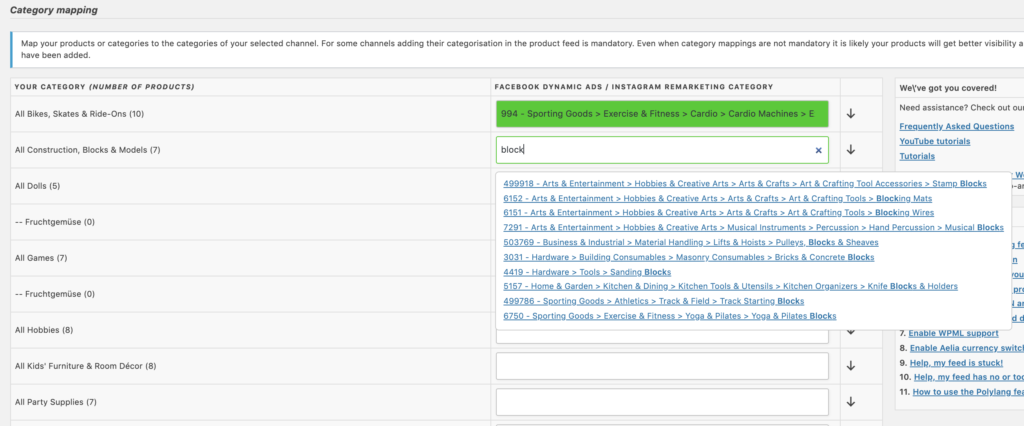
Although not required by Facebook we strongly advise you to map all your categories as it will increase changes of your products being shown to the right type of consumer. Increasing your sales and decreasing the CPC you’ll have to pay to Facebook. Please note: the plugin will put in Google’s category taxonomy ID in your product feed and not the entire category name.
When you are done mapping hit the “Save mappings” button to continue to the feed filter and rules section.
4. Feed filters and rules
There might be very good reasons for you not to want all products in your product feed or to manipulate data in it. For this you can set filters and rules. We have written separate blogs about how to create those:
Hit the “Continue” button when you are done creating filters and rules. You will be taken to the last step of your feed configuration, adding Google Analytics tracking codes.
5. Google Analytics settings
This is the last step of your product feed configuration. You have set-up a product feed and your campaign is almost up-and-running. However you would also like to track results of your campaign and make adjustments to make them more profitable. For this our plugin offers you the option to add aGoogle Analytics parameters to your product URL’s (which are in your product feed).
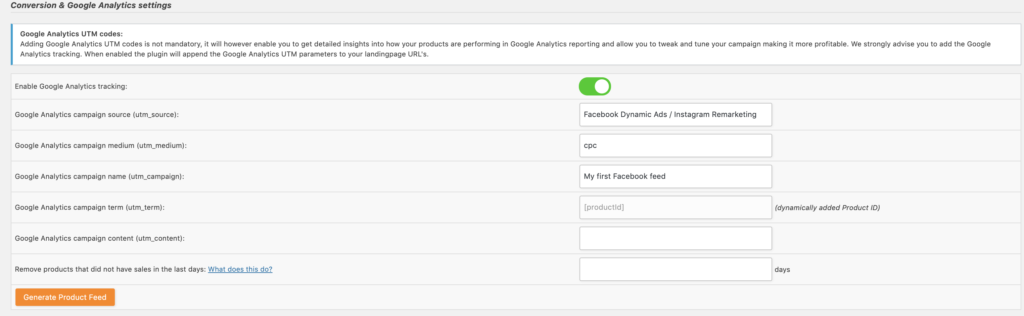
Enable Google Analytics tracking
When this option is enabled the plugin will add so-called Google Analytics UTM parameters to your product URL’s. The values for these UTM parameters can be determined in the extra Google Analytics fields (utm_source, utm_medium, utm_campaign, utm_content and utm_term). You will find that the utm_term parameter cannot be changed. Our plugin puts in your product ID’s so you can run Google Analytics reports to see how individual products are performing.
Hit the ‘Generate Product feed’ when you are ready.
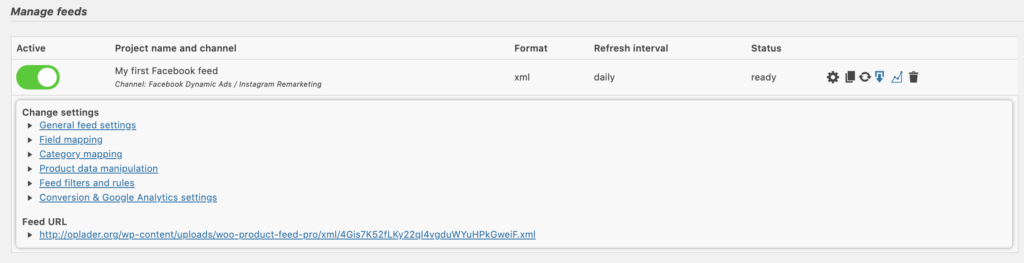
6. The Product Feed is ready to go
The plugin will take you to the ‘Manage Feeds’ section of the plugin and immediately start processing your product feed.

When the feed generation is done the status will change to ‘ready’.
By selecting the ‘radar’ icon you can change all previous configurations you made and find the URL of your product feed:
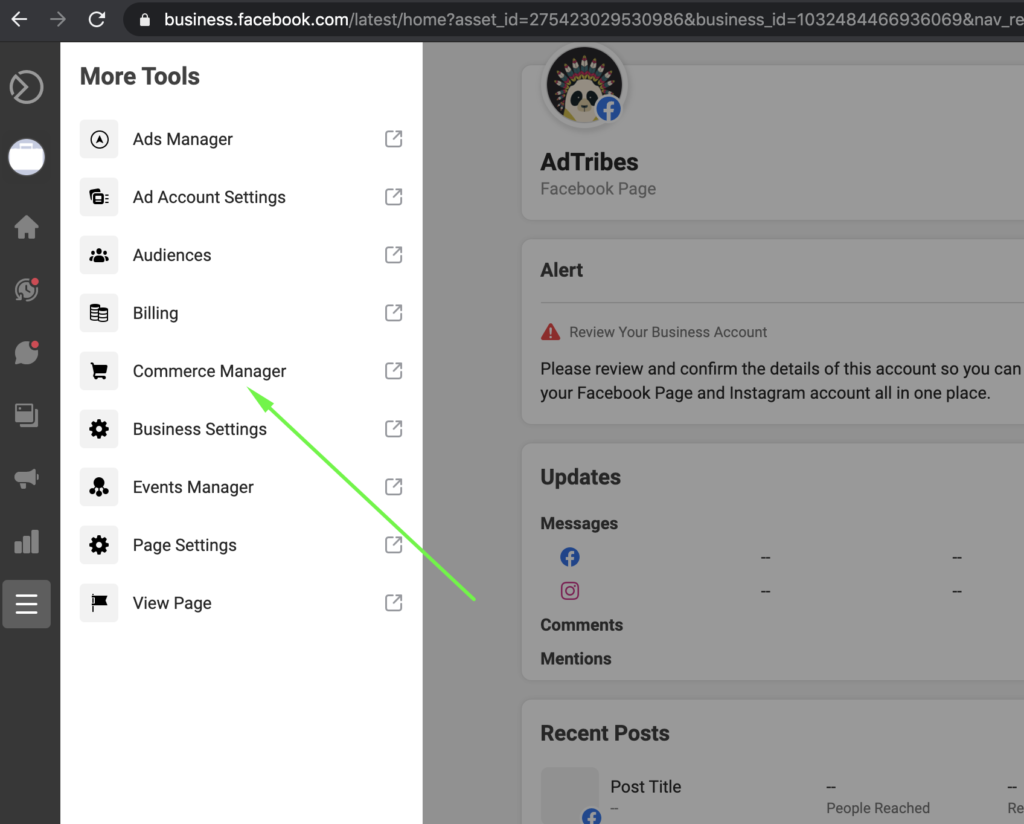
7. Upload your feed to Facebook’s business manager
Finally, you need to tell Facebook where it can find your product feed. Copy/past your feed URL location and head over to your Facebook business manager and login. Now your first step is to click on the “Commerce manager” link in the menu:
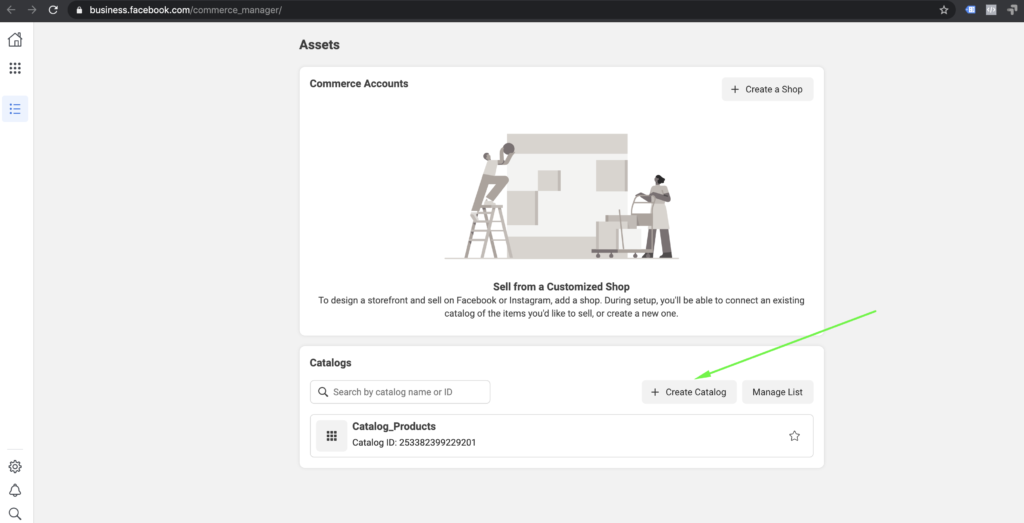
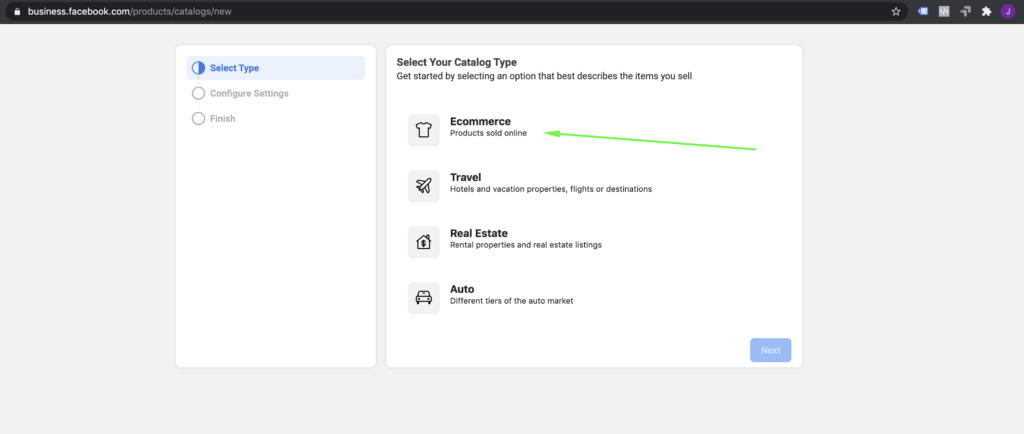
Now hit the “+ Create Catalog” button:
Select “Ecommerce” as your Catalog type:
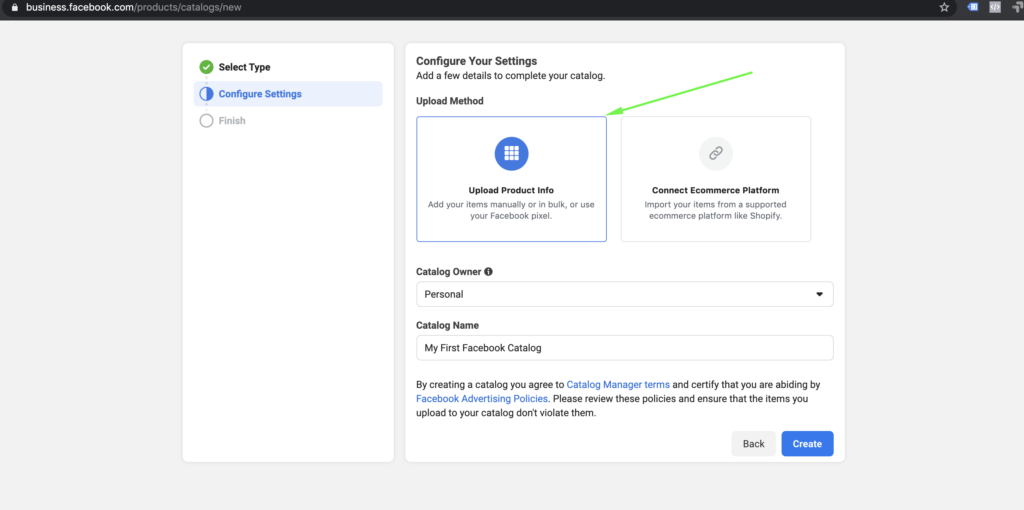
The Upload Method you need to select is “Upload Product info”. Make sure to also select the proper Catalog Owner, this can either be “Personal” however more likely you want to select your business acccount.
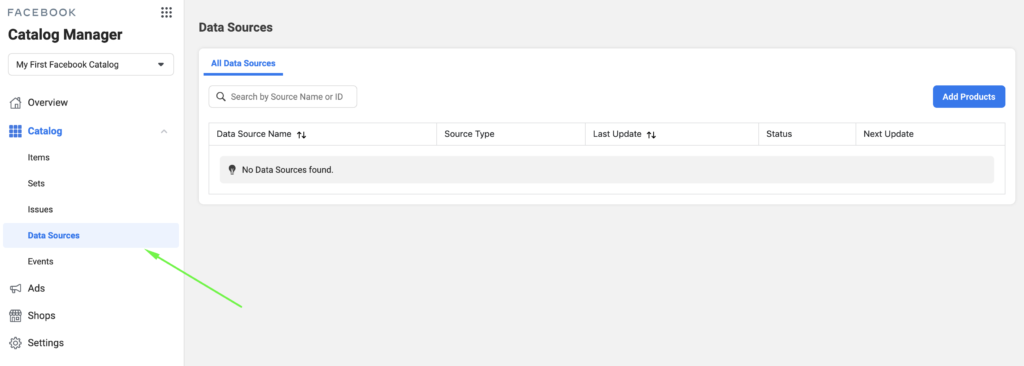
Your catalog now has been created. However, its still empty. You haven’t told Facebook yet where it can find your products.

Now select “Data Sources” in the menu of your Catalog Manager:
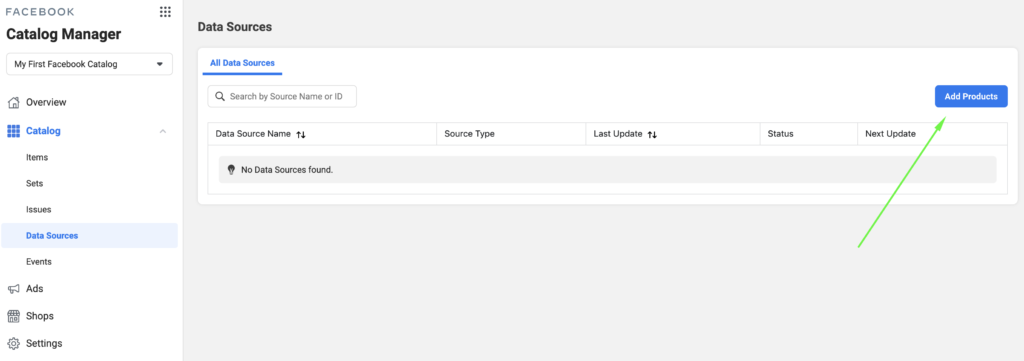
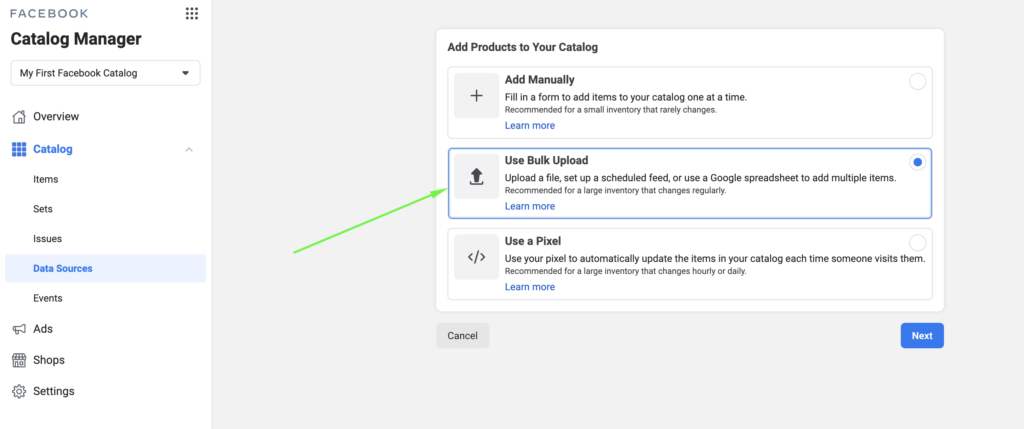
And hit the blue “Add Products” button:
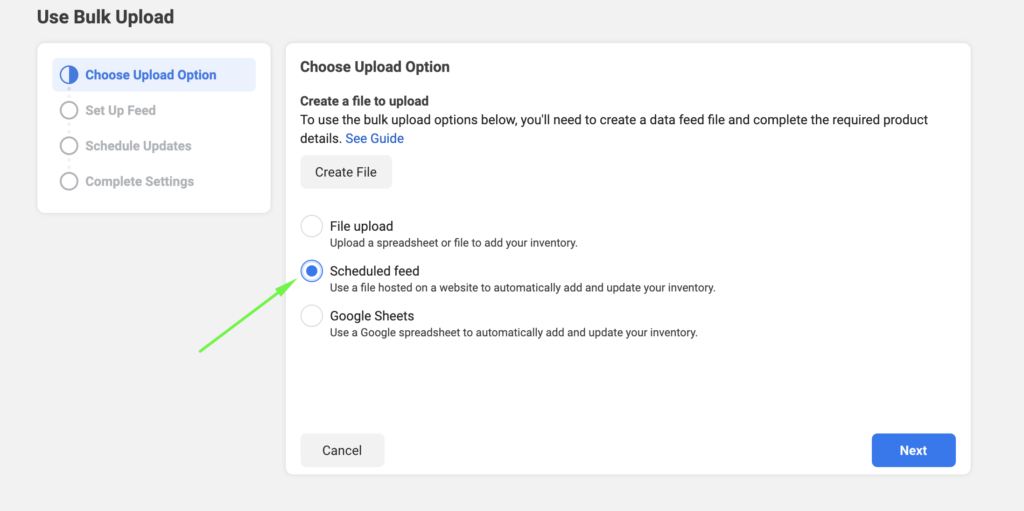
You now have to select how you want to add products to your catalog. Select the second option “Use Bulk Upload”:
We have created a product feed and we want Facebook to regularly fetch the content of that feed so the upload option we pick is “Scheduled feed”:
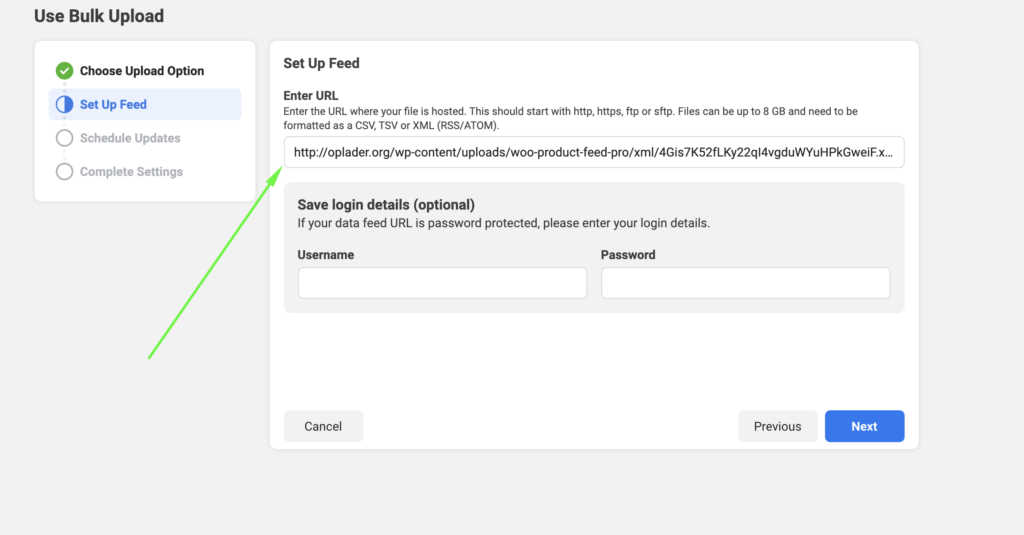
You now have to fill in the URL where Facebook can find your product feed. Remember you copied the feed URL before? Now its time to paste it in below. There is no need to fill in an username and password as your feed location is not password protected.
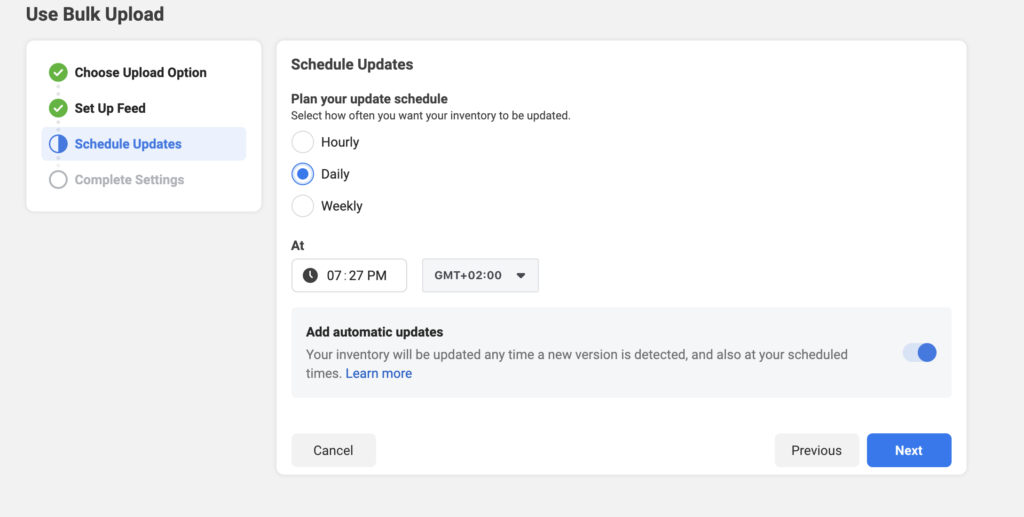
You can now plan your scheduled feed updates and tell Facebook how often and at what intervals it should fetch your product feed. This schedule of-course largely depends on how often you expect your product data to change (new products, updated prices, out-of-stock products).
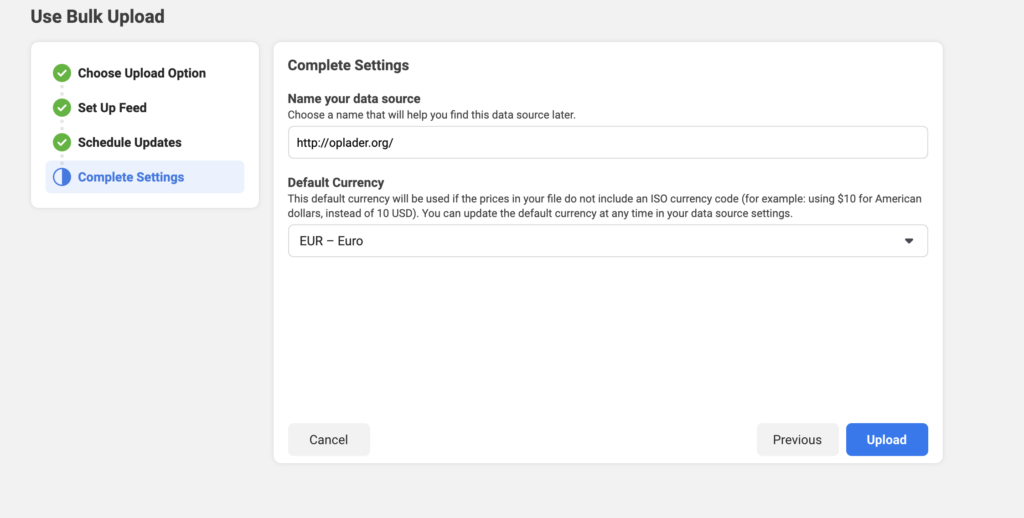
Almost done! Just name your data source and select the currency you are using on your website:
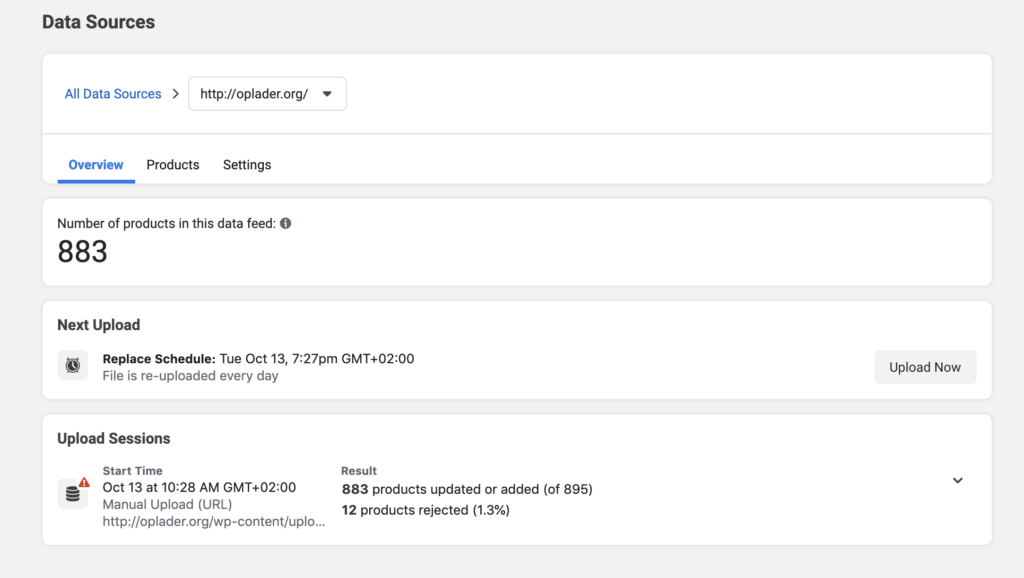
Facebook will now start retrieving your products and show you how much products it found in your feed, including the ones it found errors on and therefore rejected:
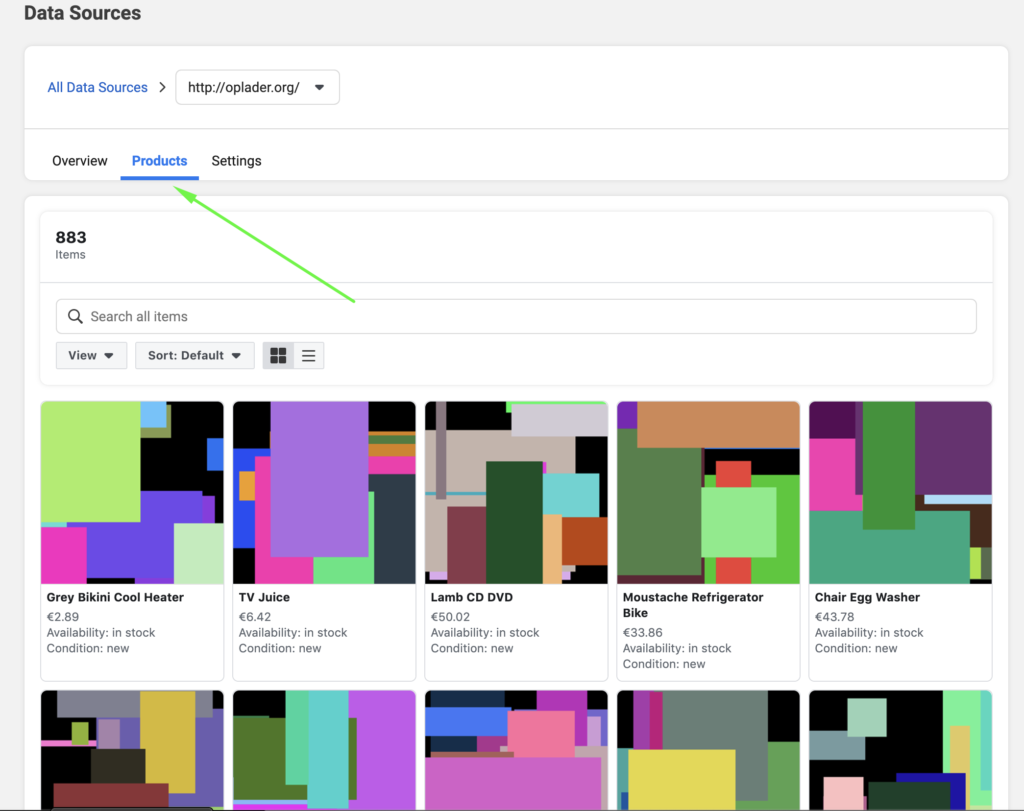
Now you can check on all products by selecting the “products” tab of the above screen:
And that’s all. You have just created your first Facebook feed and uploaded it to your business manager. You rock, well done!
Facebook pixel and Facebook catalog aligned
Are you experiencing problems getting your Facebook Pixel to match the products in your Facebook catalog feed? You are not alone! Multiple times a week we receive questions of users who have issues with their Facebook pixel and their Facebook catalog feed. These issues are related to the Facebook pixel plugins not being able to insert the proper values into the content_ids parameter of the pixel. To overcome this problem we added a feature to our plugin. This feature ads the Facebook Pixel to all of your website pages and aligns it with your Facebook catalog feed. As a result you can retarget more of your products in Facebook.
The set-up is straightforward. Enable this option in the plugin settings section:
![]()
Make sure to insert your Facebook pixel ID. Once enabled you will find all of your pages have the proper pixel code inserted. The most important part of the pixel code on your product pages is this part:
fbq(“track”,”viewContent”,{content_category:”Plugins”, content_name:”Red Shoe”, content_type:”product”, content_ids:[“4091“],value:”69.00″,currency:”EUR”});
In the above example the Red Shoe’s product ID is 4091. In order to align the content of your pixel code with your Facebook catalog feed, specifically the product ID, you have to map Facebook’s g:id field to the ‘Product ID’ attribute. Do not map the ‘g:id’ field to any other attribute. Mapping it to another attribute will cause mis-alignment between the content_ids of the Facebook pixel and the Facebook catalogue feed.
![]()
Content of the Facebook pixel on your product pages
The content of the Facebook pixel is different depending on what product type page it is triggered.
Simple products:
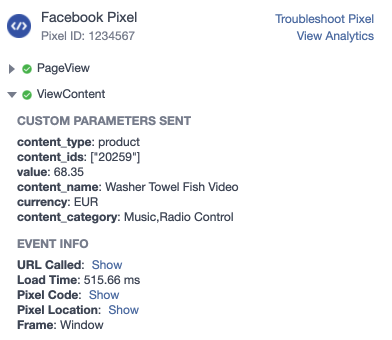
The 20259 value in the ‘content_ids’ parameter matches with the product ID in your product feed.
Variable parent products:
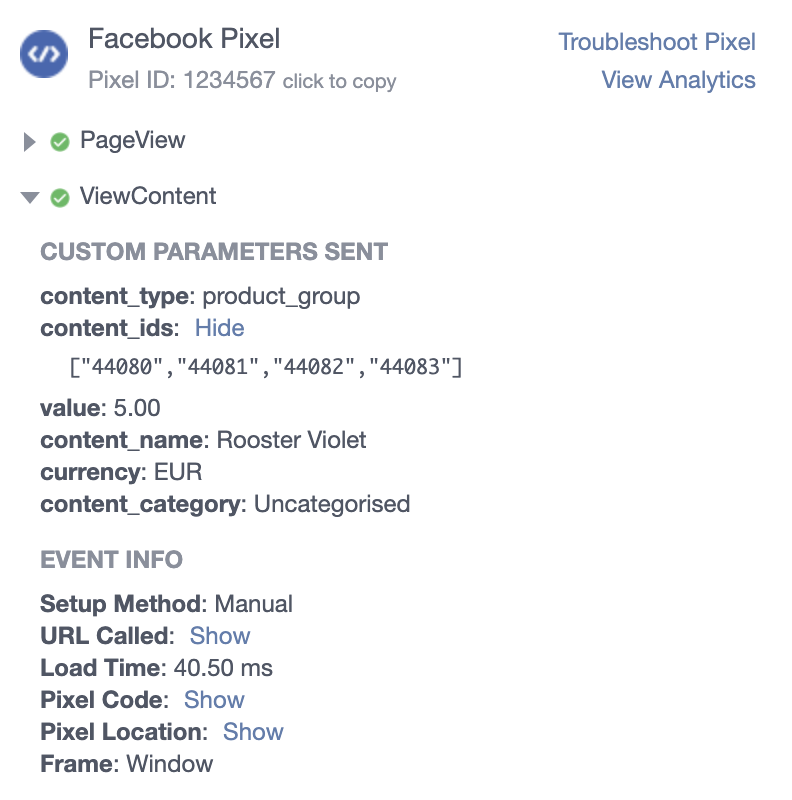
The 44080, 44081, 44082 and 44083 values in the ‘content_ids’ parameter matches with the variations product ID’s of the parent variable product, combined with the content_type ‘product_group’ tells Facebook it is looking at a variable product.
Variable child (variant) products:
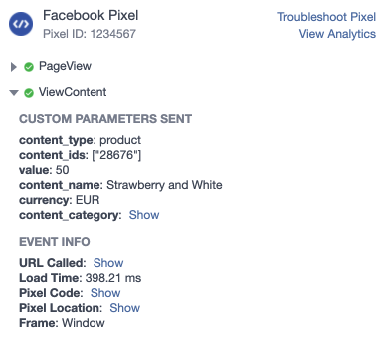
The 28876 value in the ‘content_ids’ parameter matches with the product ID in your product feed.
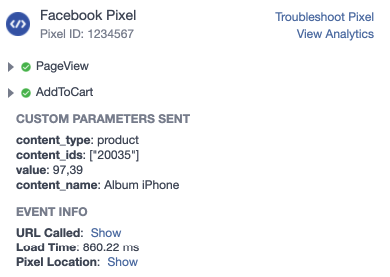
Since release 6.3.6 of our plugin the ‘addToCart’ events are also being measured when visitors on your website hit the ‘add to cart’ button anywhere on your website:
And that’s all. Your Facebook pixel and Facebook catalog feed are perfectly aligned now so you can use your Facebook audience for advertising / remarketing your products.
How to add only one variation of a variable product to your product feed
On popular request we added a feature that allows you to only add one variation of a variable product to your product feed(s) instead of all variations of a product. Mainly for Facebook catalogue feeds this is a useful feature as adding lots of product variations that are almost identical and only vary on a minor specification will result in your catalogue or other campaign becoming to big to manage.
We have therefore added a feature (as of version 4.9.9 of our plugin) which allows you to only add the variation that is selected as the ‘default form values’ version. That is the variations that shows when the variable product page opens, the preselected drop-downs. Make sure you set those for all your products, not just for our plugin but for mainly for the potential customers visiting your website.
This is where an how to set the default form values:

In the example above our variable product has 3 variations:
- red
- blue
- yellow
The ‘red’ variation has been set as the default variation that shows when your product page is being opened. Now let’s assume you do not want to add the blue and yellow variation to your product feed. Only the red one should make it to the feed. This can easily be achieved by enabling the option ‘Only include default product variation’ on the general feed settings section of your feed configuration.
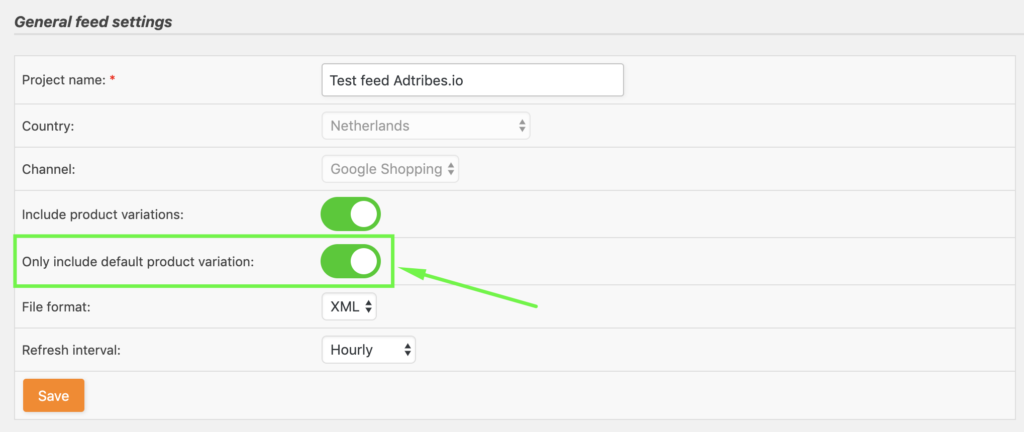
That’s all! Only the ‘red’ variation of this variable product will make it to your product feed.
How to create Facebook country and language override feeds
As of version 4.2.6 of our plugin the Facebook / Instagram template contains the ‘override’ column allowing you to, next to Facebooks base catalog feed, also create so-called country and language override feeds.
Find an excellent introduction about these override feeds on Facebooks help-page here.
It is pretty easy to create these override feeds using our plugin. Just follow these steps below.
On the first page of the feed configuration make sure you select the ‘Facebook Dynamic Ads / Instagram Remarketing’ channel and select CSV as file format:
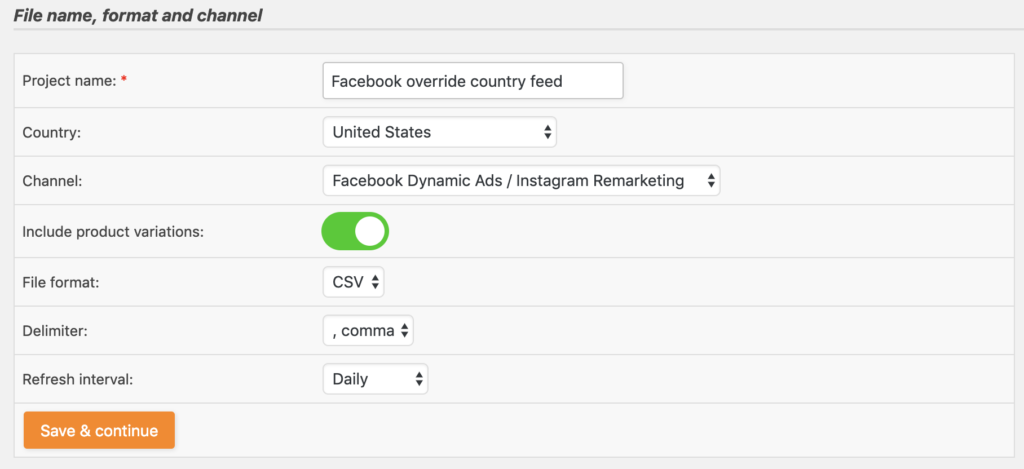
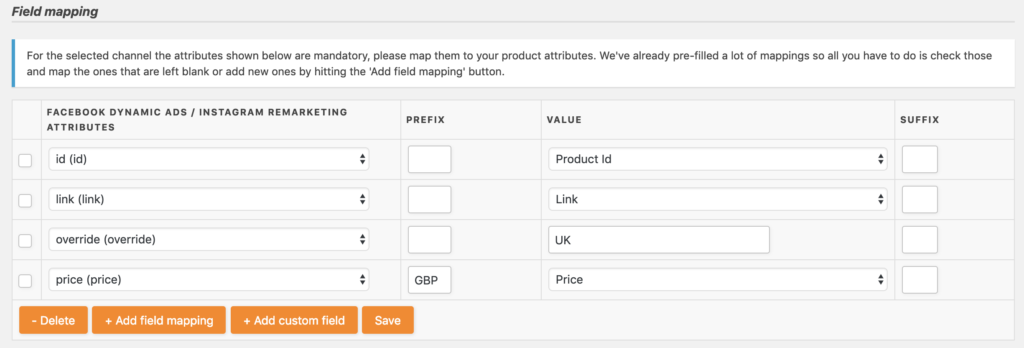
You will find that on the next page the plugin will show all required fields for a Facebook base feed. Make sure you delete all the columns you do not need for your country or language override feed and add the override field by hitting the ‘+ Add field mapping’ button and select the override field. In the value column of the newly added override column you than select ‘Static value’ from the drop-down. This will change the drop-down itself into an input field where you can put in any static value you want. In the example below we are creating a country override feed for the UK so we fill in UK.
Now continue all steps of the configuration like you would normally do. The plugin will now create your Facebook country override feed. The exact same steps need to be taken when you are creating a language override feed. Just fill in a static language code in the static field.
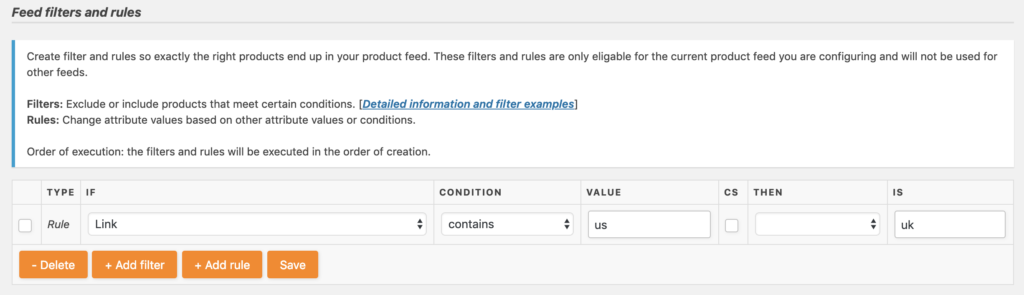
In some occasions you also need to change part of the URL to make it country specific in order for the consumers to land on the correct landing page. In those cases you can create a so-called replace-rule in which you replace a country specific part of the URL with another one. In the example below we replace the us part with uk:
That’s all! Please do not hesitate to reach-out to us whenever you have questions or need help configuring your override feed.


Related Articles
Product Feed PRO for WooCommerce - Feature
View Guide Links at the bottom of the page Installation 1 CRU CREDIT Setup (optional) 1 CRU CREDIT Ease Of Use Easy Want this feature? Request Here Purchase CREDITS Here Generate WooCommerce product feeds for all your marketing channels, such as ...Product Feed PRO for WooCommerce - Troubleshooting Guide
How to create filters for your product feed Filters: Filters are meant to filter out products you do not want to appear in your product feeds. You can set two different types of filters, ‘include only’ and ‘exclude’ filters. Exclude filters You want ...Google Product Feed - User Guide
For pricing and how to add to your website see at the bottom of the page. Setting up your feed in Google Merchant Centre Configure your Google Merchant Centre account The first thing to do, before you import your feed for the first time is to make ...Google Product Feed - Features
View Guide Links at the bottom of the page Installation 1 CRU CREDIT Setup (optional) 2 CRU CREDIT Ease Of Use Intermediate Want this feature? Request Here Purchase CREDITS Here The Google Product Feed extension allows you to create a real-time feed ...Instagram Feed Pro - User Guide
For pricing and how to add to your website see at the bottom of the page. Setting up the Instagram Feed Pro WordPress Plugin 1) Click on All Feeds and then click on the button labeled Add new. Note: If you are connecting an account on behalf of ...