WooCommerce Customer / Order / Coupon Export - User Guide
For pricing and how to add to your website see at the bottom of the page.
The WooCommerce Customer / Order / Coupon Export lets you export your site’s customers, orders, or coupons to a CSV or XML file. Here are a few of the features offered to make it easier to manage your site’s data:
- Export customers, orders, or coupons, in CSV or XML format, individually or in bulk.
- Create your own custom formats to determine which fields are included and where they’re positioned.
- Automatically export and send your file to a remote server via FTP, HTTP POST, or email, such as to your fulfilment service.
- Exports run asynchronously in the background, meaning you can export thousands of records while you complete other tasks – or take a well-earned break!
Export data manually
You can export customers, orders, and coupons manually at any time. When you begin a bulk export or export items from the Orders or Users lists, a modal will appear to let you know the export is processing:
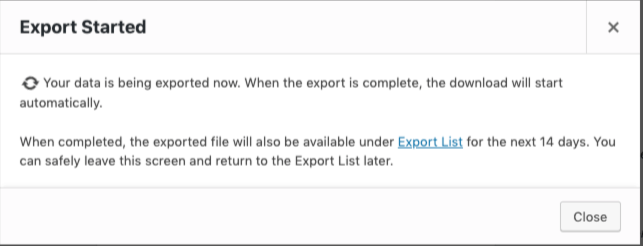
If you leave this modal open while the export processes, you can download the file via that modal:
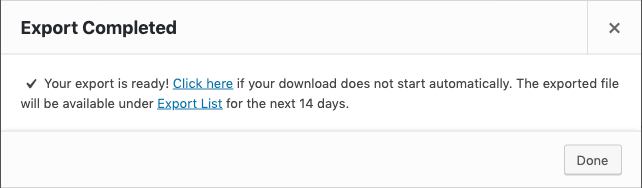
However, since customer and order exports are processed asynchronously in the background on your site, you can feel free to close the modal or leave your site completely while the export runs. This lets you keep working while your export processes are behind the scenes. Exports are batch-processed, which allows your site to process an export for thousands of records without timing out.
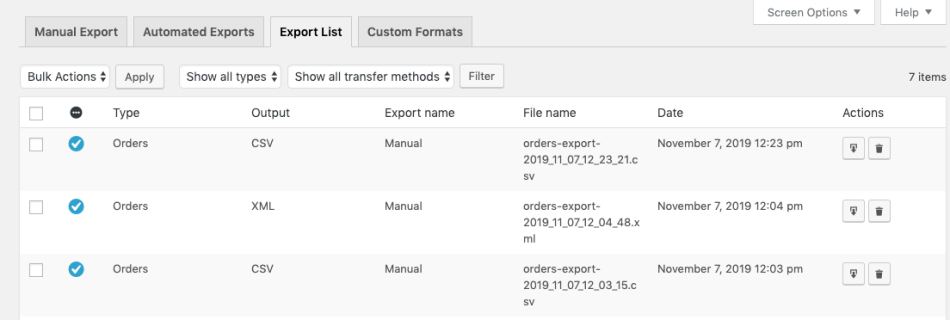
If you leave the export modal, you can download the file from an admin notice that will appear when the export is ready or by going to WooCommerce > Exports > Export List, where we store exports for 14 days.

Note: If your site does not support background processing, your site is incapable of processing the export in the background. That means you’ll need to leave the export modal open while the export processes. Click here to read more about background processing and how to resolve this issue.
Exporting data in bulk
To manually export data in bulk:
- Go to WooCommerce > Export.
- On the Manual Export tab, update the following settings:
- Output type: Choose to export your file in CSV or XML format.
- Export type: Choose whether to export orders, customers, or coupons.
- Format: Select a predefined or custom format.
- Filename: Enter a name for the file generated by this export.
- Mark as exported: Enable to ensure the exported data is excluded from future exports. Click here to learn more about this setting.
- Batch processing: Only enable if your site does not support background processing.
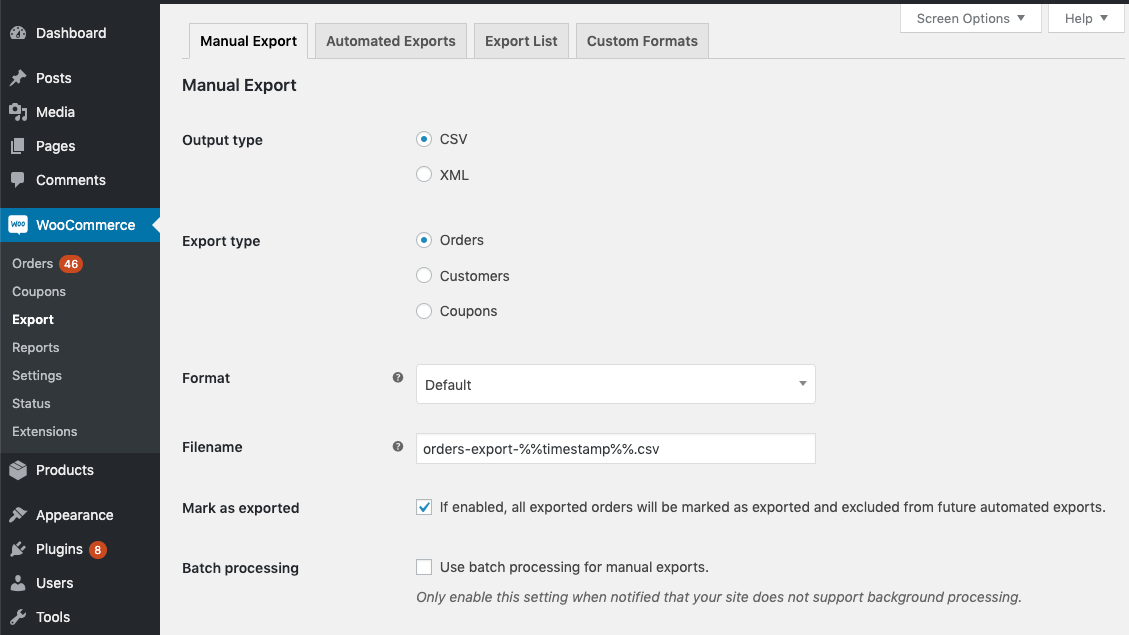
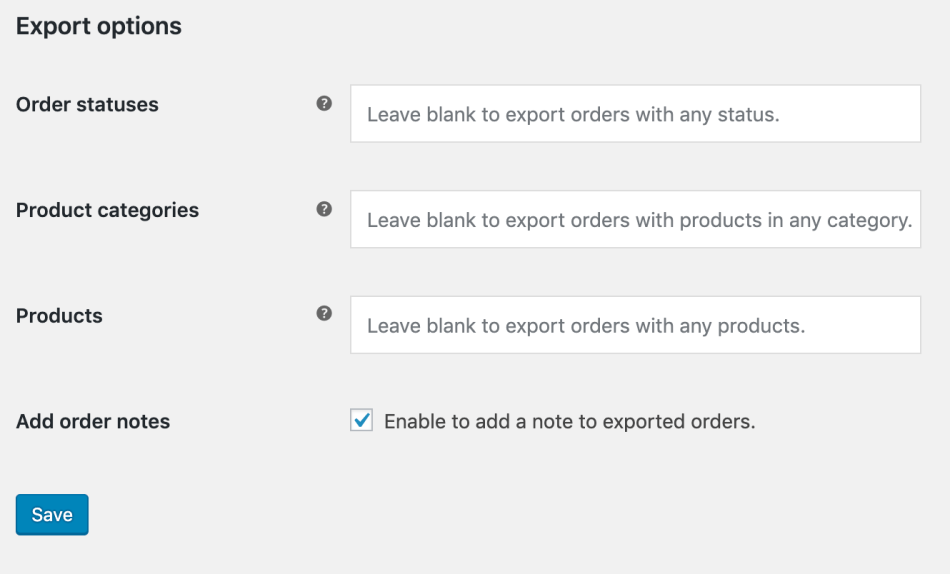
- Update the Export Options section to target particular orders (and include order notes), customers, or coupons. The available options will change based on your selected Output type.
- Click Export.
If you have WooCommerce Subscriptions activated on your site and you’re exporting orders, you can also choose to export subscriptions orders only.

You can download the export file as explained above.
Exporting data from the Orders list
You can export one or more orders from the Orders page by following the steps below:
- Go to WooCommerce > Orders.
- Select one or more orders to export. You can set the Exported filter to show orders based on their export status.
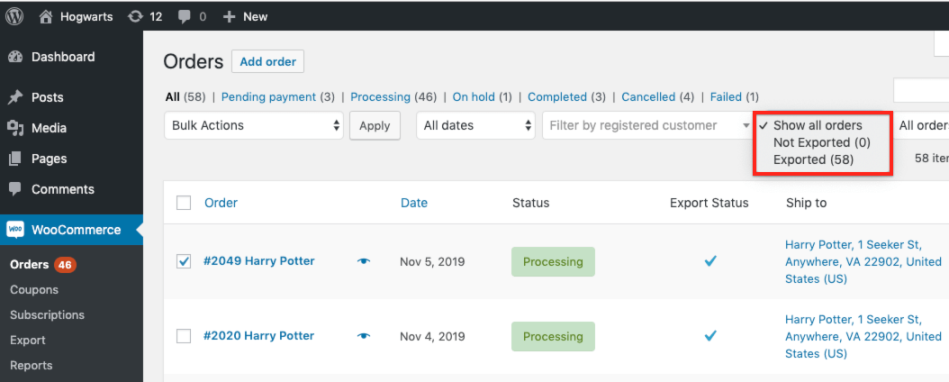
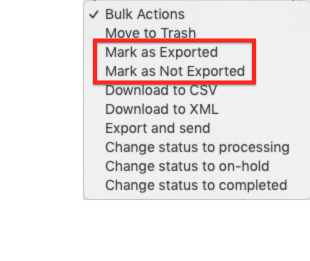
- From the Bulk Actions menu, choose one of the following actions:
- Download to CSV
- Download to XML
- Export and Send: Export the selected orders and send them via FTP, HTTP POST, or email.
- Click Apply.
- If you selected an immediate download (e.g. Download to CSV or Download to XML), you can retrieve the download file as explained above.
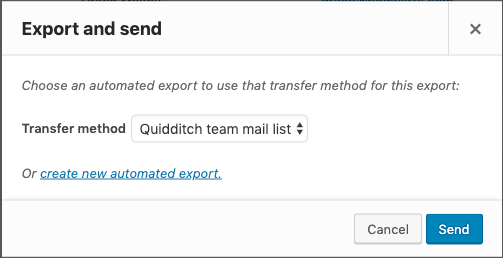
- If you chose Export and Send, you’ll be prompted to select one of your automated order exports so the same transfer method can be used to send this export. Only automated order exports with FTP, HTTP POST, or email transfer methods can be selected for this type of export.
Once an order is exported from the Orders page, it will be marked as exported. This will prevent the order from being included in future automated exports. Click here to read more about this setting and how to change it.
Exporting data from the Users list
You can export one or more customers (i.e. users that have made at least one purchase) from the Users page by following the steps below:
- Go to Users and select one or more customers to export.
- From the Bulk Actions menu, choose one of the following actions:
- Download to CSV
- Download to XML
- Export and Send: Export the selected customers and send them via FTP, HTTP POST, or email.
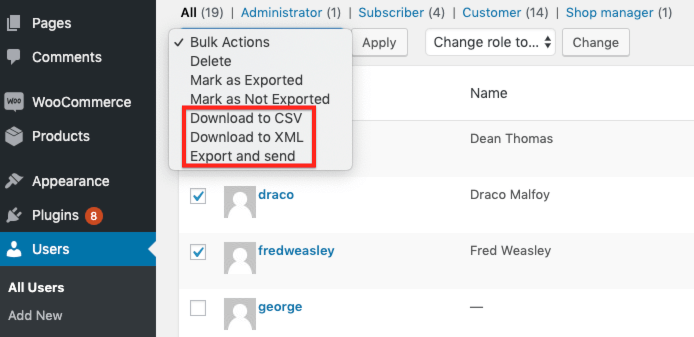
- Click Apply.
- If you selected an immediate download (e.g. Download to CSV or Download to XML), you can retrieve the download file as explained above.
- If you chose Export and Send, you’ll be prompted to select one of your automated order exports so the same transfer method can be used to send this export. Only automated customer exports with FTP, HTTP POST, or email transfer methods can be selected for this type of export.
Once an order is exported from the Users page, it will be marked as exported. This will prevent the customer from being included in future automated exports. Click here to read more about this setting and how to change it.
Export data automatically
If your site supports background processing, you can create one or more automated exports to send customers or order export files on a recurring basis.
Before you get started, please read the following notes about automated exports:
- Orders placed / customers created before activating this plugin will not be automatically exported. They can, however, be marked as exported if you’d like.
- Only items marked as not exported will be included in automated exports. Click here to learn more.
- Exports are scheduled in your WordPress site’s timezone. You can find your timezone settings under Settings > General.
Create an automated export
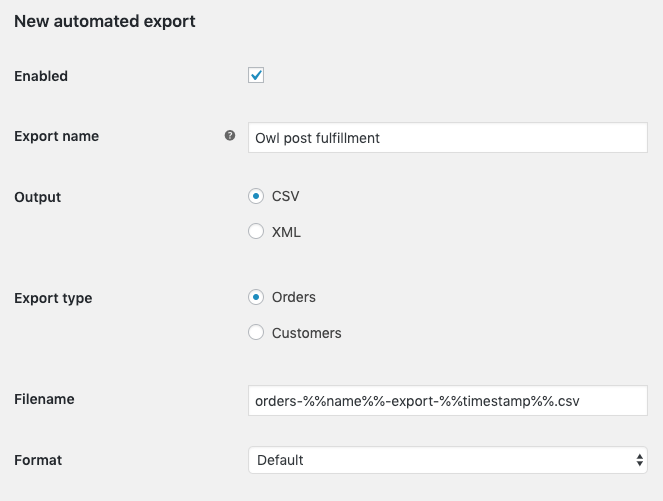
You can create an automated export by following the steps below:
- Go to WooCommerce > Export > Automated Exports and click Add New.

- Update the following settings for the automated export:
- Enabled: Turn the automated export on or off.
- Export name: Enter an internal name for the export.
- Output type: Choose to export your file in CSV or XML format.
- Export type: Choose whether to export orders, customers, or coupons.
- Filename: Enter a name for the files generated for the export.
- Format: Select a predefined or custom format.
- Update the Trigger automated export setting to determine when the export will run. Click here to read more about scheduling.
- You can run order exports as orders or paid or on set intervals.
- You can only run customer exports at set intervals.
- Update the Method setting to determine how the export will be sent/transferred. Click here to read more about transfer methods.
- If you’re exporting orders, you can update the Export Options section to target particular orders and include order notes.
- Click Save.
You can return to the Automated Exports tab to view and manage your automated exports.
Export schedules
This plugin relies on WP-Cron (the established way of performing recurring tasks within WordPress) to schedule automated export jobs. Unfortunately, the WP-Cron system is not always perfectly accurate – it requires constant traffic to your site to trigger events at the right times, which can be difficult for sites with less traffic.
There are two workarounds for this accuracy issue:
- Setup a real system cron on your server that ensures WP-Cron is triggered every minute. Click here to learn about setting this up. Your hosting provider should be able to help with this workaround, which would be ideal since it’s guaranteed to solve the issue at random times.
- Use a service (e.g. Pingdom or UptimeRobot) to ping your site every few minutes. This will ensure WP-Cron fires regularly.
Export transfers
Transfer methods
There are four methods you can use to transfer automated exports:
- Locally
- FTP
- HTTP POST
- Email
Note: When you choose to Export and Send data from the Orders or Users pages, you’ll be prompted to select an automated export. The plugin will then use that export’s transfer method settings to send the exported data.
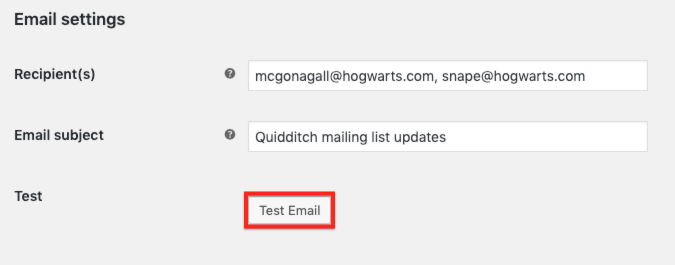
The FTP, HTTP Post, and Email methods include a test feature that you can use to confirm that everything is set up properly before activating the automated export.
Locally
Exports transferred locally are available for 14 days in the Export List. There’s no special setup required for this transfer method.
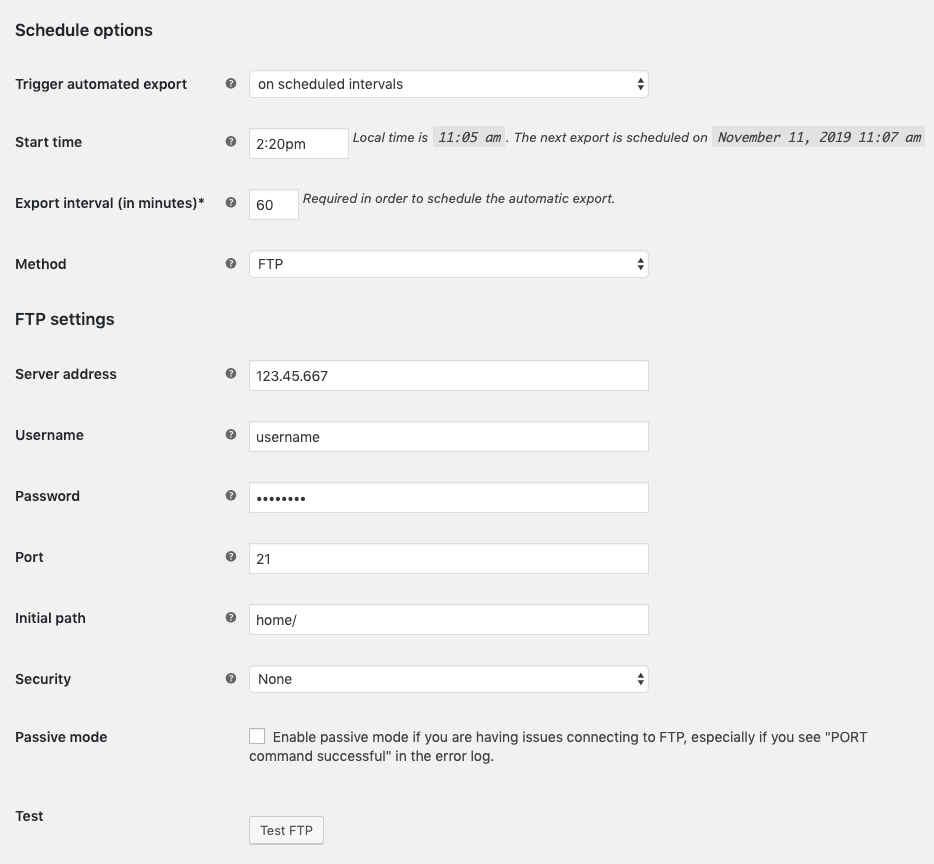
FTP
- To transfer via FTP, you’ll need to update the following settings:
- Server address: Enter an IP address or hostname for the FTP server.
- Username
- Password
- Port: Enter “21” for regular FTP, “22” for SFTP, or “990” for FTP with Implicit SSL.
- Initial path: Enter the initial path for the FTP server without a leading slash and with a trailing slash. If you’re connecting via SFTP, the initial path should be the full path of the folder if your username doesn’t default to the HOME directory.
- Security: Choose your FTP server’s security.
- Passive mode: Enable to turn on passive mode for FTP connections. This should be disabled unless you are having issues connecting, especially if you’re seeing the PORT command successful message followed by a timeout in the error log (WooCommerce > Status > Logs).
Don’t know your FTP settings or credentials? Get in touch with your FTP provider to confirm any details you aren’t sure about.
HTTP POST
To transfer via HTTP POST, you’ll need to enter the HTTP POST URL where the export file should be sent. This is a great option for sending files to Zapier.
Email
To transfer via email, you’ll need to update a few settings:
- Recipient(s): Enter one or more (comma-separated) emails that should receive the export. If left blank, the export will send to the site admin’s email address, which is shown in the field’s tooltip and can be edited by going to Settings > General.
- Email subject: Set a subject line for the export email to help recipients identify the export file.
Transfer monitoring
When you configure automated exports, the plugin will track the transfer status of each export under the Export List. If a transfer fails, any site user who can manage WooCommerce (typically admins and shop managers) will be notified via admin notice.

If several failures occur consecutively, an admin notice will recommend checking out the logs and export settings to ensure the automated export is set up properly.
Marking data as exported
Because this plugin supports manual and multiple automated exports, it’s important to consider what will happen to orders or customers after export. This is especially important for stores that send automated exports to external sources. You wouldn’t want to include the same order in multiple automated exports to your fulfillment center, but you also wouldn’t want to exclude that order from an automated export if you exported the order manually for some other purpose.
To give you complete control over what data are included/excluded from your exports, we’ve included the ability to change export status (i.e. whether an item was exported or not) both at a global level (e.g. impacts all your exports) or for individual automated exports.
What happens when something is exported?
When you manually export order or customer, it is marked as exported and will be excluded from all future automated exports. However, the order or customer will be included in future manual exports. If you do not want your manual export to impact future automated exports, be sure to disable the Mark as Exported setting before exporting.
When you automatically export orders or customers, it is marked as exported for that automated export and will be excluded from future runs of that automated export only. This prevents you from sending the same order over and over again to your fulfillment center.
How can I change whether something is marked as exported?
You can mark orders/customers as exported or not exported from a few locations.
- Orders or Users lists. Use the Mark as Exported or Mark as Not Exported bulk actions to change the export status for the selected objects. This will change the export status for all exports.
- Order detail or User detail pages. Select a specific order or user to toggle the export status at a global level (i.e. impacts all exports) or for one or more automated exports. This lets you determine whether an order or customer should be included in particular future automated exports.
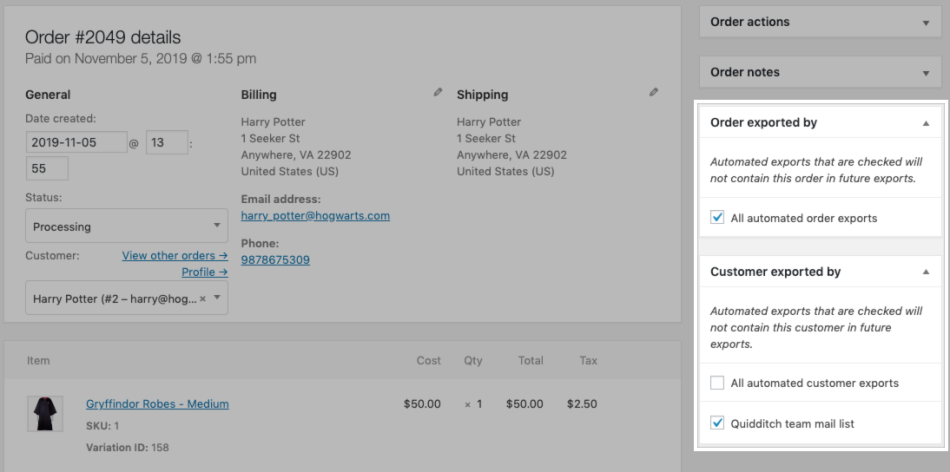
Note: Changing the export status to “not exported” is not a permanent change. This status will revert if the order or customer is included in a future export, as defined here.
Export formats
We offer several predefined formats, but you can also create your own custom format to ensure the file format meets your exact specifications.
Note: While we do our best to not change column order in our default formats, we strongly recommend not relying on column ordering, since any changes we must make will break integrations that rely on a specific order. Instead, we recommend using the column names / IDs, which are guaranteed to never change.
Predefined formats
You can use one of our predefined formats to export your customers, orders, and coupons. The CSV Import formats are compatible with our Customer / Order / Coupon CSV Import Suite plugin.
Customer exports
- Default CSV format
- Default XML format
- CSV Import format
Order exports
- Default CSV format
- Default – One row per item CSV format
- Default XML format
- CSV Import format
Coupon exports
- CSV Import format
Note: You can download our sample CSV files from Google Sheets by clicking File > Download as > CSV or make a copy to your own Google Sheets to modify by clicking File > Make a Copy.
Create custom formats
You can create multiple custom export formats, which are useful if you need to rearrange, remove, or add columns to your export. Custom formats can be used in your manual or automated exports.
Custom CSV format
Follow the steps below to create a custom CSV export format:
- Go to WooCommerce > Exports > Custom Formats.
- Select the export type you want to create – Orders, Customers, or Coupons.
- Click Add new CSV format.

- Select an existing format to use as a starting point for your custom format and click Load, or click X to start from scratch.
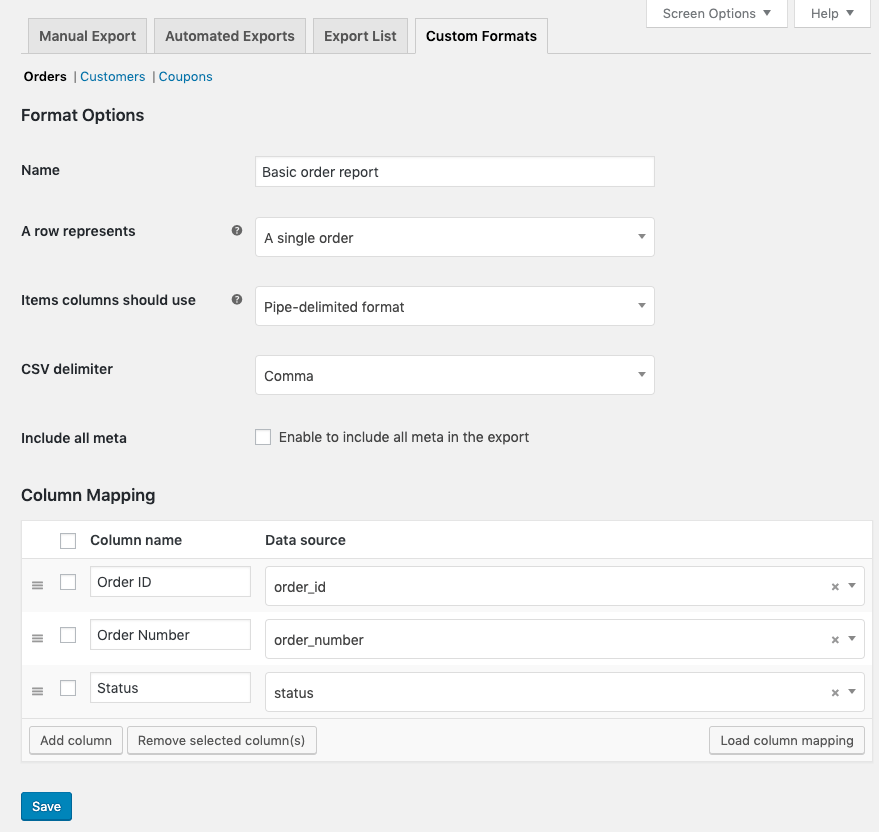
- Update the Format Options:
- Name: Enter an internal name for your export format.
- CSV delimiter: Select a delimiter to separate columns in your file.
- Include all meta: Choose whether to include all meta in the export. Click here to learn more about adding meta to exports.
- If you are creating an orders export format, you can also update the following extra options:
- A row represents: Choose whether a row should represent a single order or a single line item (e.g. an order with multiple line items will span multiple rows).
- Item columns should use: Choose whether items columns (e.g. line items) should be pipe-delimited or JSON format.
- JSON example: typically used in the predefined CSV Import format for orders – [{"product_id":99,"product_name":"Woo Album","quantity":1,"total":19.99}]
- Pipe-delimited example: typically used in the predefined Default CSV format for orders – product_id:99|sku:woo-album|name:Woo Album|quantity:1|total:19.99
- Update the Column Mapping to determine which fields will appear on your export.
- When adding columns, the data source determines what data will appear in the export. You can select an option from the list, add a custom meta key, or add a static value.
- Click Save.
Custom XML format
Follow the steps below to create a custom XML export format:
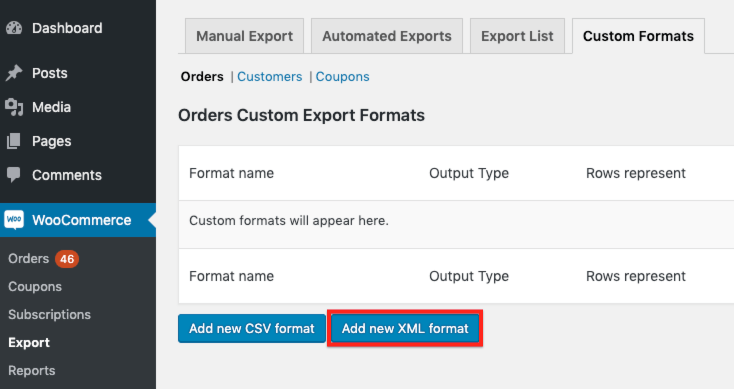
- Go to WooCommerce > Exports > Custom Formats.
- Select the export type you want to create – Orders, Customers, or Coupons.
- Click Add new XML format.
- Select an existing format to use as a starting point for your custom format and click Load, or click X to start from scratch.
- Update the Format Options:
- Name: Enter an internal name for your export format.
- Indent output: Enable to pretty-print the XML output with indents, which is helpful if a human is reading the file but unnecessary otherwise.
- Include all meta: Choose whether to include all meta in the export. Click here to learn more about adding meta to exports.
- Update the Column Mapping to determine which fields will appear on your export.
- When adding columns, the data source determines what data will appear in the export. You can select an option from the list, add a custom meta key, or add a static value.
- Click Save.

Adding custom meta
You can add columns for order, coupon, or user meta to custom formats.
To add custom meta, select “Meta field…” from the Data source drop-down menu and enter the Meta key.

You must know the correct meta key for the data when adding a column for meta. If you’re not sure, running an export with the Include all meta setting enabled will include all meta keys, so you can use that to find the meta key you want to include in your custom format going forward.
Note: While this plugin can export order metadata, it cannot export metadata for line items. Line item metadata can only be added as a single column when the A row represents setting is configured to “A single line item” and the item meta key is added to the column list.
Adding static values
You can add columns for static values to custom formats. You can use this feature to add blank columns or columns with a set value for all rows (e.g. your store’s name).
To add a static value, select “Static value…” from the Data source drop-down menu and enter the Value.
Frequently asked questions
Q: Can I export refunds?
A: Yes! You can set the Refunds setting in the Export Options to export only refunds, if desired, and can also add the following columns to your predefined formats or custom formats:
A: Yes! You can set the Refunds setting in the Export Options to export only refunds, if desired, and can also add the following columns to your predefined formats or custom formats:
refunded_total: The amount refunded in the order
Item_refunded: The total refunded for a particular item in the order
Q: Can I export a customer’s VAT number in an order export?
A: If you’re using WooCommerce Taxamo or EU Vat Number plugins, the VAT number associated with the customer who placed the order will be included in your order exports in a vat_number column.
A: If you’re using WooCommerce Taxamo or EU Vat Number plugins, the VAT number associated with the customer who placed the order will be included in your order exports in a vat_number column.
Q: There are users missing from my customer export. Where are they?
A: Users must place at least one order before they will be considered “customers” and included in this export.
A: Users must place at least one order before they will be considered “customers” and included in this export.
Q: Can I duplicate columns in my custom export format?
A: No, we automatically remove all duplicate sources because columns are used as keys for the column headers.
A: No, we automatically remove all duplicate sources because columns are used as keys for the column headers.
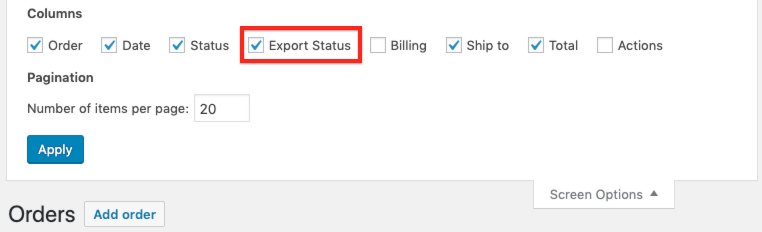
Q: Can I remove the Export Status column from the Orders or Users pages?
A: Sure thing! You can hide this column (and many others!) by going to the Screen Options pages at the top of these screens.
A: Sure thing! You can hide this column (and many others!) by going to the Screen Options pages at the top of these screens.
Q: Can I export serialised data?
A: Yes! You can export serialised data in its serialised form. If you need to add a custom meta, you can create a custom format and use the Include all meta option.
A: Yes! You can export serialised data in its serialised form. If you need to add a custom meta, you can create a custom format and use the Include all meta option.
Excel display issues
Q: Why are leading zeros (e.g. in a ZIP code) missing from my Excel export?
A: By default, Excel hides leading zeros. This is most common with ZIP codes like “02111” – Excel will automatically hide the first zero and display “2111”. However, the zero is included in the export – you can force Excel to show this by formatting the column as “Text”.
A: By default, Excel hides leading zeros. This is most common with ZIP codes like “02111” – Excel will automatically hide the first zero and display “2111”. However, the zero is included in the export – you can force Excel to show this by formatting the column as “Text”.
Q: Why are the foreign/special characters not displaying correctly in Excel?
A: We’ll need to force Excel to use UTF-8 encoding to render these characters properly by adding this snippet to your site – please be sure you know how to safely add custom code to your site before adding this snippet:
A: We’ll need to force Excel to use UTF-8 encoding to render these characters properly by adding this snippet to your site – please be sure you know how to safely add custom code to your site before adding this snippet:
add_filter( 'wc_customer_order_csv_export_enable_bom', '__return_true' );
Note: Excel for Mac doesn’t support UTF-8 characters, so your exports may not display accented or special characters properly. We recommend using a different application, such as:
- Google Sheets
- LibreOffice
- Numbers
Q: How can I ensure that Excel won’t show all my data in one column?
A: It sounds like your computer is set up to use a different delimiter than the standard comma. In most cases, the alternative delimiter is a semicolon. You can change delimiters in your export format.
A: It sounds like your computer is set up to use a different delimiter than the standard comma. In most cases, the alternative delimiter is a semicolon. You can change delimiters in your export format.
XML format questions
Q: Can I separate Product Add-Ons in the XML file so they’re easier to find?
A: Unfortunately, the way that Product Add-Ons are stored on orders makes it nearly impossible to accurately get all add-ons for an order, so we do not support this for XML exports. However, we do have a code snippet available that should work for most stores, but please be sure you know how to safely add custom code to your site and test this thoroughly!
A: Unfortunately, the way that Product Add-Ons are stored on orders makes it nearly impossible to accurately get all add-ons for an order, so we do not support this for XML exports. However, we do have a code snippet available that should work for most stores, but please be sure you know how to safely add custom code to your site and test this thoroughly!
Q: Can I change the character encoding or XML version? My site uses special characters.
A: Absolutely! The defaults should work for most sites, but if you need to filter the character encoding, standalone definition, XML version, or other format definitions, you can do so using the wc_customer_order_export_suite_format_definition filter. Here’s a sample snippet to get you started – please be sure you know how to safely add custom code to your site before installing this snippet!
A: Absolutely! The defaults should work for most sites, but if you need to filter the character encoding, standalone definition, XML version, or other format definitions, you can do so using the wc_customer_order_export_suite_format_definition filter. Here’s a sample snippet to get you started – please be sure you know how to safely add custom code to your site before installing this snippet!


Related Articles
WooCommerce Customer / Order / Coupon Export - Features
View Guide Links at the bottom of the page Installation 1 CRU CREDIT Setup (optional) 1 CRU CREDIT Ease Of Use Easy Want this feature? Request Here Purchase CREDITS Here Easily Export Orders, Customers, and Coupons from WooCommerce While WooCommerce ...WooCommerce Customer / Order / Coupon Export - Troubleshoot Guide
Can't see any Troubleshooting Guides on this page? This means we don't have any, please raise a ticket here if you have an issue and help us build out our guides! Overview and pricing of this feature. Click here Looking for the user guide for this ...Managing Orders - Woocommerce
Orders are created when a customer completes the checkout process, and they are visible to users with Admin and Shop Manager roles only. Each order is given a unique Order ID. Order IDs are non-sequential as they use the default WordPress ID ...Basic Woocommerce - User Guide
For pricing and how to add to your website see at the bottom of the page. Adding and Managing Products Adding a product Before adding your first product, let’s get familiar with how product categories, tags, and attributes work. Product Categories ...WooCommerce Pre-Orders - User Guide
For pricing and how to add to your website see at the bottom of the page. With WooCommerce Pre-Orders you can sell pre-orders for products and services in your WooCommerce store. Pre-Orders can be charged upfront or when the pre-order is available by ...