WooCommerce eParcel - User Guide
For pricing and how to add to your website see at the bottom of the page.
Australia Post
How to Register for the Australia Post Shipping and Tracking API
Registering for access to Australia Post's Shipping & Tracking web services is a very straightforward process.
If you haven't already done so, you will need to register your eParcel account to use the Shipping & Tracking API. This is easily achieved via: https://developers.auspost.com.au/
You will need to either log in or register an account. Once you have successfully logged in, you will see a page similar to this:
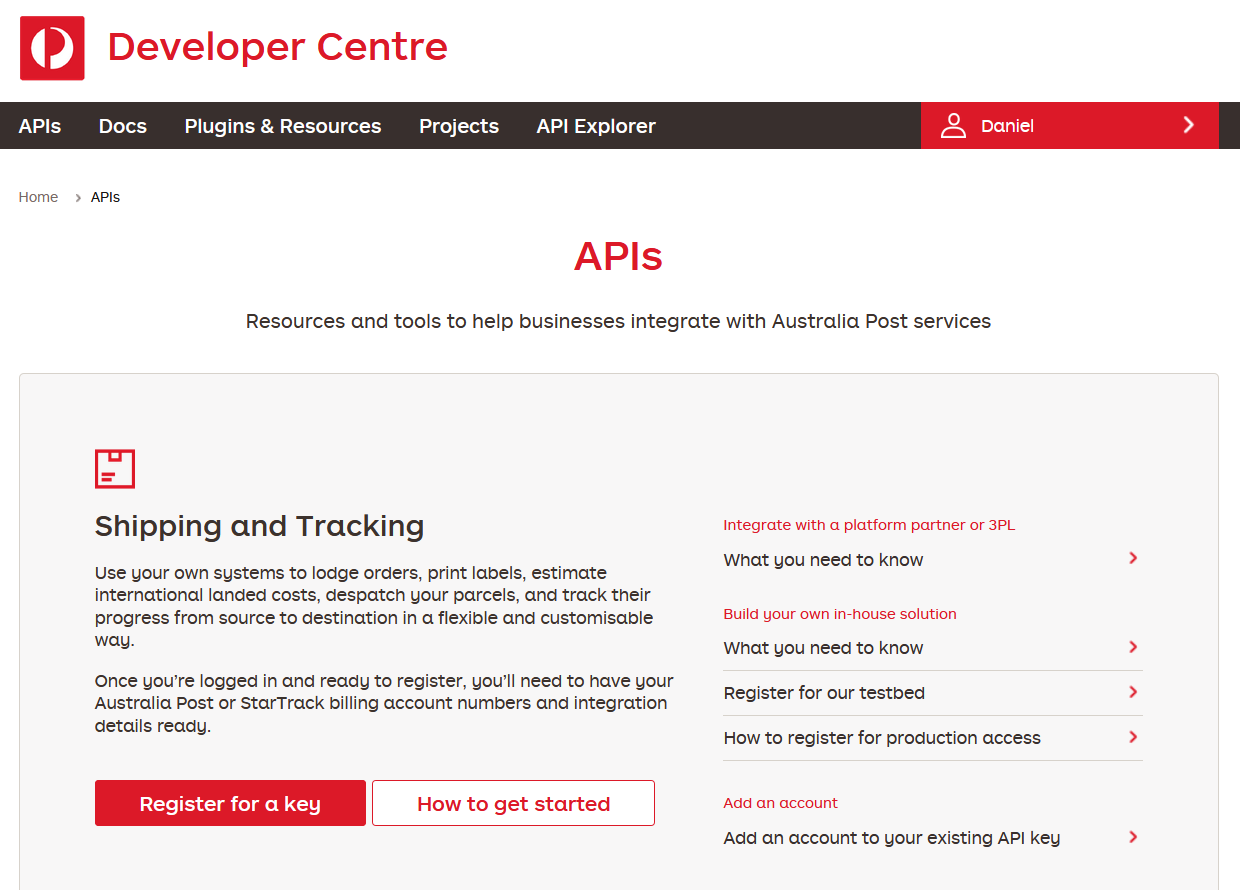
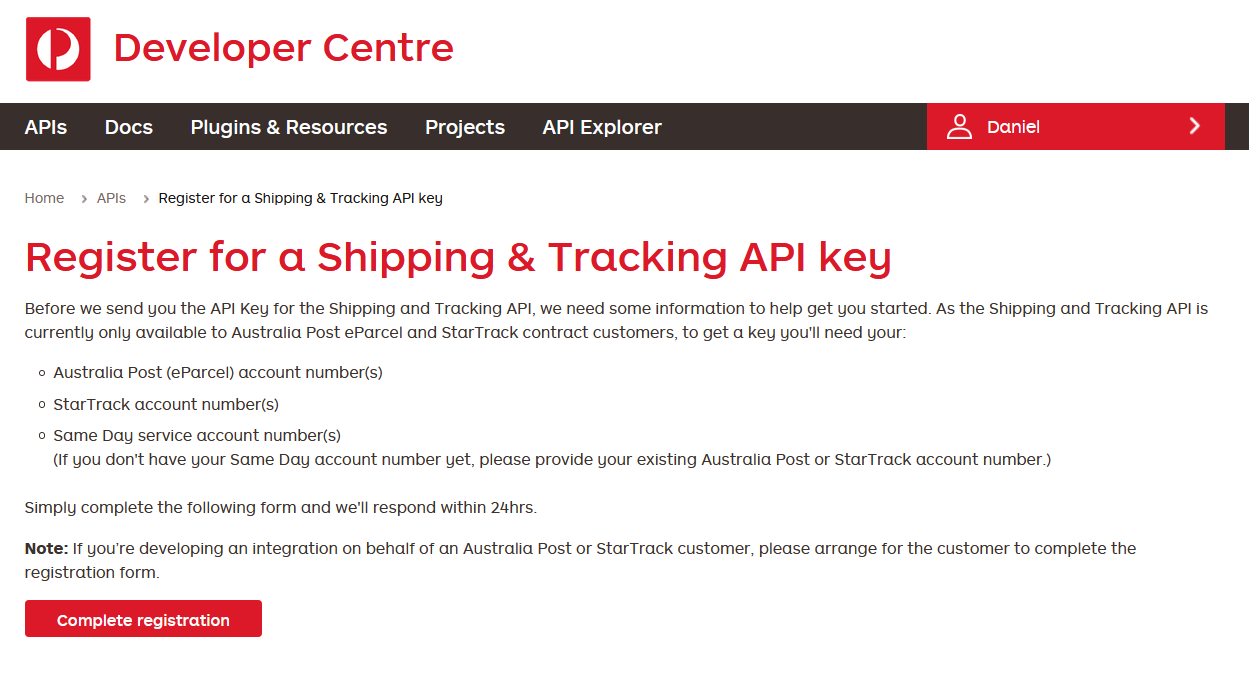
Click on the Register now for Key link under Shipping & Tracking. This will take you to the registration process. Simply click on the Complete Registration button.
Once you have clicked the Complete Registration Button, the following popup will appear:
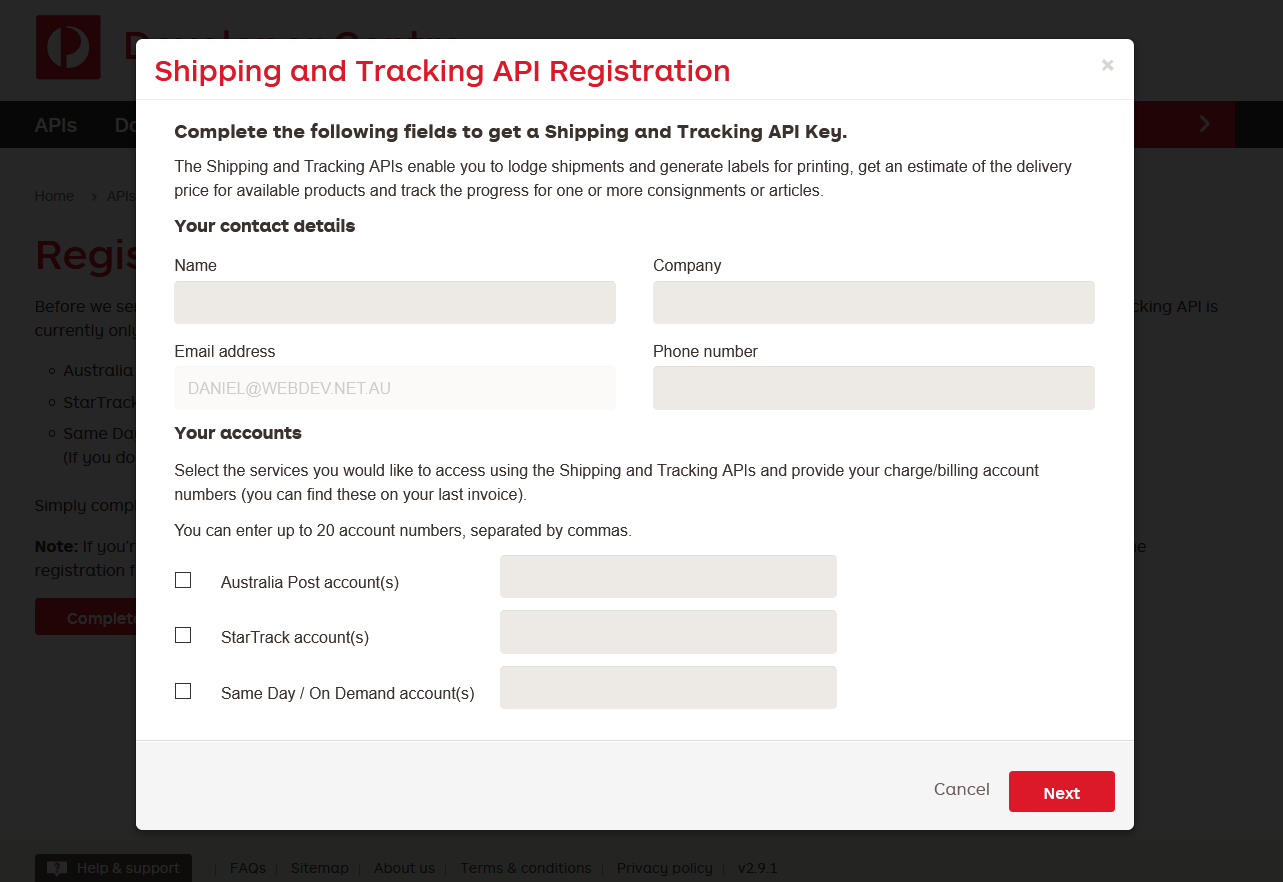
Provide all your various eParcel details here, and then click the next button.
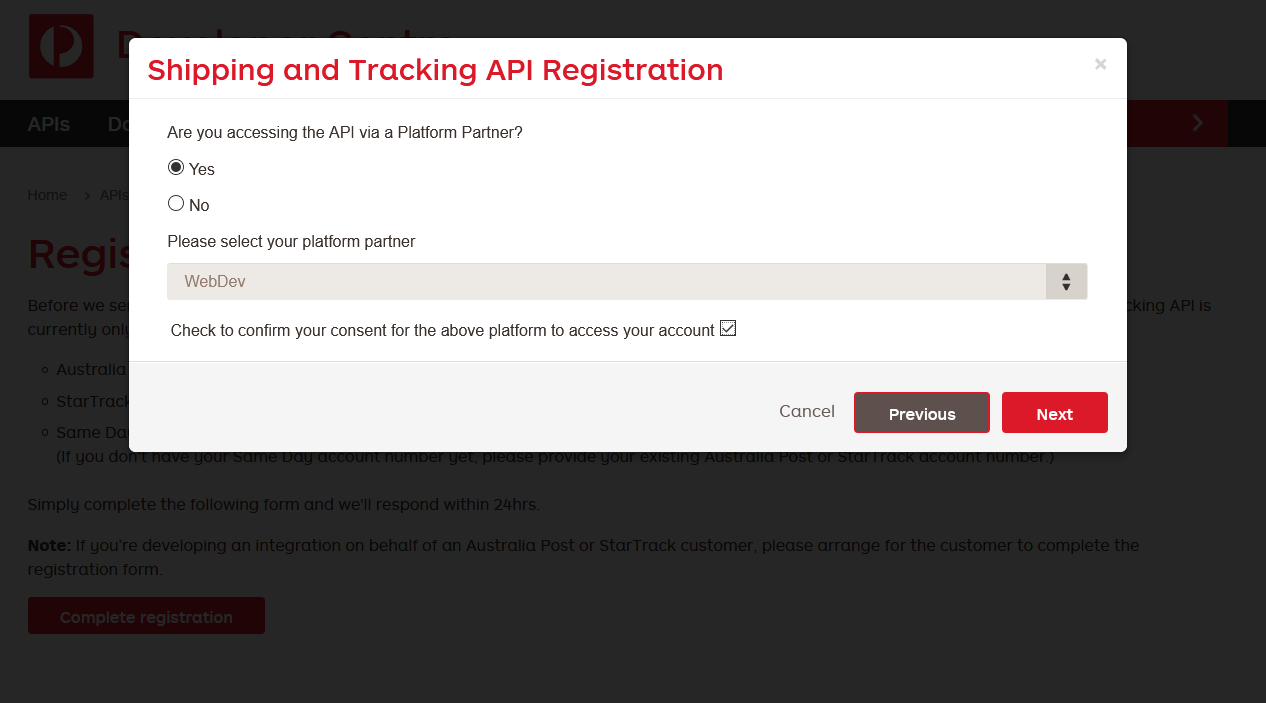
You will then be asked about whether you are accessing the API via a platform partner. WebDev is an official Australia Post Platform Partner, so please tick Yes and select WebDev from the list provided.
You will also need to check the box where it is asking for your consent to access your account.
From this point forward, simply provide the various details and continue to click the next button until the wizard is completed.
Once completed, you will need to wait until your application has been processed. You will receive an email with some documentation, when you are ready to proceed. This email is vital because it will contain not only the API Account Number but also the API Key and API Secret. These three ingredients form the requirements for our software to communicate to Australia Post on your behalf.
You are now ready to go!
Configuration / Operation
Establishing a connection to Australia Post
Remember all those Australia Post steps you followed before? This is where need to provide the 'API Key'
and 'Secret' that you defined earlier, The Australia Post Account number would have been emailed to you
from Australia Post when you registered to use the Shipping & Tracking API.
Once all the details have been entered, simply click on the 'Connect to Australia Post' button. The plugin
will attempt to talk to Australia Post using the provided details and if successful, you will notice the plugin
automatically retrieves details about your account and displays them to you.
The displaying of your account details is a good sign! It means you've successfully connected your website to
Australia Post and outside of some minor configuration tweaks, you can already start creating shipments and
labelling your outgoing goods.
General eParcel Settings
Within the settings of the plugin, there is a tab titled 'General Account Details'. This tab allows you to
customise the logic of the plugin to suit your shipping needs and policies. It looks like this:
Default Domestic Service Code
This is the service you want to establish as your default for all domestic shipments created. This can be
overridden by special rules defined under the 'Shipping Service Codes' tab, however, it is very important for
you to define this as it is the fallback option.
Require Signature
If you require a signature on all your deliveries, then simply select 'Yes' to this option.
SafeDrop Enabled?
This option is only available when you require signature.SafeDrop allows your customers to override the
signature requirement and opt for signature for delivery if no-one is home. If you require signatures but set
this option to no, then if no-one is home then the customer will be 'carded' and require pickup of goods
from their local Australia Post branch.
Show Signature Override?
This option will modify the 'create shipment' page to allow you to choose which shipments require signature
or not. The default selected option will be whatever you decide for the 'Require Signature' flag.
Email Tracking Enabled?
This lets Australia know whether to email the customer with updates regarding the delivery of customer
orders.
Dangerous Goods?
This option lets Australia Post know whether you are shipping dangerous goods or not.
Fragile Goods?
This option lets Australia Post know whether you are shipping fragile goods or not.
Allow override of Order Value?
This allows you to override the auto-calculated order value with a different value for domestic &
international shipments.
Default Label Layout
Depending on how you print your labels, this option simply pre-selects your default so you don't need to
keep changing it on the 'Generate Labels' page.
Show Branding on Label
This is an important option which allows you to control whether the Australia Post label branding is printed
when generating labels. If you are using pre-printed Australia Post label stock, then its a good idea to set this
to 'No'.
Label Consolidation
This option is a feature which has evolved over time, and provides a solution for different business models.
• Print a single label
This option will only ever print a single label for orders. This option can be used in conjuction with
the 'Parcel Sizes' for those merchants who can confidently pack all ordered products into a single
box or satchel.
• Each ordered product needs a label
For those merchants who deal with pre-packaged goods, and send them directly to the customer
without any form of consolidation. Then this option will allow the plugin to generate a label for
every product ordered (multiplied by quantity ordered).
• Pack/Label by Parcel Quantity
Perhaps you deal with a single product range which you pack by quantity because you know how
many can fit into a set parcel. For e.g. Soap or Wine. If your products comes in 3packs, 6packs, cases
(or equivalent), then this option will attempt to determine the best possible fit for your products
based on quantity ordered.
Default International Service Code
This is the service you want to establish as your default for all international shipments created. This can be
overridden by special rules defined under the 'Shipping Service Codes' tab, however, it is very important for
you to define this as it is the fallback option.
Default International Service Code (Non PTI)
The pack and track service is not available in all overseas countries. This option allows you to establish the
fallback option for those countries that do not support this service.
General Product Decription
For international deliveries, this field is required. It provides the description of your products to customs.
Tarriff Code
For international deliveries, this field is required. It provides the tarriff code your international shipment will
use. If your not sure what this will be for your products, then you can use the following website to find a
code which resembles the sort of product you deal with: https://www.foreign-trade.com/reference/hscode.htm
Classification Type
For the purposes of international deliveries and customs declarations, this field is required and indicates the
type of shipment. By default, this value should be set to OTHER, however, depending on your business
model and the type of product you are distributing you may need to change this field. If you are unsure of
which to select, leave the field as OTHER.
Default Parcel Dimensions
Whilst the plugin will attempt to retrieve dimensional data from either your products and/or defined parcel
sizes. These fields will provide the plugin with some default dimensional data to apply to your shipments. If
you only have a single sized carton/satchel that you use to deliver to customers, then simply provide it here.
Shipping Service Codes
These settings allow you to define rules for various shipping services which override the default settings
previously defined. These are especially useful, if you offer express domestic or international services which
the customer pays extra for. Or even if you have defined special shipping methods to cover the extra costs
of those hard-to-reach countries. Its entirely up to you.
To change the type of Australia Post label which will print for a given shipping service, simply select the
desired service from the list and click the Add button.
Once added to the list, use the drop downs to select the label you wish to use either domestically or
internationally.
Remember – Not ALL countries support Pack & Track services, so be sure to define the non pack and track
option under ‘Default Intl. Code’.
Defined Parcel Sizes
If you have a set range of carton/satchel sizes that you use within your organization, you can define them
here to make the labelling process that little bit faster. This interface also provides an opportunity to define
the dimensional data of the carton/satchel sizes, which is especially important when your contract is
volumetric based.
This page is also especially important when doing label consolidation by parcel quantity. By providing a
ranged value within the Product Quantity column, you are defining the quantity of product the particular
parcel size supports.
Email Settings
One of the many strengths of this plugin is the emailing of tracking information to customers when their
order has been manifested (by the plugin). By providing the details of the email which is sent to the
customer, you can control what they receive.
The email designer also supports a number of customer/order specific fields which can be inserted into the
email which is sent. Simply place the cursor in the position you want the field inserted, and then click on the
‘Insert Field’ link in the toolbar, and select the field you want to insert.
Creating eParcel Shipments
In order to generate labels, a shipment must first be created. Don’t worry, its fairly straightforward.
When you click on the ‘Create Shipment’ link under ‘eParcel’, you should see a listing of orders similar
to the below screenshot:
There are couple of key features to point out on this screen. Firstly, when the page loads, ALL domestic
orders are immediately validated against Australia Post’s postcode database to ensure the Suburb, State &
Postcode for the orders are correct. In the above image, you can see that one is highlighted red. This
particular order has had an issue with its address validation, and will need to be corrected before a shipment
can be created.
This page also provides you with the ability to override the automatically calculated weight for the order.
If you have defined parcel sizes, or allow for signature overriding, then these options will also be available in
the list.
Simply tick the orders you wish to generate a shipment for, then click on the ‘Generate Shipments for
Selected Order(s)’ button.
Upon successful generation of the shipments, you will be presented with a success message, such as below:
Generating eParcel Labels
One shipments for orders have been created, you will find the orders listed on the ‘Generate Labels’
page, found under the ‘eParcel’ menu.
The orders will be split by service on different tabs. This allows you to batch generate, all your international
or express labels in one go, without having to manually sort through the list.
Simply click on the orders you want to generate labels for, select from the label layout you wish to use and
click on the ‘Generate Labels for Selected Orders(s)’ button.
Upon successfully generating labels, you will be presented with a success message (as seen below), and
clicking on the ‘Download Labels’ button will open a new window containing a PDF view of the labels you
need to print and affix to your cartons/satchels.
You will also notice the ‘Lbl?’ column in the list change from a cross to a tick for the shipments you’ve
generated labels for.
You can re-generate the labels at anytime using a different label layout, in the event you have made a
mistake.

Oops! I generated labels using the wrong label layout, what do I do?
Don’t worry, you can regenerate labels using any label format at any time. Just tick the order(s) and click
on the desired label layout and generate once more.
When you are done labelling for the day, simply click on the ‘Create eParcel Manifest for Printed Labels’
button. All generated labels will be made final with Australia Post and you will then be able to generate the
hardcopy of the manifest to supply to either the Australia Post driver or local branch staff member.
In the event that you need to make changes to a submitted manifest, you will need to contact your
lodgement facility (as per your contract) and manually request changes to the manifest with them. Orders
can also then be manually changed back to ‘Processing’ and another shipment/label can be generated.
Manifests / Australia Post Orders
All manifests which are submitted to Australia Post are available to view within the ‘Orders / Manifests’
screen found within the ‘eParcel’ menu.
When you submit a manifest, you will need to create an order summary in order to download the hardcopy
of the manifest. Click on the ‘Create Order Summary’ button to the right of the manifest you created,
and then you will be able to ‘View Order Summary’. The order summary needs to be printed and
supplied to the Australia Post driver upon pickup, or to an Australia Post staff member if the orders are
dropped directly to your local branch.
Australia Post Service Status
Like all systems, they need to maintained. To provide you with as much information as possible, there is a
‘Service Status’ page available within the ‘eParcel’ menu. This page is updated constantly and reports not
only on the current status of the various Australia Post API’s but also lists any outages, updates or
maintenance events.
If you experience difficulties generating shipments, labels or manifests. It is a good idea to check this page to
make sure that Australia Post is not currently experiencing an outage.
eParcel Statistics
As shipments, labels and manifests are generated within the plugin, it collects valuable reporting statistics to
display. This interface will be able to give you the information you need on your deliveries, as well as
providing a state by state breakdown on shipments.

Related Articles
WooCommerce eParcel - Feature
View Guide Links at the bottom of the page Installation & set up 2 CRU CREDITS Ease Of Use Easy Want this feature? Request Here Purchase CREDITS Here WooCommerce Parcel Send Pro This software has been handcrafted to enable Australian Merchants to ...Australia Post Shipping Method - Feature
View Guide Links at the bottom of the page Installation 1 CRU CREDIT Setup (optional) 1 CRU CREDIT Ease Of Use Easy Want this feature? Request Here Purchase CREDITS Here Get Shipping Rates via the Australia Post Shipping API Do you need to ship ...WooCommerce eParcel - Troubleshoot Guide
eParcel Issues If you encounter issues like the below image, you need to check your settings: Ways Go to Parcel Sizes and create a Parcel Size or Check the Labelling Options and select Pack/Label products by Parcel Quantity Overview and pricing of ...Australia Post Shipping Method - User Guide
For pricing and how to add to your website see at the bottom of the page. Parcel Packing Methods There are three packing methods with Australia Post; each affects the parcels you send to the API. Pack items individually (Default) Each item in your ...Australia Post Shipping Method - Troubleshooting Guide
Can't see any Troubleshooting Guides on this page? This means we don't have any, please raise a ticket here if you have an issue and help us build out our guides! Overview and pricing of this feature. Click here Looking for the user guide for this ...