Afterpay - User Guide
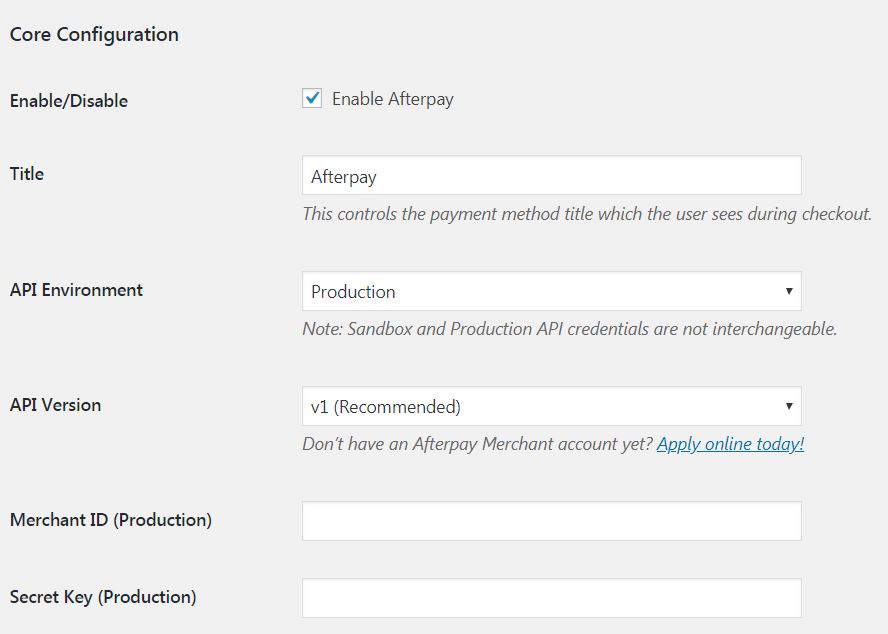
Acquire Merchant ID and Secret Key
Acquire the details needed from your Afterpay account:
- Access the Home page in your Afterpay account.
- Copy the Merchant ID from the footer of the page below the Orders list.
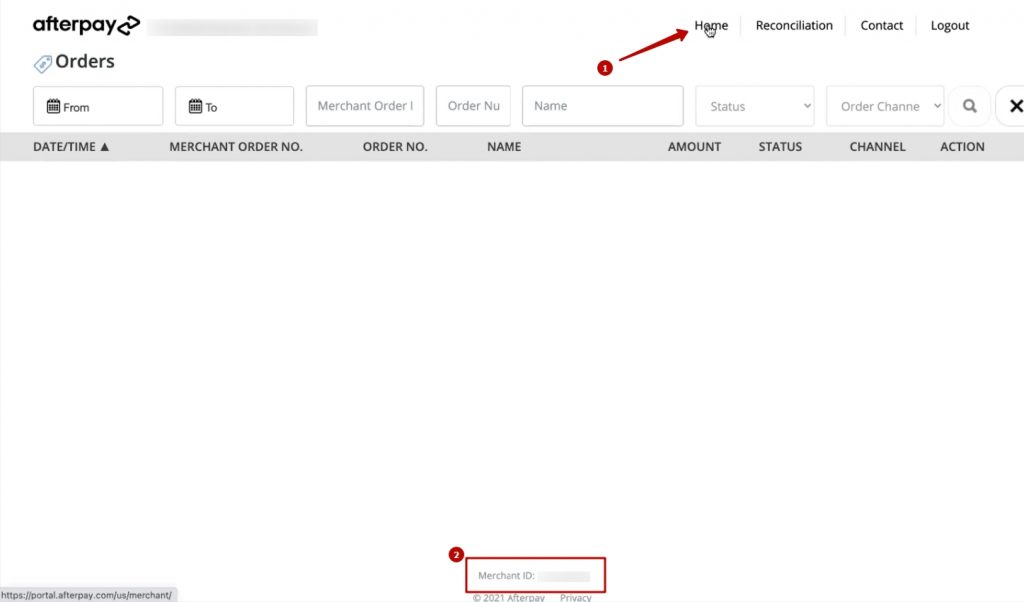
- A Secret Key is equivalent to a password for connecting to Afterpay. The Afterpay team should have sent your Secret Key to the email linked to your Afterpay account, find the email in your inbox and copy the Secret Key.
Configure
Completing the below steps will enable and display Afterpay as a Payment Method and add Afterpay messaging to product pages.


Notes
The ‘Sandbox’ API Environment is only applicable for dedicated test websites.
Advise your Afterpay Account Manager should test credentials be required.
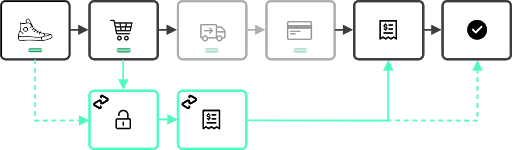
Express Checkout
Afterpay Express Checkout reduces the overall checkout steps so that your shoppers can complete their orders quickly. We’ll let customers checkout directly from the shopping cart and use their pre-filled information on Afterpay – name, shipping address, phone number, email – to complete their orders on your website.
Simply – less checkout steps, more conversions.

Checkout Steps for Customers
The customer can proceed to the cart where they can choose to ‘Checkout with Afterpay’. Afterpay will pre-fill shipping and billing details, and shoppers can complete their order with 1-click.
Afterpay Express checkout comes with Integrated shipping options where Afterpay displays your shipping options to consumers within the Afterpay checkout, with the ability to confirm the order within Afterpay.
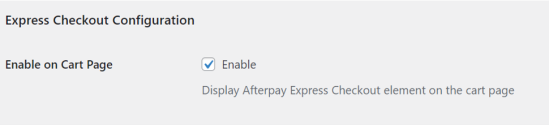
Enable or Disable Express Checkout
- Navigate to: WordPress Admin Dashboard
- Navigate to: Woocommerce > Settings > Payments > Afterpay
- Find ‘Express Checkout Configuration’ and toggle the checkbox.
The ‘Afterpay Gateway for WooCommerce’ plugin is available for extension or customisation, without alternations to the plugin code.
This allows for a greater level of compatibility with future updates.
Advanced Configuration is divided into the following sections:
Please raise a ticket with CRU for any advanced configurations that involve developer-level access.
Check Product Eligibility
The Afterpay plugin runs a series of checks to determine whether Afterpay should be an available payment option for each individual product. Third-party plugins can exclude Afterpay from products that would otherwise be considered supported. This can be done by attaching to the following filter hook:afterpay_is_product_supported
Display on Individual Product Pages
Third-party plugins can also filter the HTML content rendered on individual product pages using the following filter hook:afterpay_html_on_individual_product_pages
Note: This is intended for altering the HTML based on custom, varying criteria.For setting the default HTML, use the admin interface under:
“WooCommerce > Settings > Checkout > Afterpay”.
For hiding the HTML for a subset of products, consider using the following filter hook:
afterpay_is_product_supportedDisplay on Category Pages and Search Results
To filter the HTML content rendered on category pages and search results, use the following filter hook:afterpay_html_on_product_thumbnails
Note: This is intended for altering the HTML based on custom, varying criteria.For setting the default HTML, use the admin interface under:
“WooCommerce > Settings > Checkout > Afterpay”.
For hiding the HTML for a subset of products, consider using the following filter hook:
afterpay_is_product_supportedDisplay on the Cart Page
To filter the HTML content rendered on the cart page, use the following filter hook: afterpay_html_on_cart_page
Display at the Checkout
To filter the HTML content rendered at the checkout, use the following filter hook: afterpay_html_at_checkout
Customising Hooks & Priorities
As discussed in the section entitled “Theme Support” above, various WooCommerce hooks are assumed to be implemented by the active WordPress theme. Afterpay methods can be detached from their default hooks and reattached to different hooks, or to the same hooks with different priorities.
Since version 2.1.0, hooks and priorities can be customised from within the plugin settings page.

Shortcodes
Afterpay Product Logo
This is provided for rendering an advanced img tag for displaying the Afterpay logo on individual product pages. The img tag uses the srcset attribute to include 3 different resolutions of the logo for screens with varying pixel density ratios.
Or make 4 payments [OF_OR_FROM] [AMOUNT] with [afterpay_product_logo]
colourblackwhite
The default theme is colour. This can be overridden by including a theme attribute inside the shortcode. For example, if you have a dark themed website and wish to use the white mono version of the Afterpay logo:
Afterpay Product Messaging
To use the shortcode on product pages, please make sure the “Payment Info on Individual Product Pages” has been enabled. Edit the text content as appropriate. Optionally, clear the hook name if you would like to disable the default behaviour of rendering the content when the hook is triggered. Instead, the content will then only render wherever the shortcode is added.

Then simply paste [afterpay_paragraph] into the product description, or into a content area using your page builder.


To use the shortcode on custom pages, simply provide a product id in the shortcode.
[afterpay_paragraph id=”99″]


FAQ
Why is Afterpay not showing on product pages?
To display the Afterpay instalment detail on the product pages, the active WordPress theme must implement the below action hook:woocommerce_single_product_summary
Why is Afterpay not showing on category and search result pages?
To display the Afterpay instalment detail on the category and search result pages, the active WordPress theme must implement the below action hook:woocommerce_after_shop_loop_item_title
Why is Afterpay not showing on the cart page?
A: To display the Afterpay instalment detail on the cart page, the active WordPress theme must implement the below action hook:woocommerce_cart_totals_after_order_total
Note: The “Payment Info on Cart Page” setting must also be enabled, and all the cart items must be eligible. Overview and pricing of this feature. Click here
 Troubleshooting this feature? Click here
Related Articles
Afterpay
View Guide Links at the bottom of the page Installation 1 CRU CREDIT Setup (optional) 1 CRU CREDIT Ease Of Use Easy Want this feature? Request Here Purchase CREDITS Here Afterpay allows customers to receive products immediately and pay for purchases ...Afterpay - Troubleshoot Guide
Can't see any Troubleshooting Guides on this page? This means we don't have any, please raise a ticket here if you have an issue and help us build out our guides! Overview and pricing of this feature. Click here Looking for the user guide for this ...Square Payments and Point of Sale - User Guide
For pricing and how to add to your website see at the bottom of the page. Configure To begin using WooCommerce Square, you first need to connect your site to Square by following the steps below: Go to WooCommerce > Settings > Square. Select Connect ...Square Payments and Point of Sale - Troubleshoot Guide
Can't see any Troubleshooting Guides on this page? This means we don't have any, please raise a ticket here if you have an issue and help us build out our guides! Overview and pricing of this feature. Click here Looking for the user guide for this ...AutomateWoo - User Guide
For pricing and how to add to your website see at the bottom of the page. AutomateWoo is a marketing automation plugin which integrates directly with your WooCommerce store. Using automated marketing campaigns and a unique set of tools, AutomateWoo ...