Gravity Forms - Troubleshoot Guide
Form submissions not syncing to Mailchimp
This troubleshooting guide is for standard forms such as Contact Us or any other form that captures data that syncs to Mailchimp.

Requires Mailchimp/Form Add-On Integration
If you are finding that new form sign ups that were previously syncing to Mailchimp are no longer syncing, you can check a few settings below:

Note: Make sure when searching for users in Mailchimp, you try their email address as this is always going to be unique.
Only new entries will sync to your Mailchimp, entries before the fix will still not show.
Checking Mailchimp API Key
- Navigate through Forms → Settings → Mailchimp
- Check the Mailchimp API key on the field if it is correct. If not, feel free to update this and hit Update Settings button
Checking if form has a Mailchimp feed
- On the forms list page, hover over the form you want to check and hover again over Settings and select MailChimp
- This will how it shows when there is feed setup. Check the feed by clicking edit
- On the feed edit page, you can check if the details are correct. Feel free to update any information and hit Update Settings button to save your changes.
- If there are no feeds, you can add a feed by following the steps below: Make sure that the API was provided and has been set up first
A feed simply allows form submission data to be sent to another source. In this instance, form data is being sent to Mailchimp.
Create a Feed
- To create a feed to Mailchimp, do the following from your WordPress Admin Dashboard:
- Click on Forms in the left side menu.
- Select the form that you want to use with Mailchimp.
- Once within your desired form, hover over Settings and click on Mailchimp.
- Click Add New to create a new feed. You will be presented with the Mailchimp feed settings screen.
Feed Settings Screen
The following fields are available within the settings screen. Refer to the screenshot of the settings below.
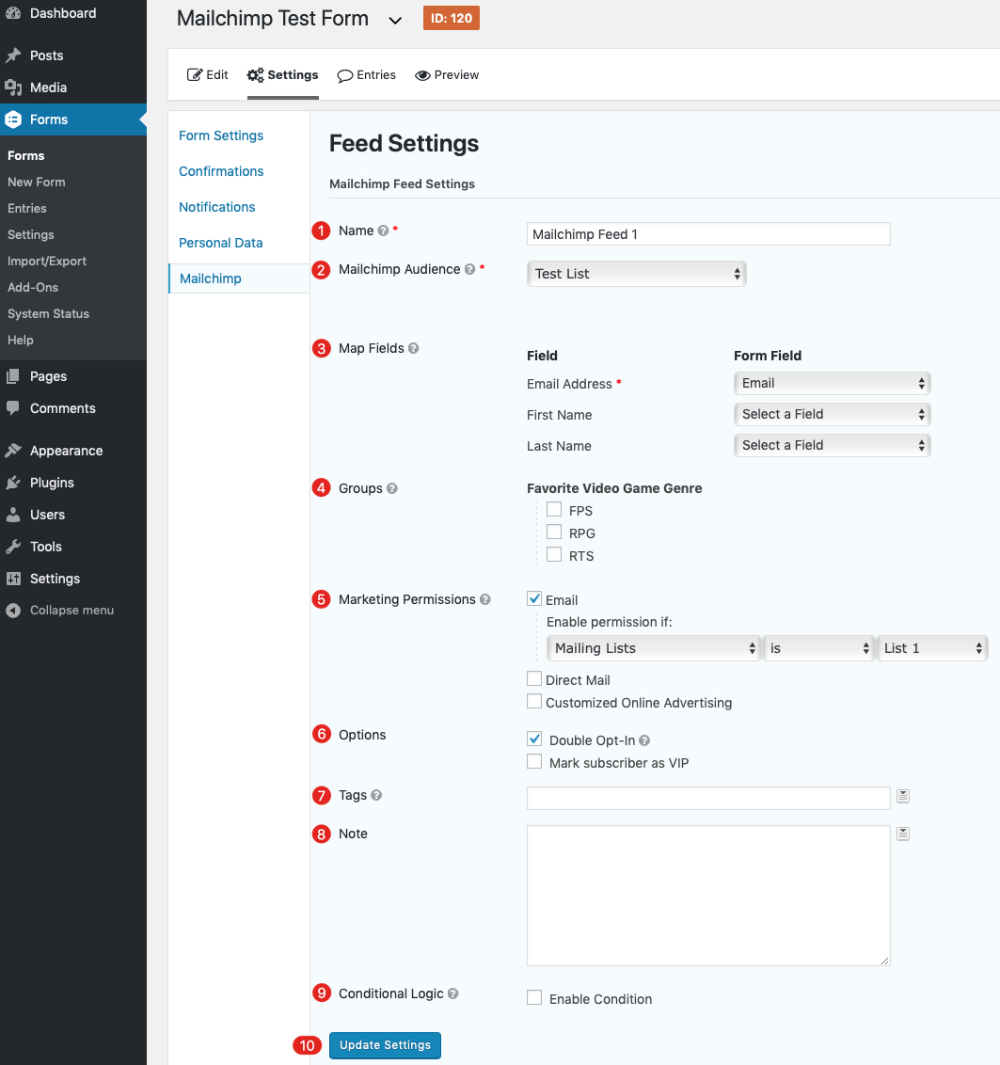
- A feed Name is required. It is only used for identification and will not be shown anywhere other than your feed listing.
- Mailchimp Audience: Chose the Mailchimp subscriber list you wish to send form submissions to.
- Map Fields: Map each of the Mailchimp fields to the desired form field that will contain that information. In Mailchimp, these are the fields that display in the user profile information. You can add new fields to the profile under Audience -> Manage Audience -> Settings -> Audience fields and Merge tags. Be sure to map them in the feed settings after creating them in Mailchimp. Please note: if you do not see any form fields in the drop down to map to the Mailchimp Email Address, please be sure you added an Email field to the form, from the Advanced Fields section of the form builder.
- Groups: Used to add users to your Mailchimp groups. See Adding Mailchimp Subscriptions to Groups for more information.
- Marketing Permissions: This allows you to set a condition to opt users into different marketing types. If an existing user is found and already opted-in for a Marketing Permission, they will stay opted-in.
Notes: Requires GDPR fields to be enabled for the Mailchimp list. This is done under Audience -> Manage Audience -> Settings -> Audience name and campaign defaults. Also the list is required to have at least one member; if the list does not have any members, add a temporary user (you can delete it after). - Options: If you select Double-Opt-In, then all list subscribers will be sent a confirmation email via Mailchimp’s service before they are finalised as included in the mailing list. The Mark subscriber as VIP checkbox sets the VIP flag.
- Tags: Using text and merge tags, you can assign tags to the entered subscriber. Multiple tags can be set as a comma-separated list. This new integration with Mailchimp’s tags was launched with Mailchimp Add-On v4.4. For more information on tags, refer to Mailchimp’s documentation.
- Note: Assign a note to the entered subscriber. This is sent to Mailchimp so the note is added to the member details. This is only visible to the Mailchimp account owner. Supports merge tags.
- Conditional Logic: If unchecked, every successful form submission will be sent to Mailchimp. If you wish to set specific conditions for sending form data to Mailchimp, then check the “Enable Condition” box and fill out your required criteria.
- Click the Update Settings button to save your options.
Form Emails Not Sending?
A form is not sending an email when an entry has been submitted?
How to check the notification Recipient
- On the forms list page, hover over the form you want to check and hover again over Settings and select Notifications
- Select Admin Notification
- Check the Send to Email field if this is the correct email the notification must be sent to and edit it if not. Also check the From Email field if this is the email that was registered on AWS SES (CRU would have asked you to verify your email address previously, if you are looking to add a new email address please raise a ticket). If not, you can edit it.
Edit Confirmation Message
- Go to Forms -> Form to edit -> Settings -> Confirmation.
- Edit the Default Confirmation
Connect to a Stripe Live Account
If connected to the live Stripe environment, any transactions passed will attempt to generate real charges.
- Navigate to your Forms → Settings → Stripe Settings, and look for the Stripe Account section.
- Set the Mode to Live
- Click the “Connect with Stripe” button.
- You will be presented with the Stripe sign-in page. Complete the sign-in process.
- You should now see a Stripe account selection page (these accounts are created from within your Stripe service dashboard, see this guide). The email address of your Stripe account will be displayed at the top of the page.
- Select the account you wish to use to collect live payments and click the “Connect” button.
- You may be presented with various Stripe forms requesting additional business information if your account is not fully setup for live payment. Complete any information Stripe requires, and then authorize the account to confirm connection to your Gravity Forms.
- You will be returned to the Stripe Settings page. You should see “Connected to Stripe as” with your account name as well as a “Disconnect” button.
 Overview and pricing of this feature. Click here
Overview and pricing of this feature. Click here
Looking for the user guide for this feature? Click here
Looking for the user guide for this feature? Click here
Related Articles
Gravity Forms - User Guide
For pricing and how to add to your website see at the bottom of the page. Create a New Form Log into your WordPress admin, and look for the Forms menu with the Gravity Forms “G” in the left-hand navigation area. Under the Forms item, you will see an ...Gravity Forms Mailchimp Add-on - User Guide
For pricing and how to add to your website see at the bottom of the page. Setting Up the Mailchimp Add-On Where to Find These Settings The Mailchimp settings page can be found within your WordPress admin dashboard. From within the left side ...Gravity Forms Mailchimp Add-on - Features
View Guide Links at the bottom of the page Installation 1 CRU CREDIT Setup (optional) 1 CRU CREDIT Ease Of Use Easy Want this feature? Request Here Purchase CREDITS Here The Gravity Forms Mailchimp Add-On gives you an easy way to integrate all of ...Gravity Forms - Features
View Guide Links at the bottom of the page Installation 1 CRU CREDIT Setup (optional) 1 CRU CREDIT Ease Of Use Easy Want this feature? Request Here Purchase CREDITS Here Go where no form has gone before. Built-in features give you more control with ...Gravity Forms Zapier - Feature
View Guide Links at the bottom of the page Installation 1 CRU CREDIT Setup (optional) 1 CRU CREDIT Ease Of Use Easy Want this feature? Request Here Purchase CREDITS Here Extensive Integration Options Zapier is an impressive platform that allows ...