Gravity Forms - User Guide
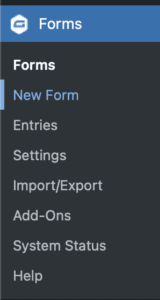
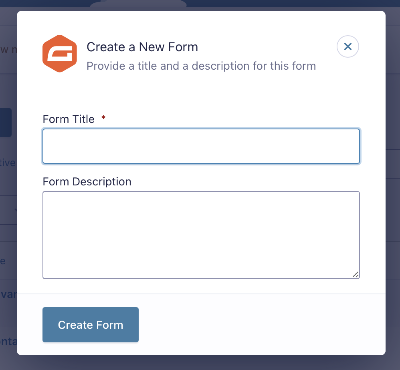
Create a New Form
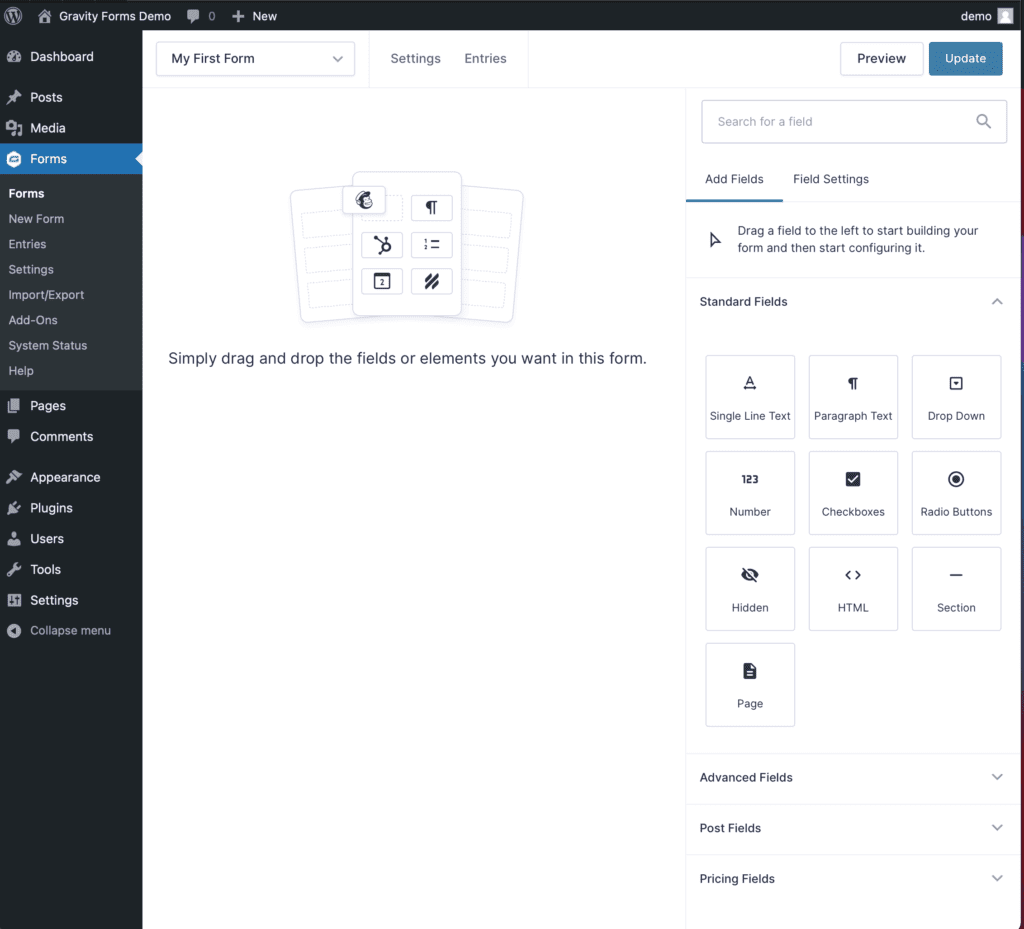
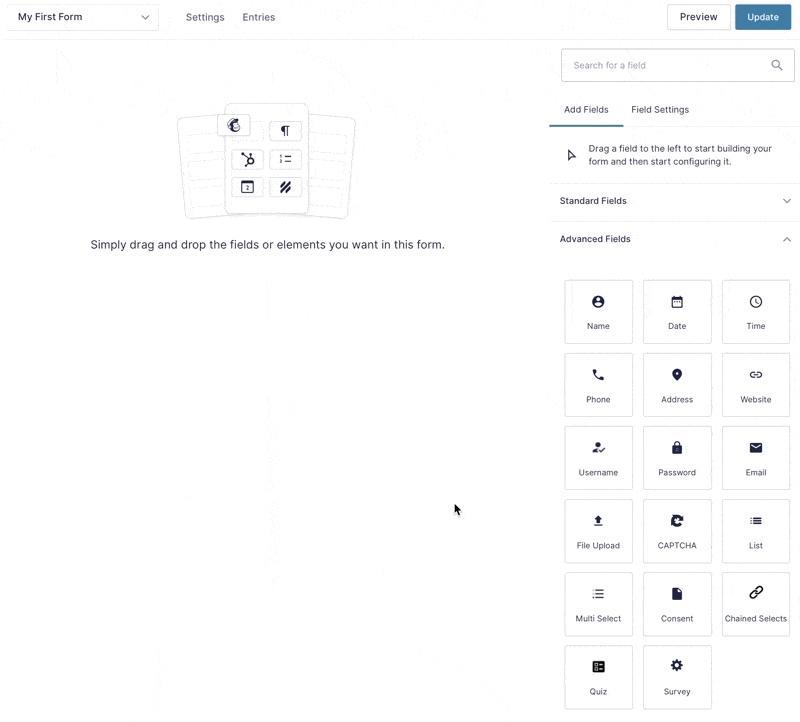
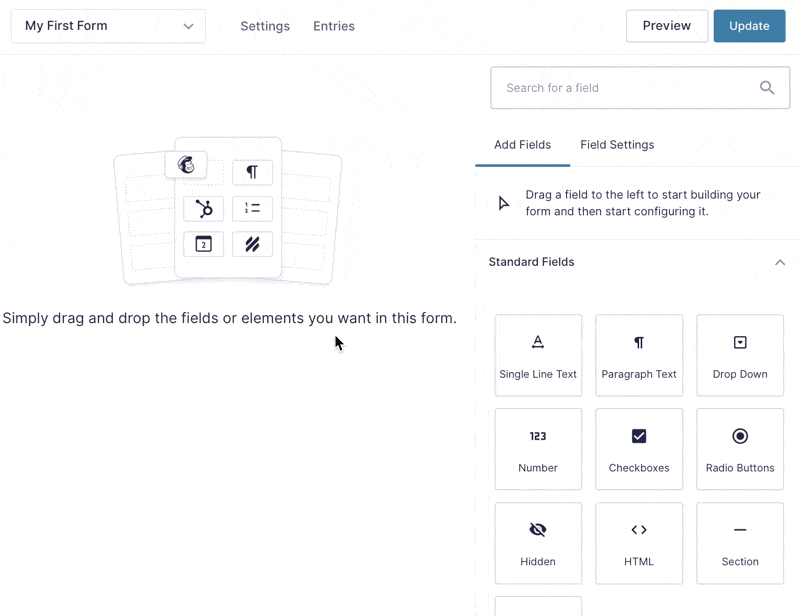
The Form Editor
Top Bar

- Shows you the form you are editing, and allows you to quickly switch to other forms.
- Go to Form Settings.
- Go to this form’s Entries list.
- Show a preview off this form.
- Update the form and capture the changes you have made.
The Field Library
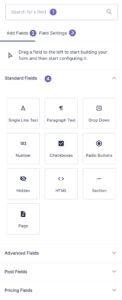
- The search bar allows you to quickly find any field.
- Two tabs are offered to this section, Here the Add Fields tab is selected, which shows all the available field categories.
- This tab gives you access to the field settings of the selected field, and will auto-select when you are select a field.
- All the available fields are shown here, grouped under multiple field type categories. Choose the category you are interested in, and it will expand to reveal all the available field of that category.
- Standard Fields: the simple basics.
- Advanced Fields: multi-part and more complex fields.
- Post Fields: fields associated with WordPress posts, such as tags and excerpts.
- Pricing Fields: product related fields.
- More field categories may be added here by other add-ons.
The Layout Space
Fields Available for Forms
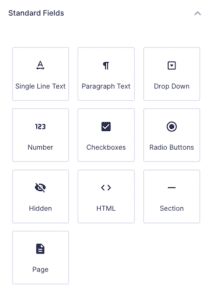
Standard Fields
Standard Fields are basic form fields that can be customised for just about any use. These can be used to capture and store a variety of data when an advanced field is not available to meet your needs.
Advanced Fields
Advanced Fields are more advanced form field types with specific usage in mind. Advanced fields may actually contain multiple fields in one container. These fields make it easy to capture data such as a user's Name, Address, etc.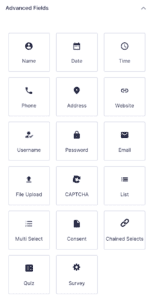
Post Fields
Post Fields are form fields that enable you to capture data that is then used to create a WordPress Post. These fields make it quick and easy for you to create forms that allow users to submit content to your site. The result posts will be set as a Draft and will need to be published before they are visible.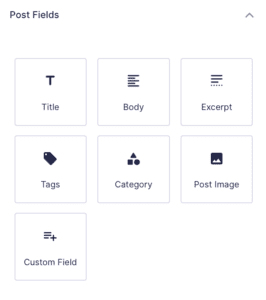
Pricing Fields
Pricing Fields are form fields that enable you to create products focused forms. Additionally, this is where you will find Add-On specific payment collection fields, such as the Stripe Card field, and the (mostly deprecated) generic credit card field that is still utilised for the Authorize.net Add-On.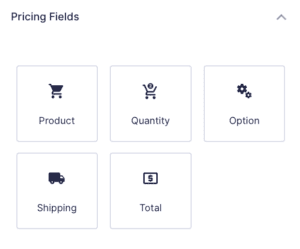
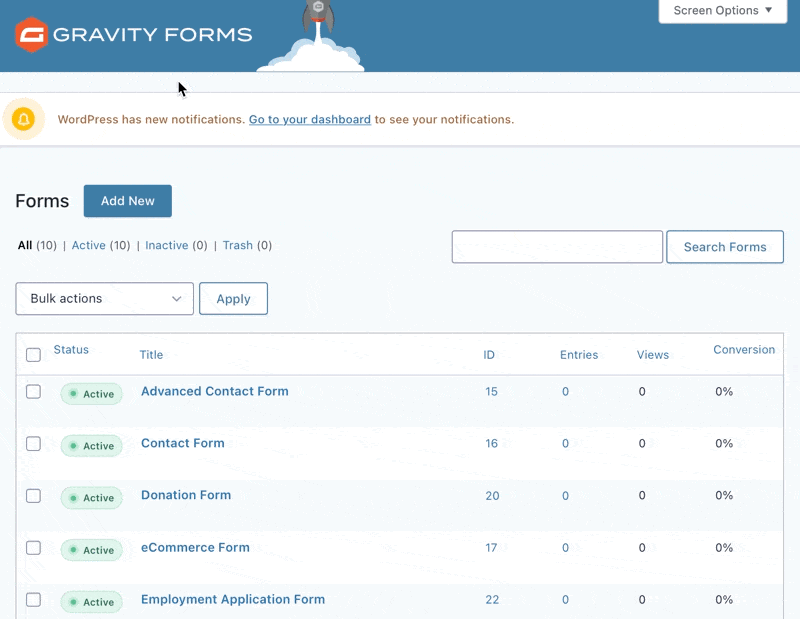
Forms List Page
The forms list page displays a list of all your forms. From this page you can manage and edit your existing forms and get a quick rundown on basic analytics such as views, number of entries, and the conversation ratio.

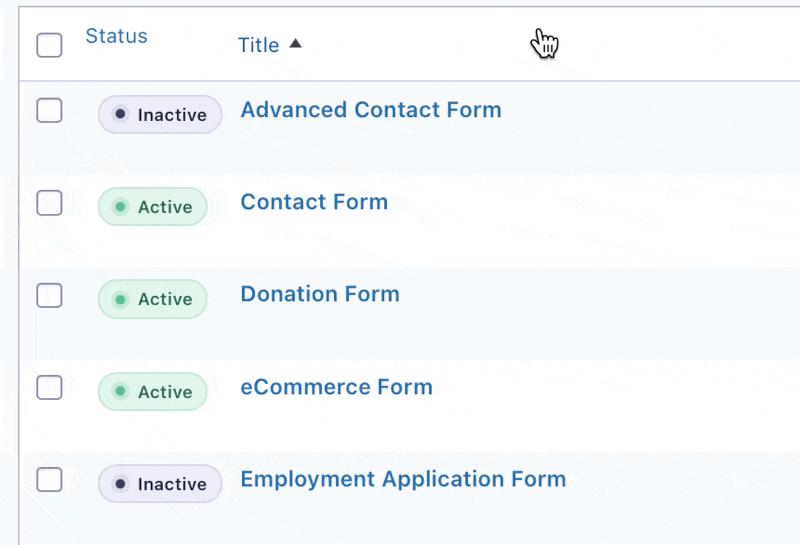
Filter Toolbar
The filter toolbar allows you to filter which forms you would like to view: All, Active, Inactive, and Trash. In the parenthesis beside each filter label is the number of forms currently applicable to that filter. By default All forms will be displayed, although you can select to view only Active or Inactive forms.
Sorting Options
Status
To the left of the form name is the status icon. By default this is checked, which activates the form. To inactivate a form, simply click on the status icon to change the status.
Title
This is the form name. It is editable by using the form editor.
ID
This is the form id. You can use this for displaying the form via the shortcode or function call.
Entries
The number of times a form entry has been created by submitting the form.
Views
The number of times a form has been viewed. This is based on the number of times the form markup is generated for those who don’t have administrator capabilities, including when the form is re-displayed following validation errors. This may differ from the metrics gathered by third-party analytics services based on user session, like Google Analytics.
Conversion
The ratio of entries to views, expressed as a percentage. Note that form previews do not count as views, but entries submitted by a form preview do count as an entry.
Form Quick Toolbar
Each form has a toolbar that displays when you hover over the first cell of a form row. This quick toolbar will allow you to edit the form, view the form settings, view the form entries, preview the form, make a copy of the form, or send the form to the trash to be deleted later.
Form Actions
The following form actions are available per form in the Form Quick Toolbar by hovering over a form in the list.
Edit
Edit the form using the form editor.
Settings
This deals with all of the settings of your form such as Form Settings, Confirmations, and Notifications.
Entries
View the entries for this form.
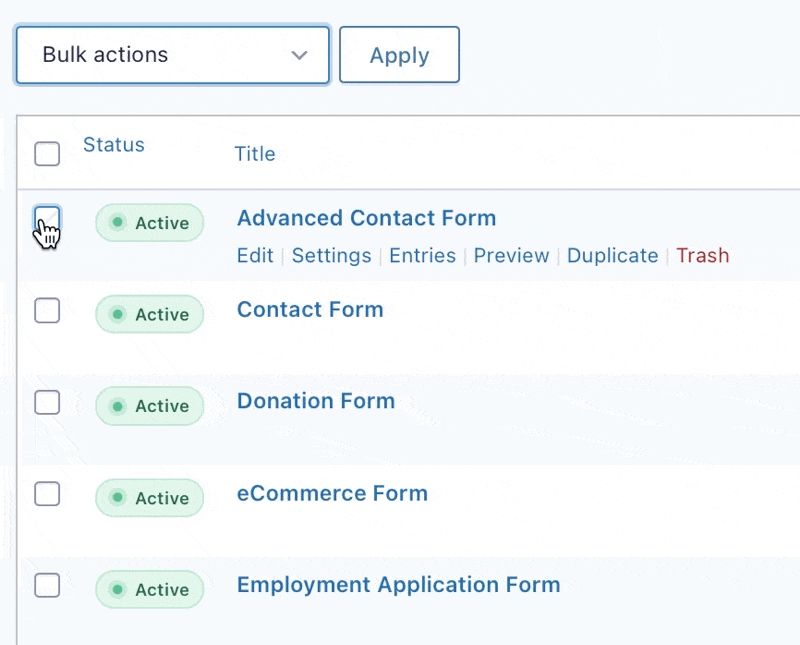
Bulk Actions
Using bulk actions you may apply the same action to multiple forms at once. To use bulk actions, you must first select the checkbox next to each form you would like to modify. Then select the desired action from the Bulk Actions drop down list, and click “Apply.”
The following bulk actions are available:
Mark as Active/Inactive
Mark all selected forms as active/inactive.
Reset Views
Reset the counter for the number of times a form has been viewed.
Permanently Delete Entries
Delete all of the entries associated with the selected form. These entries cannot be restored.
Move to trash
Send the selected forms to the Trash.
The short animation shows the application of a bulk action.
Access Your Form Settings
This article shows you how to access your form-specific settings.
From the Form List Screen
- Hover over the form title you wish to change in the list.
- When the menu appears below the form title, click or hove over settings to expose a drop down showing Form Settings.
- Now you can edit the settings you need.
- Once you are done, don’t forget to scroll to the bottom and click Save Settings.
From the Form Editor Screen
- Hover over or click Settings in the top bar.
- In the drop down menu that appears, click form Settings.
Importing a Form

- First, log into your WordPress admin dashboard.
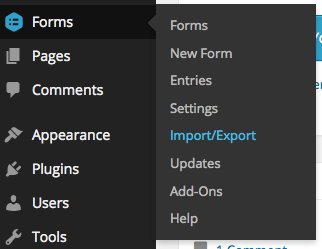
 Once logged in, hover over Forms and click on Import/Export.
- On the next page, click on the tab labeled Import Forms.
- From here, click on the Browse button and navigate to the form settings file that you need to import. As noted above, our Form exports into JSON files and will have the .json extension. Then, click the Import button.


If successful, you should see a message on the top of the page stating that the form has been imported successfully. You should now see the form appropriately listed with the rest of your forms.
Exporting a Form
When moving a form from one location to another, or even to backup your data, we have provided a tool within Gravity Forms to perform an export of your created form with just a few clicks. In this article, we will show you how to easily export any forms you have created using Gravity Forms.
- First, log into your WordPress admin dashboard.
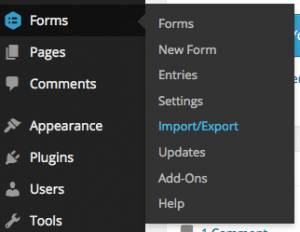 Once logged in, hover over Forms on the left side navigation menu and click on Import/Export.
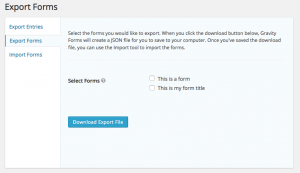 Once on this page, you will notice a few different options. Click on the second option labeled Export Forms.
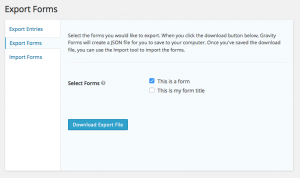 From here, select the checkbox next to any forms that you want to export. Then, click Download Export File.
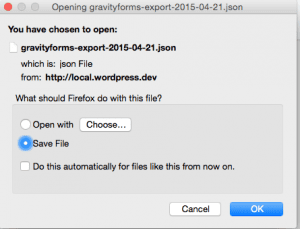 You will then be prompted to save a JSON file containing all of your form settings. Be sure to save this is a safe place for easy access later.


Your form should now be successfully exported.
Notifications
Configuring Notifications in Gravity Forms
What Is A Notification?
When a user submits a form, it can be quite helpful for the site administrator to receive an email notification that a form has been successfully submitted. This ensures that you do not have to constantly check your Entries table to see if anything has been submitted. In this article, we will show you how to configure a basic email notification for one of your forms.
Note that as your needs evolve, you can have multiple notifications for a single form, and even for a single submission. Additionally, you can determine which is activated on submission using complex conditional logic conditions. But for now, let’s just create a simple notification.
Create a New Notification
You will need to already have a form created.
- First, access the form that you want to create a notification for. This is done by clicking on Forms on the left side navigation menu, then clicking on your desired form.
- At the top menu, hover over Form Settings and click on Notifications.
- You should now see a list of all notifications that exist for that form. By default, there should already be a single notification that sends the submissions to the admin email address within your WordPress installation. The list may be sorted alphabetically by clicking on the “Name” header. To add a new notification, click the Add New button.
- First, pick a name for your notification. This is simply something to easily identify the notification. Any unique name will be fine.
Enter the Email Settings
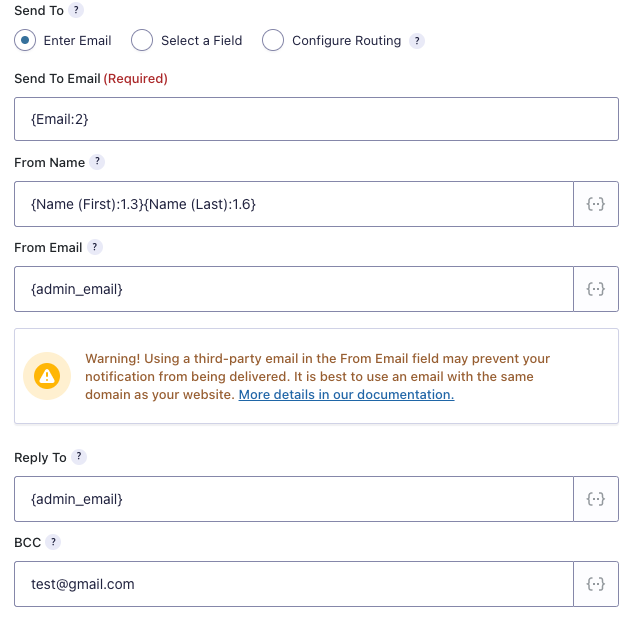
- You will see a setting labeled Send To. This allows you to determine how the message is sent. The options available are the following:
- Enter Email: This can be a merge tag for a field in your form like
{Email:2}, a single email address, or multiple email addresses separated by a comma that all notifications for this form will be sent to, eg:support@example.comorsupport@example.com,sales@example.com,ceo@example.com - Select a Field: This option will allow you to send the notifications based on the contents of an email address field in the form.
- Configure Routing: This option will allow you to change the Send To email address used for the notification based on the options that the user selects in the form.
For the purpose of this article, we are just going to take a look at the Enter Email option.
When you have the Enter Email option selected, the Send to Email field will be available. Within this field, enter the email address that you want your form notifications to be sent to.
- Enter Email: This can be a merge tag for a field in your form like
- You will need to configure a few different fields related to the email being sent. The first of these is the From Name field. When a notification email is sent, this is the name that will be displayed as the sender. Here, you can set this to something static, or dynamically generate that data. In this example, we want the name field from the form to be used as the From Name in the notification, click on the merge tag icon to the right of the field, and click on the field that you are using for the name.
The number in the merge tag is the value of the field_id. Example: {text:4} will select field ID 4. {name:5.3} will target the 3rd subfield of the field ID 5.
- Next up is the From Email field. This is the email address that is displayed as the sender when receiving the notification. You may set this to {admin_email} or use a static email address, but always use a valid from email to prevent sending and deliverability issues.
- There is also the Reply To field in which the reply address may be set. This can take a static email address, or use merge tags by clicking on the icon to the right of the field.
- The BCC field will allow you to set an email address in which the notification email will be copied to. This is useful if you have an individual that wants to receive all notification emails when sending to multiple people.
Message and Subject
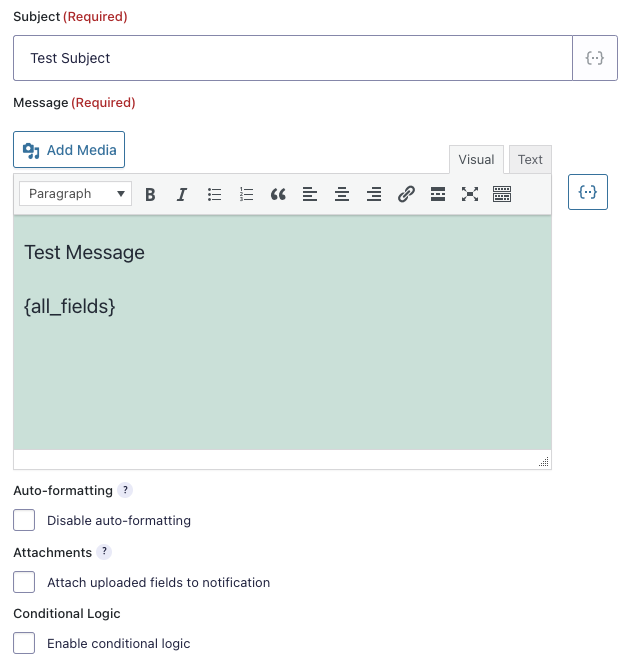
The Subject and Message fields are the most important part of the notification. This is the content that lets you know the content of the form that was filled out. These default to a subject stating the form that was filled out, as well as the message containing the form content. Just like many of the previous fields, these also support merge tags to dynamically generate content. For most people, the default content is fine, but you may change this to anything you wish. Using the drop down icon next to the input boxes, you can select your form fields merge tags and also additional merge tags.
Disable Auto-Formatting
WordPress runs a function to help add paragraph spacing to your email text in order to help readability. If you’ve carefully crafted your notification layout (e.g. using HTML) and do not want any meddling from the system, select the Disable Auto Formatting checkbox below the message field.
Adding An Attachment
As of Gravity Forms 2.4, if there are File Upload fields on the form, the Attachments option displays. By selecting this option, the files that are uploaded on the form are included when the Notification is sent.4
Using Conditional Logic With The Notification
Notifications support conditional logic, allowing you to define specific conditions that determine whether or not this notification gets sent. Select the option to enable conditional logic here, you can then configure your conditions.
Adding a form to your site
Adding a form using the Embed Form flyout
The Embed Form flyout, released with Gravity Forms 2.6, provides a simple way to add your form to a page or post from directly within the Form Editor. It utilises the WordPress Block Editor to allow you to include it in an existing or new post or page. You can also use this new interface to copy the form shortcode and then insert your form using existing shortcode methods.
Accessing the Embed Form flyout
The top bar of the Form Editor has a new button “Embed” which loads the Embed Form flyout

Clicking the Embed button will load the new Embed Form flyout
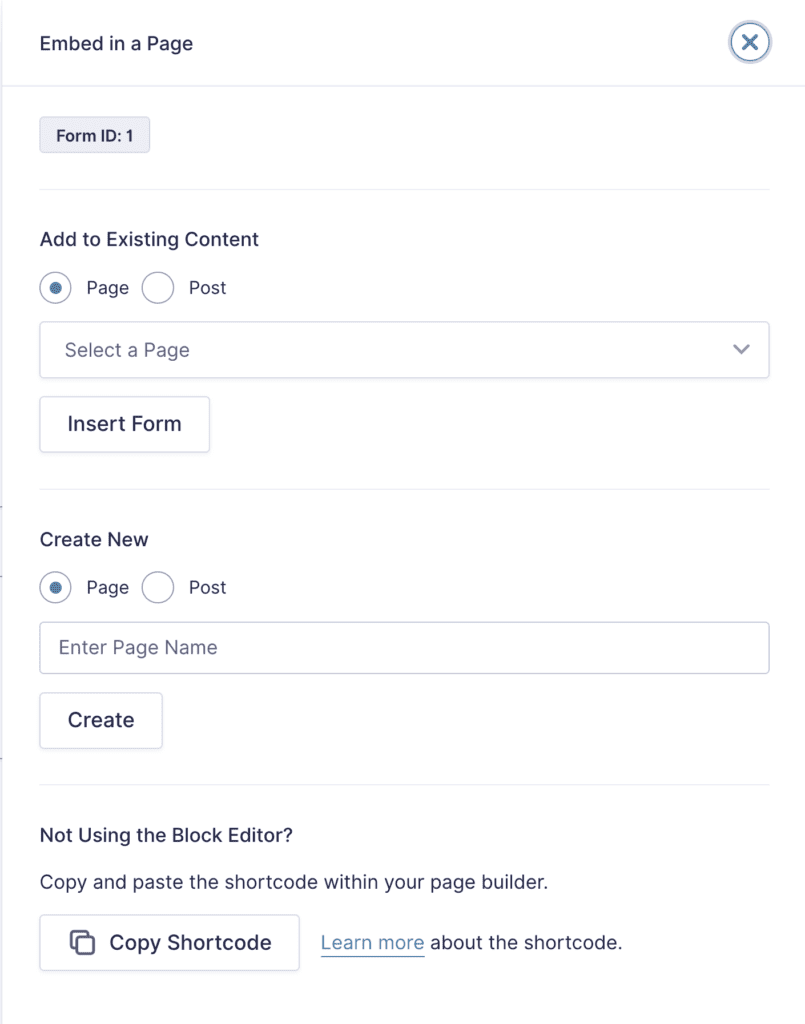
Embed Form Settings
| Setting | Description |
|---|---|
| Form ID | Current Form ID |
| Add to Existing Content | Select Page or Post to load the list of Posts or Pages on your website for selection. |
| Select a Page Drop Down | Select from a list of pages or posts on your website. |
| Insert Form Button | Click the button to Insert the current form into the Page or Post selected and load that page in the block editor. |
| Create New | Select Page or Post to create a new page or post for your form. |
| Enter a Page Name | Enter the name of the page or post to be created. |
| Create Button | Click the button to Create the new page or post and load the new page in the block editor. |
| Copy Shortcode Button | Clicking this button will copy the shortcode for the current form into your clipboard for pasting into your Page Builder. |
How to embed a Form in a New page or post
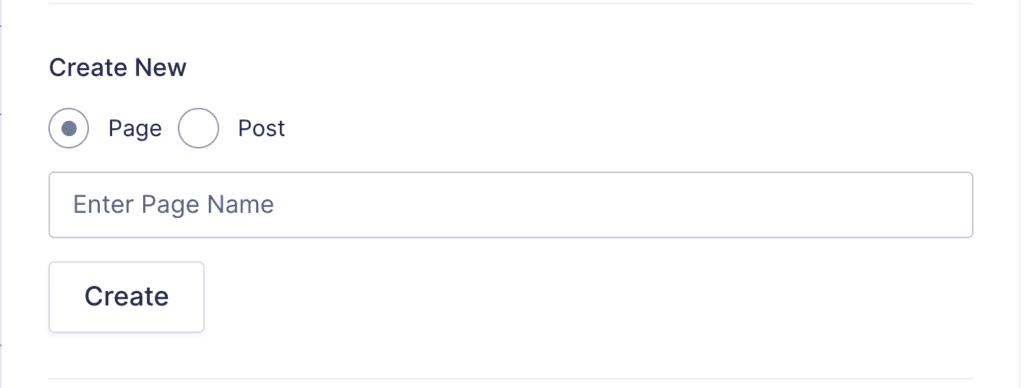
- Select Embed from the top bar. The Embed Form flyout will load.
- Select Page (or Post) under Create New.
- Enter the Page Name (or Post Name) in the input field.
- Click the Create button.
- New page will be created and your form will be embedded.
- From here you can modify Block settings for the form and publish the page.
How to Embed a form in an Existing page or post
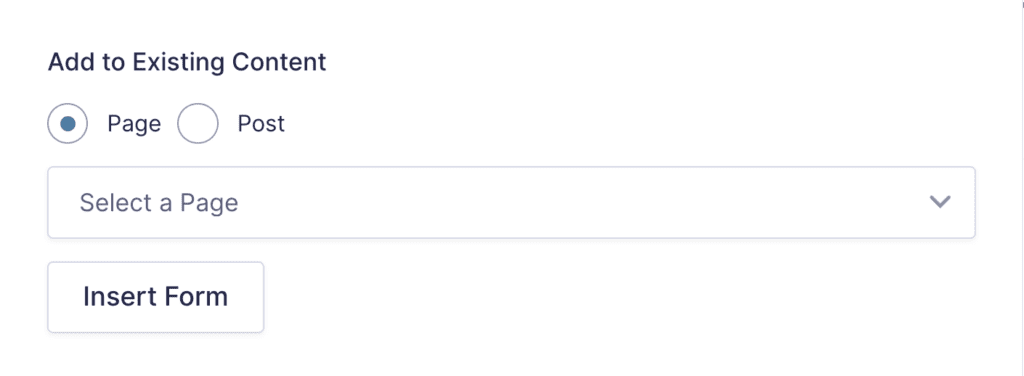
- Select Embed from the top bar of the Form editor. The Embed Form flyout will load.
- Select Page (or Post) under Add to Existing Content
- Select a Page from the list of pages on your website.
- Click the Insert Form button.
- Your page will be loaded and the Gravity Forms block will be highlighted under Embeds.
- Click the Gravity Form Block to embed your Form into the existing page or drag and drop the block into your existing content.
- From here you can modify Block settings for the form and Update the page to publish your form.
How to Copy a Shortcode with the Embed Form flyout
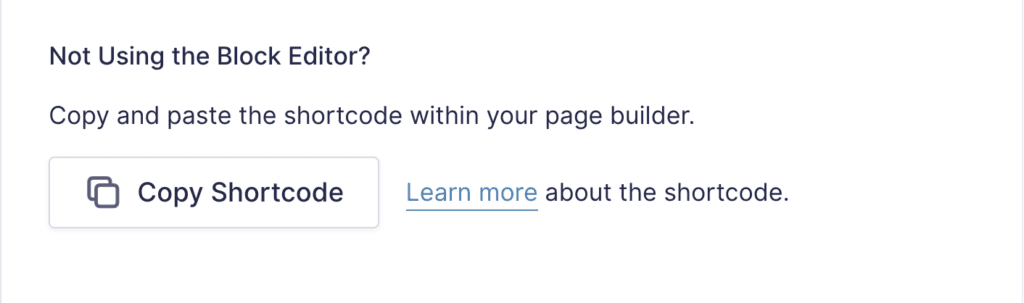
- Select Embed from the top bar of the form editor. The Embed Form flyout will load.
- Under “Not Using the Block Editor”, click the Copy Shortcode button.
- The shortcode for your form will copied to the clipboard so you can paste it into your page builder.
- You can also use the Embed Form flyout to create new custom post types or insert into existing custom post types. These can be activated using a filter (yet to be published).
Entries
Reviewing Entries (Form Submissions)
When a form is submitted, typically you will be notified via the notification system. If you need to review submissions outside of email, Gravity Forms collects all submissions within your WordPress admin dashboard.
In this article, we will show you how to review the submissions that arrive from your forms, referred to as “Entries”.
Accessing Entries
- Within your WordPress admin dashboard, click on Forms in the left side navigation menu.
- You should now see a list of all forms. To access the submissions for a form, hover over the form you want to access, and click on Entries.
- You should now see a list of all form submissions listed on the Entry list page.
- To view the details of a form submission, click on the specific entry.
Filtering Entries
When reviewing form submissions, it is also possible to filter them to get the exact data you’re looking for. This is especially helpful if you have a large number of submissions over time.
To filter, use the drop downs and text field at the top right.

Getting Started with Integrating your Form
To start integrating Gravity Forms, go to the AFI Menu > Add New .
Title: A default title will be auto added but you can rename it to a meaningful one. That can help you to quickly recognize the correct one when you have several integrations.
Form Provider: Select Gravity from dropdown. Please remember that Gravity Forms plugin must be installed and activated otherwise you won’t find it in dropdown.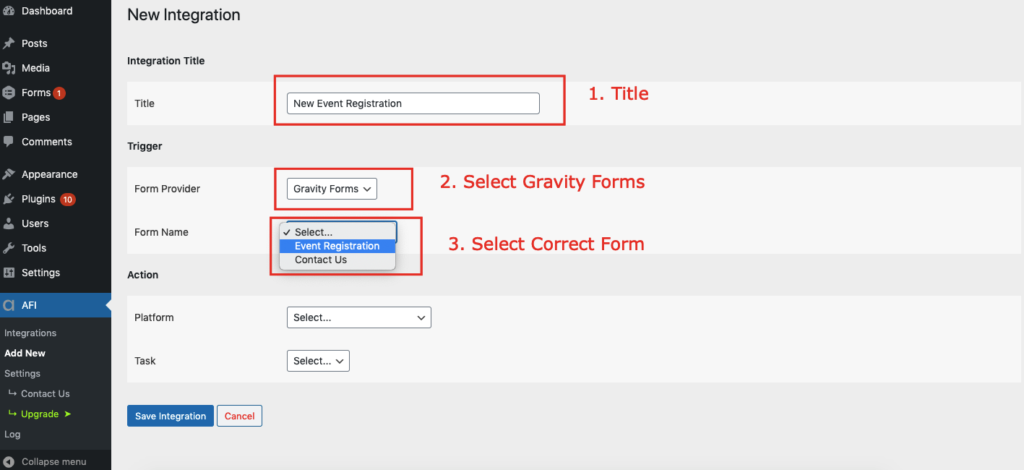
Form Name: A list of all forms created in Gravity Forms will be populated here. Select the one that you want to connect.
| Field | Supported | Output |
|---|---|---|
Single Line Text | Yes | Same as input |
Paragraph Text | Yes | Same as input |
Dropdown | Yes | By default selected label otherwise value (if set) |
Multi Select | Yes | By default comma-separated selected labels otherwise values (if set) |
Number | Yes | Same as input |
Checkboxes | Yes | By default comma-separated selected labels otherwise values (if set) |
Yes | Yes | By default selected label otherwise value (if set) |
Hidden | Yes | Value |
Name | Yes | Prefix, first name, middle name, last name, suffix separately |
Date | Yes | YYYY-MM-DD format |
Time | Yes | As selected format |
Phone | Yes | Same as input |
Address | Yes | Address line 1, address line 2, city, state, zip, country separately |
Website | Yes | Same as input |
Email | Yes | Same as input |
File Upload | Yes | Uploaded file link. Comma-separated if multiple |
List | Yes | JSON object array with key-value pair |
Consent | Yes | 1 (if marked) |
Post Fields | Yes | Value |
Platform: Now select the platform you want to connect to and finish the setup.

 Troubleshooting this feature? Click here
Related Articles
Gravity Forms User Registration - User Guide
For pricing and how to add to your website see at the bottom of the page. Create Your Form The first step in integrating the User Registration Add-On is going to be creating the form you would like to use. This can include existing forms. The only ...Gravity Forms User Registration - Feature
View Guide Links at the bottom of the page Installation 1 CRU CREDIT Setup (optional) 1 CRU CREDIT Ease Of Use Easy Want this feature? Request Here Purchase CREDITS Here Seamless Integration With the Gravity Forms User Registration Add-On you can ...Gravity Forms - Features
View Guide Links at the bottom of the page Installation 1 CRU CREDIT Setup (optional) 1 CRU CREDIT Ease Of Use Easy Want this feature? Request Here Purchase CREDITS Here Go where no form has gone before. Built-in features give you more control with ...Gravity Forms - Troubleshoot Guide
Form submissions not syncing to Mailchimp This troubleshooting guide is for standard forms such as Contact Us or any other form that captures data that syncs to Mailchimp. Requires Mailchimp/Form Add-On Integration If you are finding that new form ...Gravity Forms Zapier - User Guide
For pricing and how to add to your website see at the bottom of the page. Setup Create a REST API Key to Connect to Zapier To establish communication between your WordPress site and Zapier, you will need to create a Gravity Forms REST API 2 key to ...