For pricing and how to add to your website see at the bottom of the page.
Setup Google Analytics 4 / GA4 – Enhanced Ecommerce tracking
This article will show you how to setup ecommerce tracking for your Google Analytics 4 property with Google Tag Manager, WooCommerce and GTM4WP. GTM4WP uses the recommended event names of Google to send ecommerce actions like add to cart, product click or purchase. You do not need to setup anything in your Google Analytics 4 properties to be able to analyze ecommerce data. It will automatically pick up ecommerce events and data and show the results in monetization reports.
Step 0: pre-setup checks – Google Tag
In your Google Tag Manager container, you will first need to add a generic Google tag if you haven’t added it yet. This will store your Google Analytics 4 web stream ID (G-XXXXXXXXX) and every global attribute you set in it. It will also send the page_view event if you do not change the default options in the tag.
Start adding a new tag
Select Google tag
Enter your Google Analytics 4 measurement ID (also known as web stream ID)
It is recommended to store this ID into a variable of the type constant, as it will be needed in your event tracking tags as well
Depending on your setup in GA4 admin, you might want to enter the more generic Google Tag ID (GT-XXXX) which will also work, but in GA4 event tags, you will always need to enter the GA4 measurement ID
If you are unsure what other options need to be set in this tag, leave everything else in its default state
Enter a name at the top of the panel (in the example below you see: Google Tag – Pageview – All pages
Attach a trigger to the tag: you may chose the generic All pages trigger automatically created in every GTM container but you can also select the Initialization – All pages trigger to make sure the page view event is sent before all other events. Note: it is not guaranteed that this way all page view events will be the first during a page load but it will have a higher chance.
Save the new tag
Step 1: import GTM4WP Google Analytics 4 container template
Download the following Google Tag Manager GA4 container template (last updated: 2024. 01. 29)
On the Google Tag Manager UI, open Admin / Container / Import Container:
Select the previously downloaded file
We highly recommend to create a new workspace during the import process (enter a workspace name you wish)
Select the Merge import option
To stay on the safe side, select Rename conflicting tags, triggers, and variables
You should see only “New” items in the summary table. If you see modified or deleted items as well, check the details in consult with a Google Tag Manager expert if needed
Click the Confirm button to proceed
This import process will create the following new trigger in the workspace
Event – Ecommerce Events GA4: it will fire on all ecommerce events in your WooCommerce shop
The following variables will be created:
Ecommerce: helper variable to pull the most recent ecommerce data from the data layer
Ecommerce Items: returns the most recent product data in the data layer. You can use this variable in a Google Ads Remarketing tag to populate dynamic remarketing data
Ecommerce Transaction ID: the order ID on the order received page. You can use this variable in other tags where you need to transmit the ID of the order just placed on your site
Ecommerce Value: the total value of the order on the order received page. You can use this variable in other tags where you need to transmit the value of the order just placed on your site
Ecommerce Tax: the total tax value of the order on the order received page
Ecommerce Affiliation: usually empty, could include any affiliate partner name in the future
Ecommerce Shipping: the total shipping cost of the order on the order received page
Ecommerce Coupon: it includes all coupon codes in a comma separated list that has been redeemed during checkout (variable populated only on the order received page)
Ecommerce Currency: the currency used in the last ecommerce action. You can use this variable in other tags where you need to transmit the currency of the order just placed on your site
It will also activate the built in Event variable. These imported variables will not be needed to send ecommerce data for Google Analytics however they will be useful to fuel other tags with the same data.
The following tag will be created:
GA4 – Event – Ecommerce events: fires using the trigger described above, uses the event name of the last ecommerce action using the recommended retail event names of Google. Includes all the required ecommerce parameters using the variables listed above
Step 2: complete the newly created ecommerce event tag
Open the “GA4 – Event – Ecommerce events” tag that has been just created in Step 1
Either enter your GA4 measurement ID or select a variable that will hold this ID while the container is loaded into your website
Do NOT enter your Google Tag ID here even if you did this in your Google Tag
Make sure the message next to the measurement ID says Google tag found in this container!
Save the changes
Publish everything.
How to access a Data Layer variable
Follow the steps below to access any of the Data Layer variables this plugin can provide:
Click on the Variables link in the left pane of Google Tag Manager:
Scroll down to see the New button:
Enter a descriptive name and click on the grey circle icon:
Select Data Layer Variable from the list:
Enter the name of the Data Layer variable you wish to access:
I suggest to leave the Version parameter to Version 2
You may wish to enter a Default value which will be used by Google Tag Manager when there is no value found from my plugin (for example the search term is only included when the user is on the search result page) but this is usually not necessary
What is in the dataLayer when using this WordPress plugin?
If you activate certain plugin features, you automatically get your data into the dataLayer which can be used inside Google Tag Manager to setup variables and tags with lots of data.
In this section you can review dataLayer variable names generated by this plugin so that you can easily create your Google Tag Manager implementation.
Data about the currently viewed site in a multisite environment
How to enable site data variables?
Those variables are disabled by default, you will need to set the corresponding checkbox on the options page:
Go to Settings / Google Tag Manager on your WordPress admin area
Click on the Basic data tab
Click on the Site subtab
Put a check mark into the boxes shown on that page
Enabling this will allow you to access the following Data Layer Variables on all pages:
siteID
This will include the ID of the currently shown blog in a WordPress Multisite environment.
siteName
This will include the name of the currently shown blog in a WordPress Multisite environment.
Data about the logged in user on the site
This plugin can add several Data Layer variables which enable you to control your tags and triggers based on whether the user is logged in and with what user level.
How to enable visitor data?
This feature is disabled by default which means that you will need to enable it:
Go to Settings / Google Tag Manager on your WordPress admin area
Click on the Basic data tab
Click on the Visitors subtab
Put a check mark into the boxes shown on that page
visitorId
This variable will include the internal ID of the logged in user. The primary use of this variable is to setup User-ID tracking in Google Analytics. This value is not included in the Data Layer if there is no logged in user even if you enabled the feature on the settings page of this plugin.
visitorLoginState
This is a very simple Data Layer variable: the value logged-in means someone is logged in to your site regardless of the user level. The value logged-out means that an anonymous user is on your site.
visitorType
You can use this variable to identify the user level (aka. user role) of the logged in user.
If there is no logged in user on your site, the value visitor-logged-out will indicate that state. If a WordPress user is logged in, the name of the role of the logged in user will be included. For admin this will be administrator, for lower level users this can be something else like editor.
Data about the currently viewed single page/post
How to enable page/post variables?
Those variables are partly enabled by default, you will need to set the corresponding checkbox on the options page:
Go to Settings / Google Tag Manager on your WordPress admin area
Click on the Basic data tab
Click on the Posts subtab
Put a check mark into the boxes shown on that page
Enabling this will allow you to access the following Data Layer Variables on all pages:
pageTitle
This will include the title of the page usually shown on the tab of the browser. Note that this value will be generated on the server during page generation using the wp_title() function. This is usually the value of the page title in the browser but in some cases this can differ from what you see in your browser.
pageAttributes
This will include a JavaScript Array with the tags associated with the currently visited page/post.
pageCategory
This will include a JavaScript Array with the categories associated with the currently visited page/post.
pagePostAuthor
This will include the display name of the author of the currently visited page/post. The value will be a simple string.
pagePostAuthorID
This will include the internal ID of the author of the currently visited page/post. The value will be an integer number.
The pagePostDate variable will include the date of the currently visited page/post in the format set in the settings section of WordPress. The other 3 variables will only include a specific part of the same date as a number with a leading 0 for single numbers (04 for April for example)
pagePostType, pagePostType2
The first variable will include the value returned by the get_post_type() WordPress function. Can be page or post or the name of any custom post type on your site. The special value frontpage will be set when the user is on the frontpage of your website and bloghome if the user is on the main blog page set in the settings section of WordPress.
The second variable will be almost the same but with a prefix to differentiate certain page types:
single-
category-
tag-
tax- (for custom taxonomy pages)
author-
year-
month-
day-
date-
time-
Data about site search
How to enable this feature?
This feature is disabled by default which means that you will need to enable it:
Go to Settings / Google Tag Manager on your WordPress admin area
Click on the Basic data tab
Click on the Search subtab
Put a check mark into the box shown on that page
Enabling this will allow you to access the following Data Layer Variables on all pages:
siteSearchTerm
Includes the term the user was searching for on the search results page. Usually it is not needed to use this to track internal site search in Google Analytics as it can be tracked easily by adding the s parameter in Analytics.
You may want to use this Data Layer variable to track certain micro conversions or remarketing conditions.
siteSearchFrom
Includes the source page of the search. For example if you include a search box in one of your sidebar widgets, this Data Layer variable will include the URL of the page where the user entered the search term.
siteSearchResults
This variable will include the number of results on the search results page. You may want to use this to track empty result pages along with search terms so that you can see what information users are looking for that can not be found on your site.
Data about the browser of a user
Please note: this feature is still in beta. If you are using it, please let us know whether it works for you as expected.
How to enable browser variables?
This feature is disabled by default which means that you will need to enable it:
Go to Settings / Google Tag Manager on your WordPress admin area
Click on the Basic data tab
Click on the Browser/OS/Device subtab
Put a check mark into the boxes shown on that page
Enabling this will allow you to access the following Data Layer Variables on all pages.
Note: you do not need this feature to be enabled to collect browser/os/device data with Google Analytics. You may want to use this feature to pass such data towards other 3rd party systems or to limit certain tags in your Google Tag Manager container to only certain browsers/operating systems/devices
browserName
The name of the browser your visitor is currently using to view your site. Example values are: Chrome, Firefox, etc.
browserVersion
The full version number of the browser, including minor and build numbers. Example value could be:Â 48.0.2564.103 (this is an earlier Chrome version number)
browserEngineName
The name of the engine your browser is currently using to render the webpage. For Chrome users this will be mostly Blink, for Firefox users Gecko, etc.
browserEngineVersion
The version of the engine your browser is currently using to render the webpage.
Data about the operating system used by a user
Please note: this feature is still in beta. If you are using it, please let us know whether it works for you as expected.
How to enable operating system variables?
This feature is disabled by default which means that you will need to enable it:
Go to Settings / Google Tag Manager on your WordPress admin area
Click on the Basic data tab
Click on the Browser/OS/Device subtab
Put a check mark into the boxes shown on that page
Enabling this will allow you to access the following Data Layer Variables on all pages.
Note: you do not need this feature to be enabled to collect browser/os/device data with Google Analytics. You may want to use this feature to pass such data towards other 3rd party systems or to limit certain tags in your Google Tag Manager container to only certain browsers/operating systems/devices
osName
This will include the name of the operating system that your user is currently using to run the browser. Example values are: Windows, Android, iOS, etc.
osVersion
This will include the version of the operating system that your user is currently using to run the browser. Example values are: 8.1 (for Windows), 4.4.2 (for Android), etc.
Data about the device of a user
Please note: this feature is still in beta. If you are using it, please let us know whether it works for you as expected.
How to enable device variables?
This feature is disabled by default which means that you will need to enable it:
Go to Settings / Google Tag Manager on your WordPress admin area
Click on the Basic data tab
Click on the Browser/OS/Device subtab
Put a check mark into the boxes shown on that page
Enabling this will allow you to access the following Data Layer Variables on all pages.
Note: you do not need this feature to be enabled to collect browser/os/device data with Google Analytics. You may want to use this feature to pass such data towards other 3rd party systems or to limit certain tags in your Google Tag Manager container to only certain browsers/operating systems/devices
deviceType
Here you can see what type of device the user is currently using to browse your website. Example values are: desktop, mobile, tablet
deviceManufacturer
It is usually empty for desktop devices as browsers do not pass the name of the device (laptop or desktop PC) the user is currently using. On mobile or tablet devices however this will include the name of the company who manufactured the device. Example values are LG, Apple, Samsung, etc.
deviceModel
It is usually empty for desktop devices as browsers do not pass the name of the device (laptop or desktop PC) the user is currently using. On mobile or tablet devices however this will include the name of the device. Example values are Nexus 5, Galaxy S7, iPhone 6s, etc.
Data about the number of posts on a page or taxonomy
How to enable page count feature?
This feature is disabled by default which means that you will need to enable it:
Go to Settings / Google Tag Manager on your WordPress admin area
Click on the Basic data tab
Click on the Posts subtab
Put a check mark into the boxes shown on that page
Enabling this will allow you to access the following Data Layer Variables on all pages:
postCountOnPage
This variable will include the number of posts shown on the current page. This will be a number that is lower or equals to the numbers of posts per page in the settings of WordPress.
postCountTotal
This variable will include the number of posts shown in the current taxonomy on all pages of it. Use this to track empty taxonomy pages so that you can make sure every content is visible that has to be public.
Data about the weather conditions around the current visitor
Please note: this feature is experimental. There is no guarantee that it will always work and provide the proper information. If you are using it, please let us know whether it works for you as expected.
How to enable weather data?
This feature is disabled by default which means that you will need to enable it:
Go to Settings / Google Tag Manager on your WordPress admin area
Click on the Basic data tab
Click on the Weather data subtab
Put a check mark into the boxes shown on that page
Enabling this will allow you to access the following Data Layer Variables on all pages:
weatherCategory
This will include the group of weather parameters: Rain, Snow, Extreme, Clear, etc.
weatherDescription
This will include the exact weather condition within the group: Sky is clear, etc.
weatherTemp
This will include a float number with the current temperature around the current visitor. To set whether to show this number in Celsius or Fahrenheit, go to the plugin settings and set the corresponding radio button.
weatherPressure
This will include an integer number with the current pressure around the current visitor.
weatherWindSpeed
This will include a float number with the current wind speed around the current visitor.
weatherWindDeg
This will include an integer number with the current wind direction in degrees around the current visitor.
How to exclude admin users from being tracked
One of the most used features of every Analytics plugin is the ability to exclude logged in and especially admin users from being tracked in Google Analytics or in other products.
As Google Tag Manager goes beyond being a tool to implement Google Analytics, users are able to exclude not only Google Analytics tags but eventually every tag that is included in Google Tag Manager. Using this, your activities on your site will not be included. You will not be included in any remarketing audience and your test conversions will be not counted in your ad accounts or analytics reports.
Why not block the entire GTM container if you wish to exclude admin users?
GTM4WP does not include any feature which prevents the GTM container code from being deployed on each of your pages. Instead of it gives you some fancy Data Layer variables which can help you to create exception triggers. This will give you the ability to exclude admin users.
There can be some tags and scripts in your container that needs to fire even if you are currently testing your site. Therefore it is better to use GTM triggers than blocking the whole container from loading.
Remember: we have to describe the case when you do NOT want to trigger certain tags. This means you have to think of your trigger in the reverse way. When the trigger conditions are being met during page load or other interactions, connected tags will not fire.
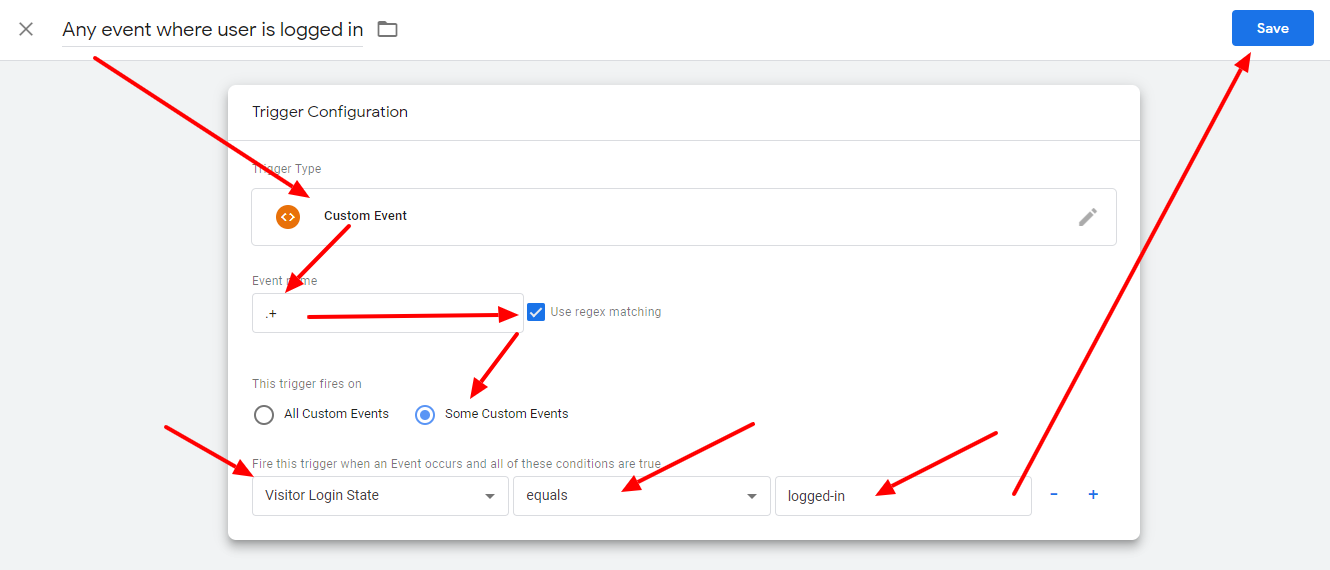
Simple case: exclude everyone logged in to your site
visitorLoginState is a very simple Data Layer variable: the value “logged-in” means someone is logged in to your site, regardless of the user role. The value “logged-out” means that an anonymous user is currently on your site. You can read the value using a Data Layer variable in GTM:
In many cases, a logged in user means an admin or an editor on the site which is enough to create a trigger:
It is important to use the Custom Event trigger type and to enter the .+ regular expression in the Event name input field. This will make sure that you are not blocking just the tags firing during page load, but the same event is also applicable to add to cart or other events that fire after the page has been loaded. The .+ regular expression is kind of an “every event” rule that will match all events on the site, including page load.
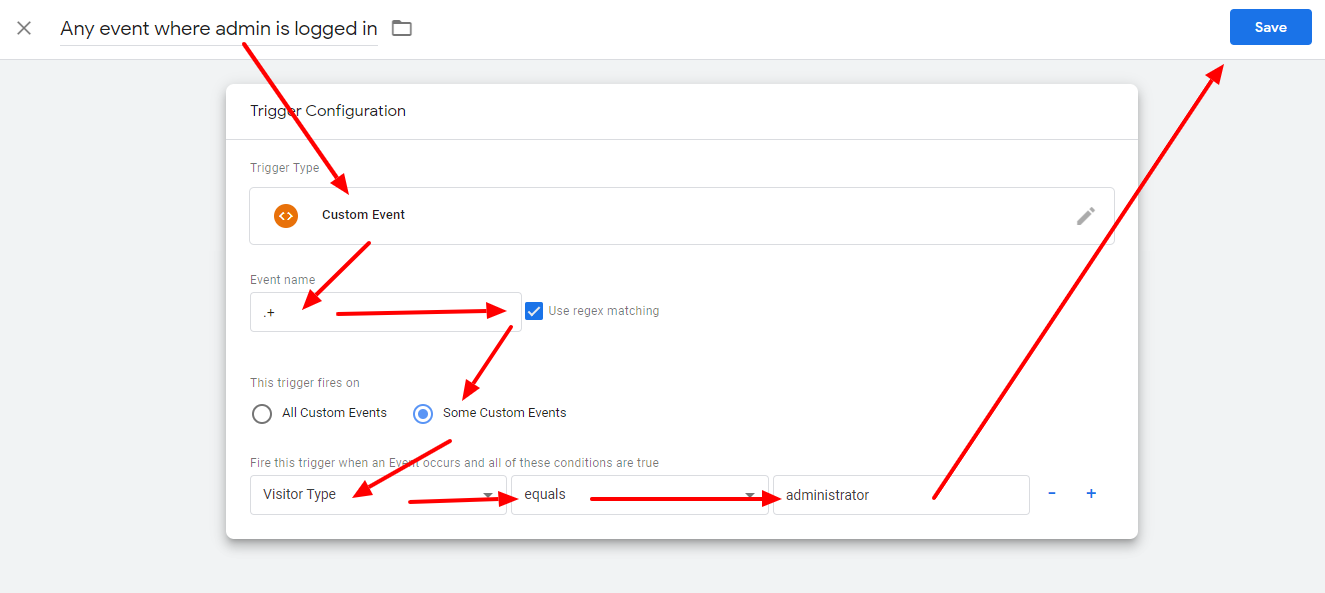
Exclude admin users or other user roles
There are cases where this is trigger not enough. Especially when you are using WooCommerce where your customers are being logged in as special WordPress users without access to the admin area. In this or any similar case you will need to identify the user role of the logged in user.
The Data Layer variable visitorType can help you to get this info. Create a new variable in GTM to access the value:
If there is no logged in user on your site, the value “visitor-logged-out” will indicate that state. If a WordPress user is logged in, the name of the role of the logged in user will be included. For admins this will be “administrator”, for lower level users this can be something else like “editor”. Using this info, you can create a trigger that matches only a specific user role:
If you want to exclude other user roles you can use ‘matching regex (ignore case)’ instead of ‘equals’ and you can list the excluded roles using pipes: administrator|editor|whatever-userrole
Exclude but not while debugging
You may want to use a slightly modified trigger to exclude admins. If you are logged in but to check the tracking codes in your Google Tag Manager container, your goal is to allow tags to fire to see what is happening.
To achieve this, you should enable the Debug Mode built in variable in Google Tag Manager and include it in the trigger:
This built in variable will evaluate to true while you turn on preview mode in Google Tag Manager and you open your website. Now you can include one more rule in your triggers:
Add your exception trigger to tags
Now you only have to add this newly created trigger to each of your tags as an exception trigger:
CRU's policy is for all tagging, tracking and pixels to be managed on your Google Tag Manager account. For more information please see here. As CRU does not manage or support Google Services, clients' are expected to either manage this themselves or ...
Google Tag Manager allows you to delegate access to other users at the account and container level. At the account level, users can be granted the ability to view or administer the account. At the container level, users can be granted read, edit, ...
View Guide Links at the bottom of the page Installation 1 CRU CREDIT Setup (optional) Please request as this is a service that may require more than a simple set up Ease Of Use Easy Want this feature? Request Here Purchase CREDITS Here Main features ...
We have had an increased request for pixels and tracking codes to be added to client websites to track both Google, Facebook and the like. As we continue to improve our website development operations and implement further controls to ensure site ...
Check the table of contents in this article for each troubleshooting topic How to check if you have connected your Google Analytics Account Once you have gone through the Wizard, you can confirm you have connected the account.You can also reconnect, ...


