How to find your Google Tag Manager Code
CRU's policy is for all tagging, tracking and pixels to be managed on your Google Tag Manager account. For more information please see here.
As CRU does not manage or support Google Services, clients' are expected to either manage this themselves or utilise an SEO agency. The good news is, once CRU has added your Google Tag Manager code to your website, all management of tagging/tracking and pixels can be done directly from your GTM account.
In order to provide CRU with the necessary GTM code, please follow this guide:
STEPS
Implement GTM on WordPress manually
Step-1 Navigate to https://tagmanager.google.com and then log in using your Google username and password.
Step-2 Click on the ‘Create Account’ link:
Step-3 Enter your account name (you can use your company name as the account name) and then click on the ‘Continue’ button:
Step-4 Now click on the drop-down under ‘Country’ and select your country.
This code is made up of two parts. The first part goes into the head section of your web pages and the second part goes into the body section.

Submit these codes to CRU Support ensuring you have labelled which one is for the <head> and which is for the <body> of your website.

Step-8: Navigate back to your GTM account and then click on the ‘Submit’ button:

Step-9: Enter the version name and then click on the ‘Publish’ button to publish your container:

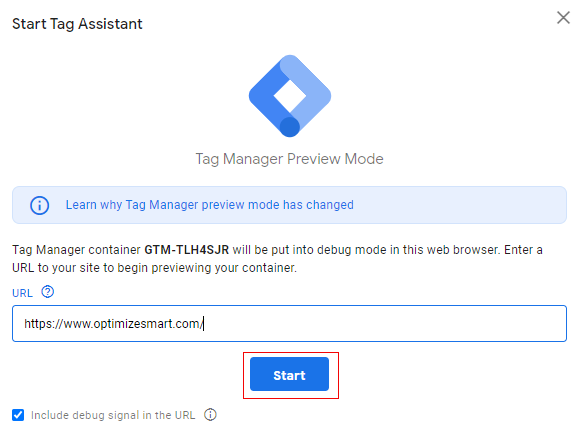
Step-10: Click on the ‘Workspace’ link (in the top navigation) and then click on the ‘Preview’ button:

It will open a new window, provide any URL of your website and click on ‘Start’.

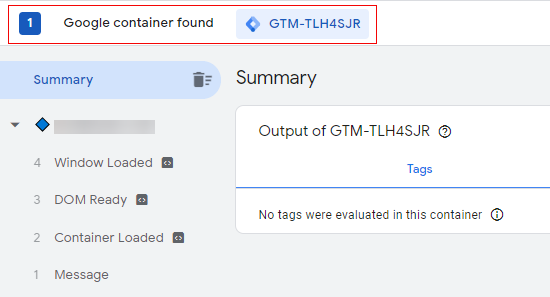
Step-11: Another tab with the URL you have specified will open. Now navigate back to the GTM preview window. You should now see the below screen with a ‘Google container found’ notification along with the GTM container ID.

If you see the preview window with the above notification, then it means the Google Tag Manager is installed on your website.

Related Articles
GTM for Wordpress - User Guide
For pricing and how to add to your website see at the bottom of the page. Setup Google Analytics 4 / GA4 – Enhanced Ecommerce tracking This article will show you how to setup ecommerce tracking for your Google Analytics 4 property with Google Tag ...SEO, Google Analytics, Pixel Tracking and Tag Manager Policy
We have had an increased request for pixels and tracking codes to be added to client websites to track both Google, Facebook and the like. As we continue to improve our website development operations and implement further controls to ensure site ...GTM for Wordpress - Feature
View Guide Links at the bottom of the page Installation 1 CRU CREDIT Setup (optional) Please request as this is a service that may require more than a simple set up Ease Of Use Easy Want this feature? Request Here Purchase CREDITS Here Main features ...GTM for Wordpress - Troubleshooting Guide
Google Tag Manager allows you to delegate access to other users at the account and container level. At the account level, users can be granted the ability to view or administer the account. At the container level, users can be granted read, edit, ...Google Product Feed - User Guide
For pricing and how to add to your website see at the bottom of the page. Setting up your feed in Google Merchant Centre Configure your Google Merchant Centre account The first thing to do, before you import your feed for the first time is to make ...