Rank Math SEO - Troubleshoot Guide
How to check if you have connected your Google Analytics Account
To check if you have connected the correct account
Reconnecting Your Account
Do I need to Install Google Analytics Tracking Code?
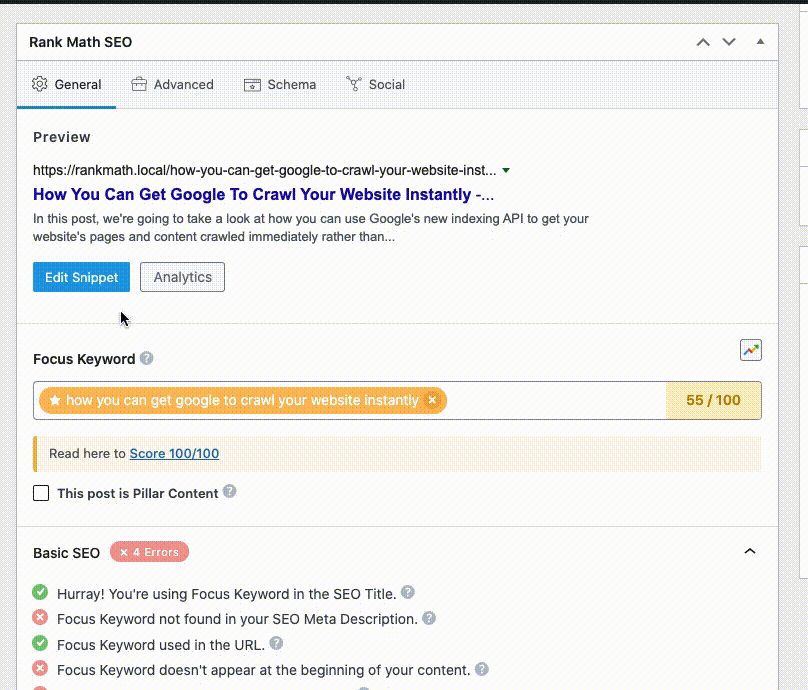
Using Google Analytics 4 Property with Rank Math Analytics
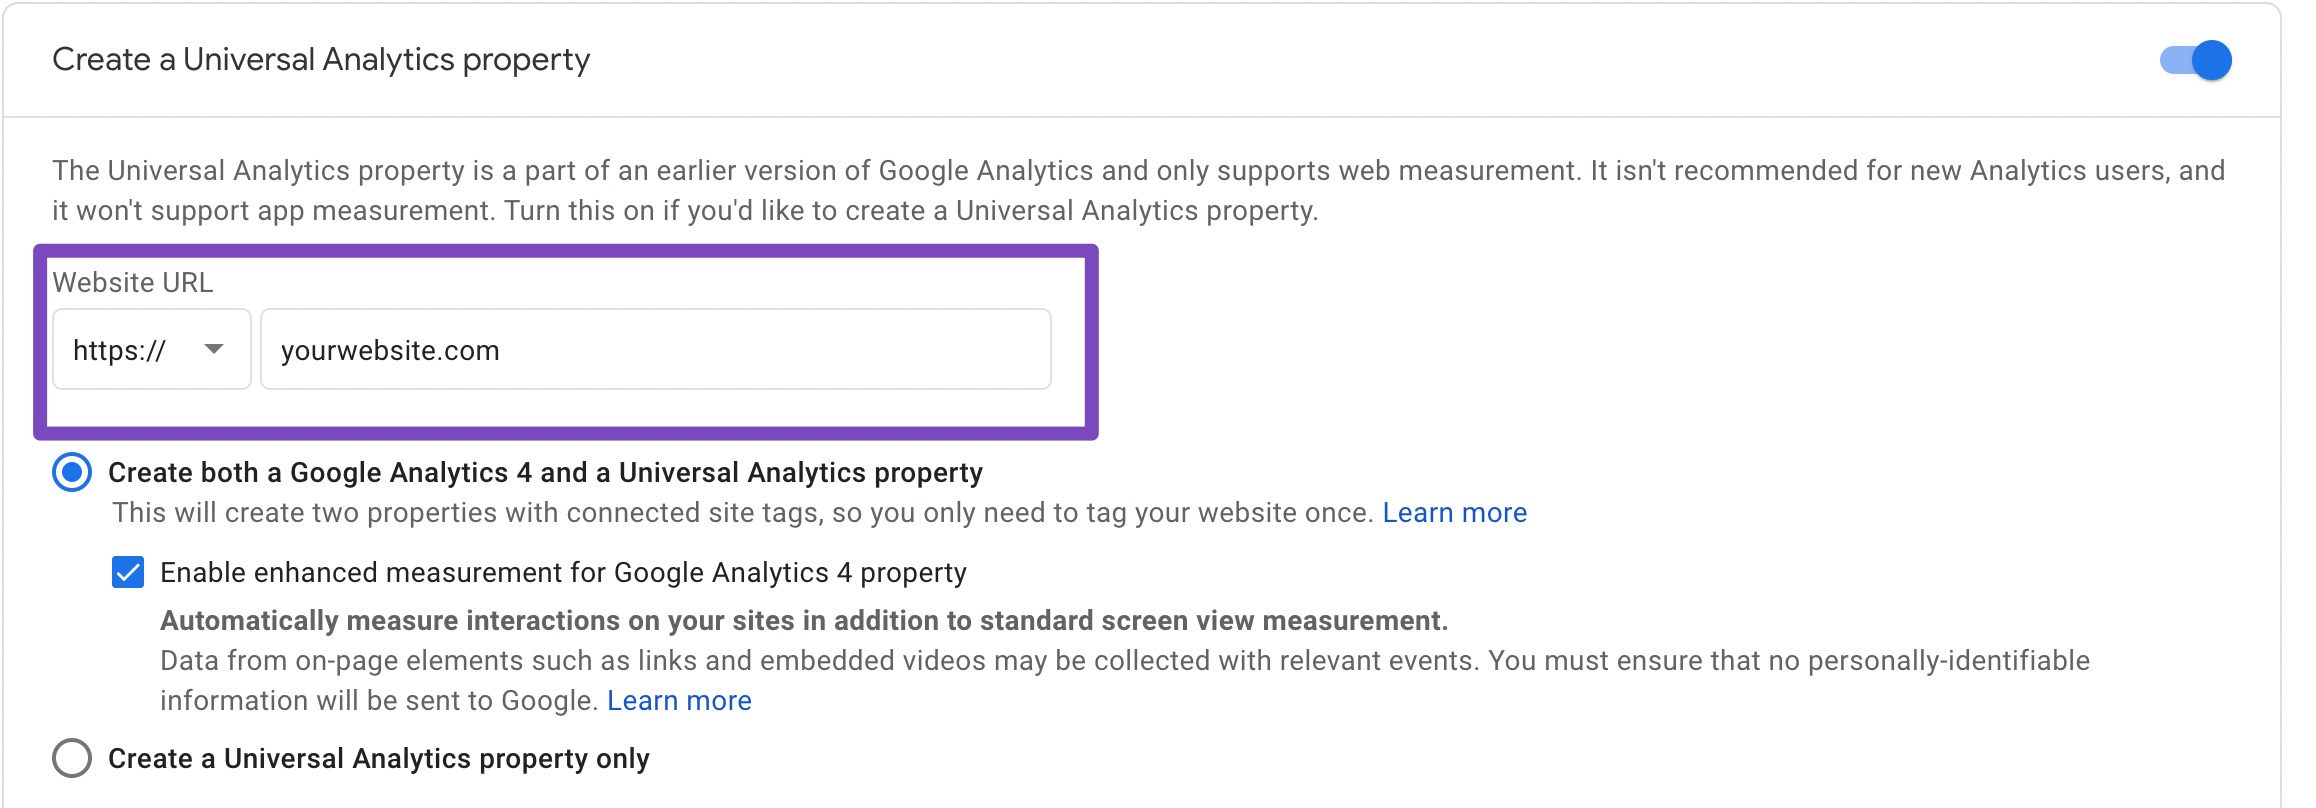
How to create a Universal Analytics property (GA3) in Google Analytics?
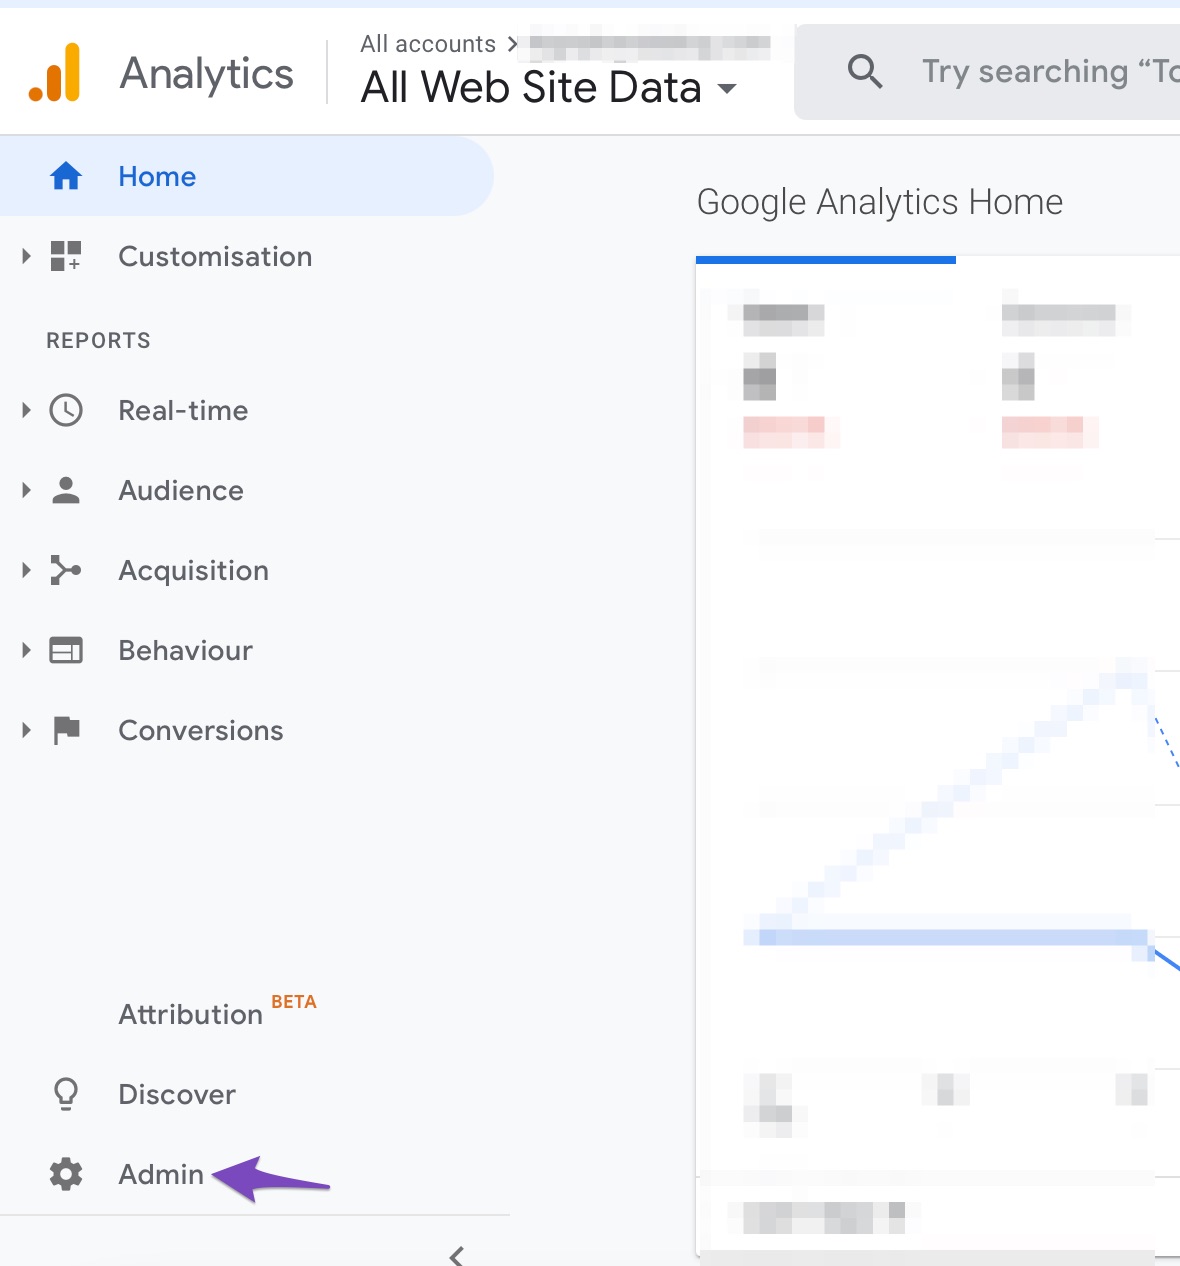
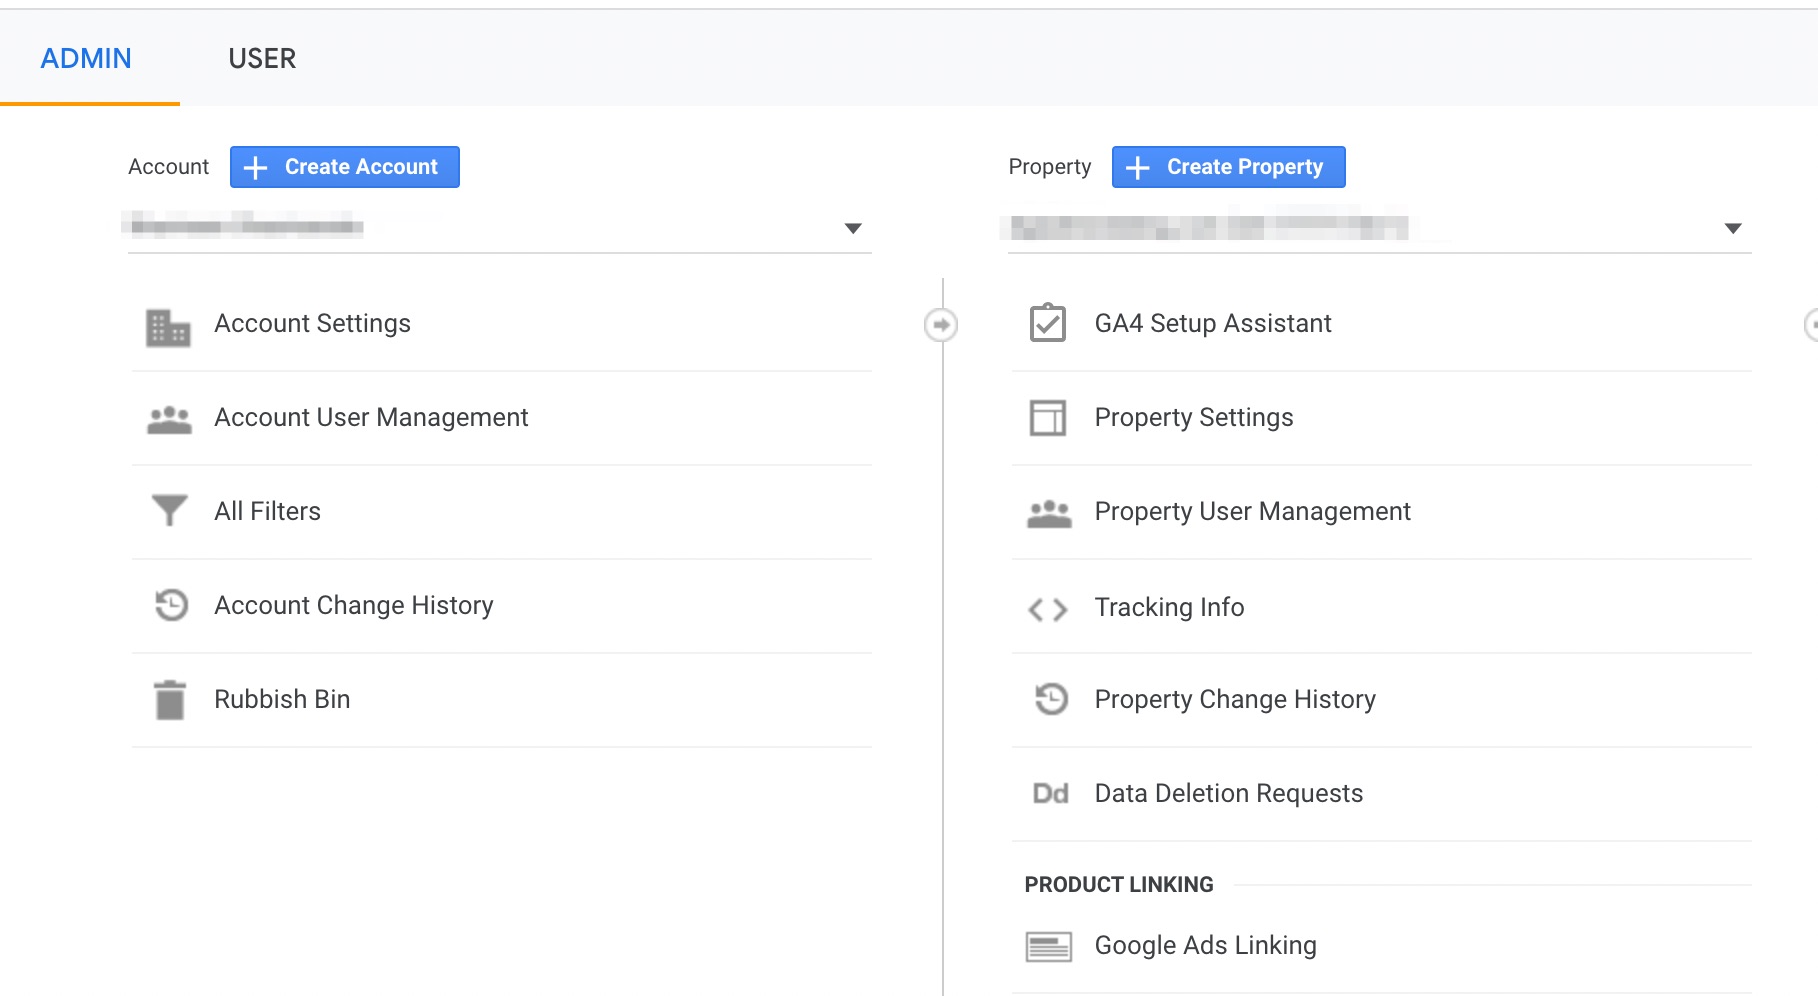
1) Login to your Google Analytics account & click on Admin (gear icon). And then click on Create Property button

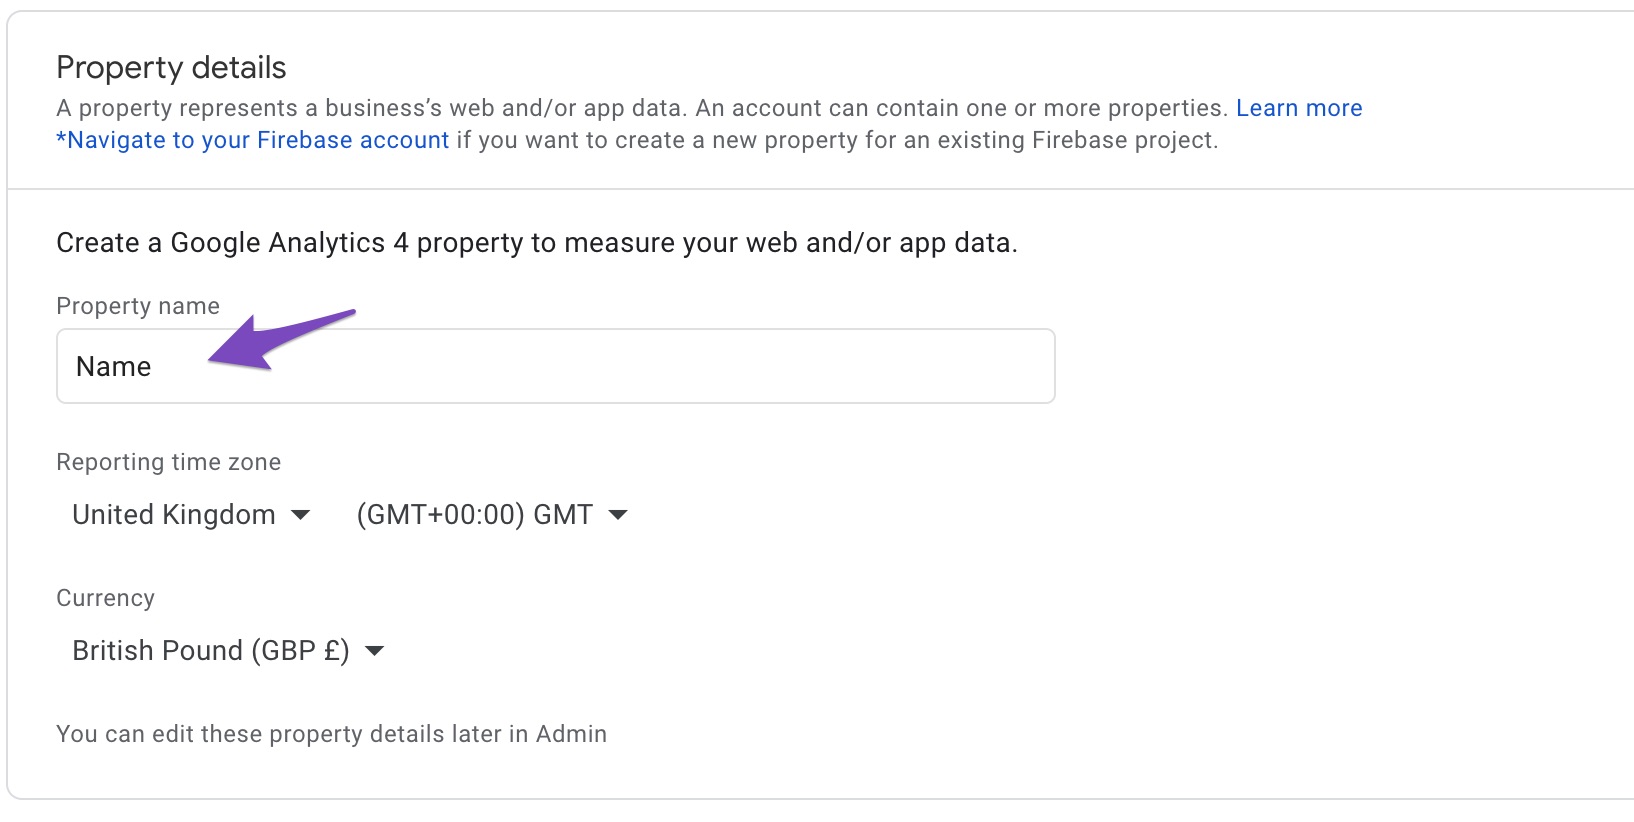
2) Give a name for your new property under the Property details sections. Now click on Show advanced options. This is your unlock key to create a Universal Analytics property 😀


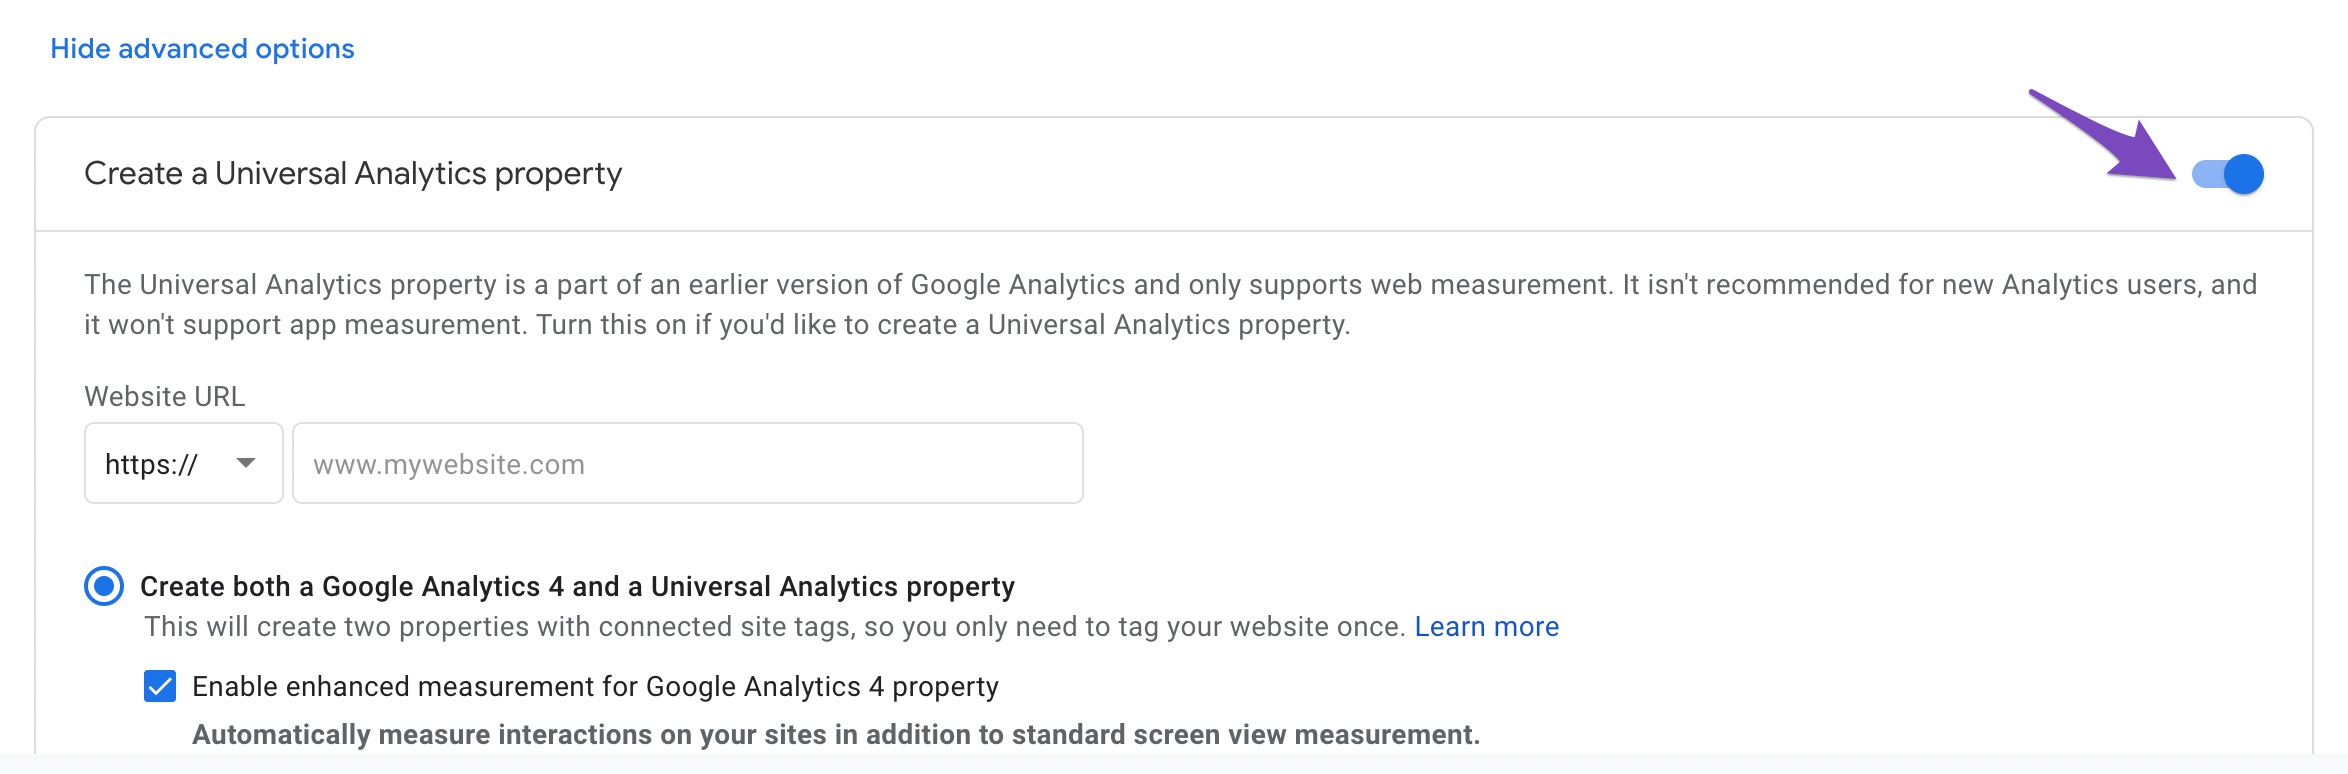
4) Now you have the choice to create either a Universal Analytics property alone or create both UA & GA4 properties together.

Now press Next & continue with the wizard. The next steps are pretty self-explanatory.
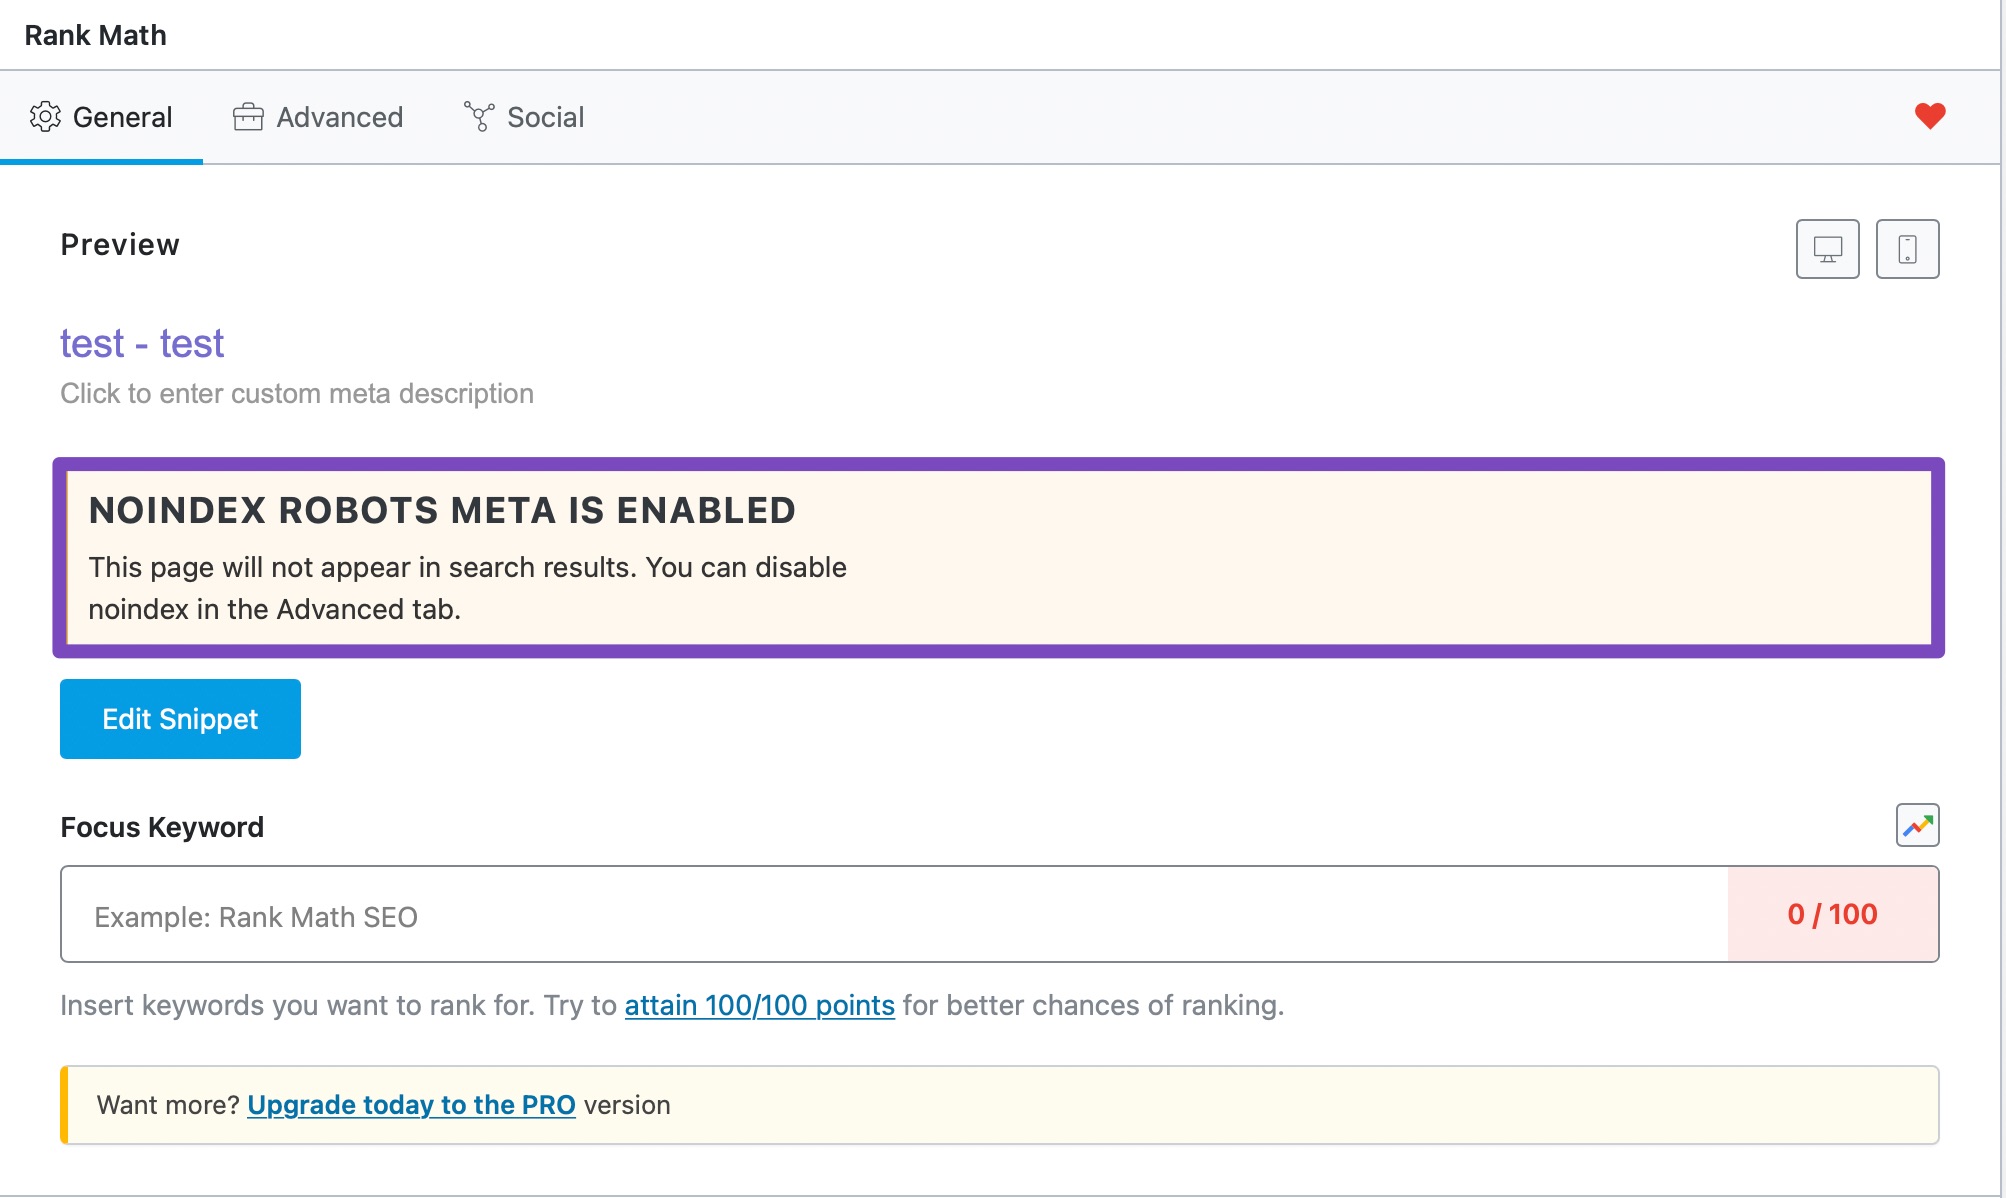
How to prevent specific product/post on search engine results
- On edit product page, scroll down to Rank Math SEO section and click Advanced tab.
- Tick No Index checkbox and update the product.
This will prevent specific product or post from appearing on search engine results
Can I NoIndex PDF Files Using an SEO Plugin?
Why Noindex Robots Meta Directive Cannot Be Added to PDF Files?
How to Prevent PDF Files from being Crawled?
Raise a Search Removal Request
Raising a removal request in Google Search Console is perhaps the quickest way to get your PDF files dropped from the index, and to raise a request, follow the exact steps we’ve discussed below.
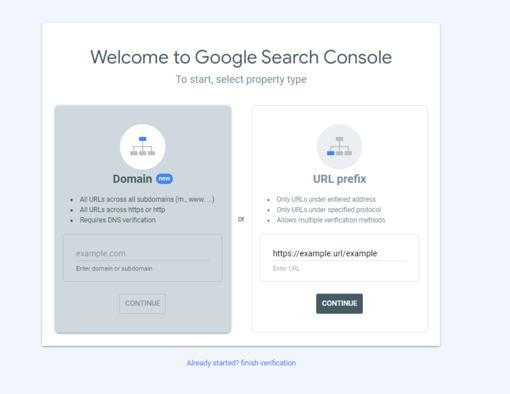
Open Search Console
Head over to Google Search Console and then log in to your account. If you haven’t already connected and verified your website in Google Search Console, then you can let Rank Math do that for you.
If you’ve multiple accounts connected with your Google Search Console, then make sure to choose the correct property.
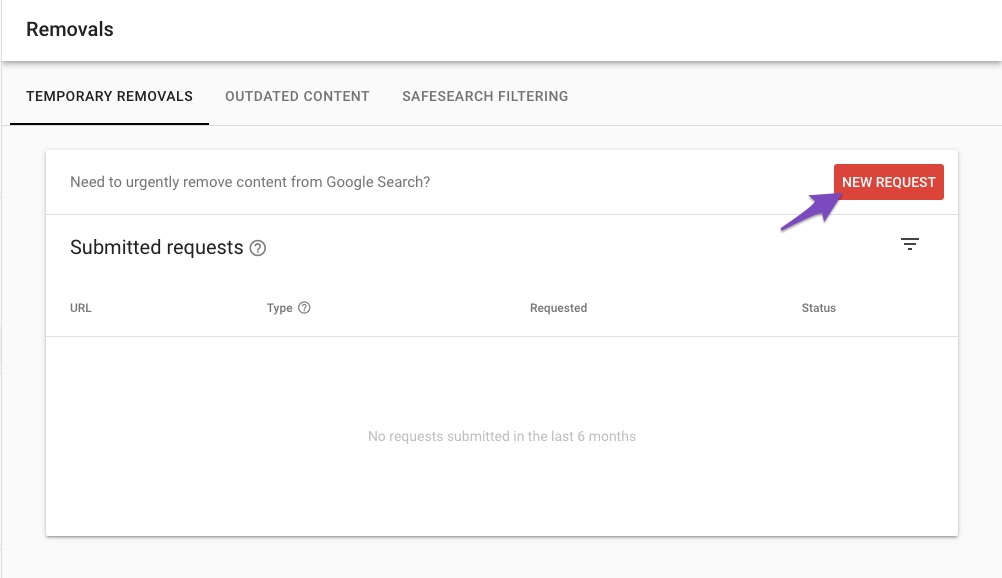
Navigate to Removals Section
From the left sidebar, click the Removals section.
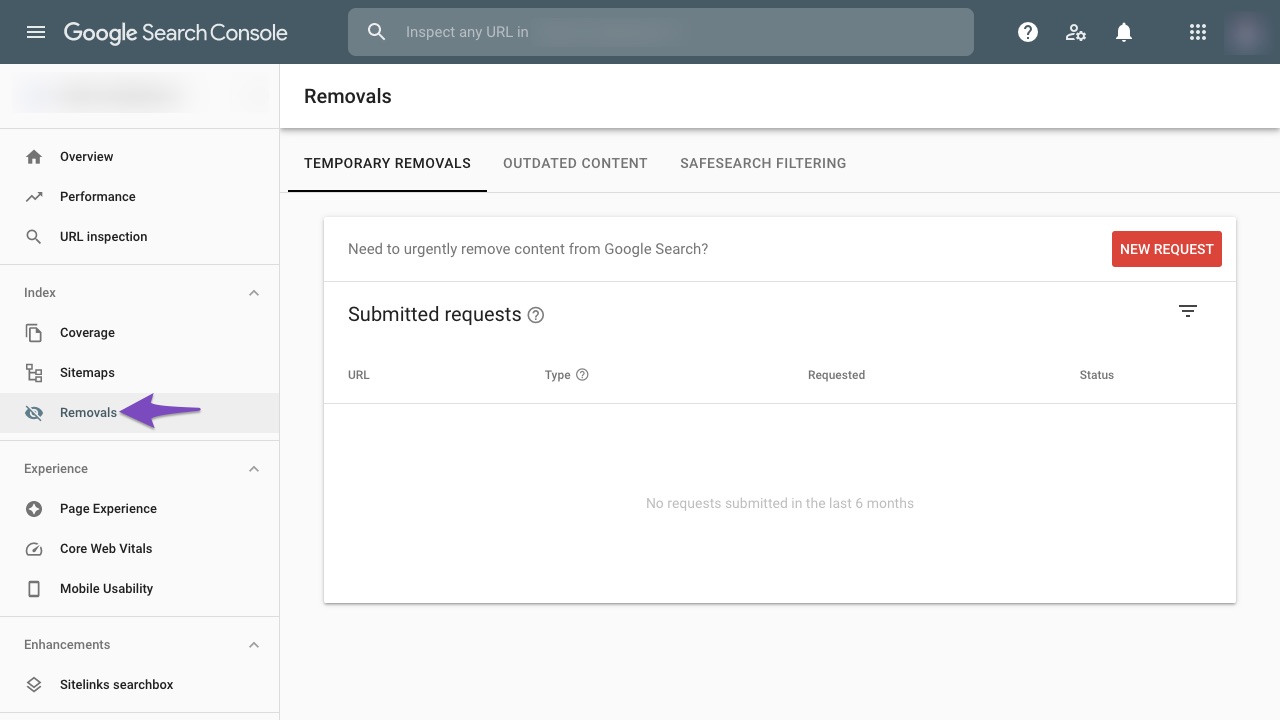
Choose New Request
On the Removals page, click New Request.
Submit New Request
In the popup that appears on the screen, enter the PDF URL that you want to remove and then click Next.
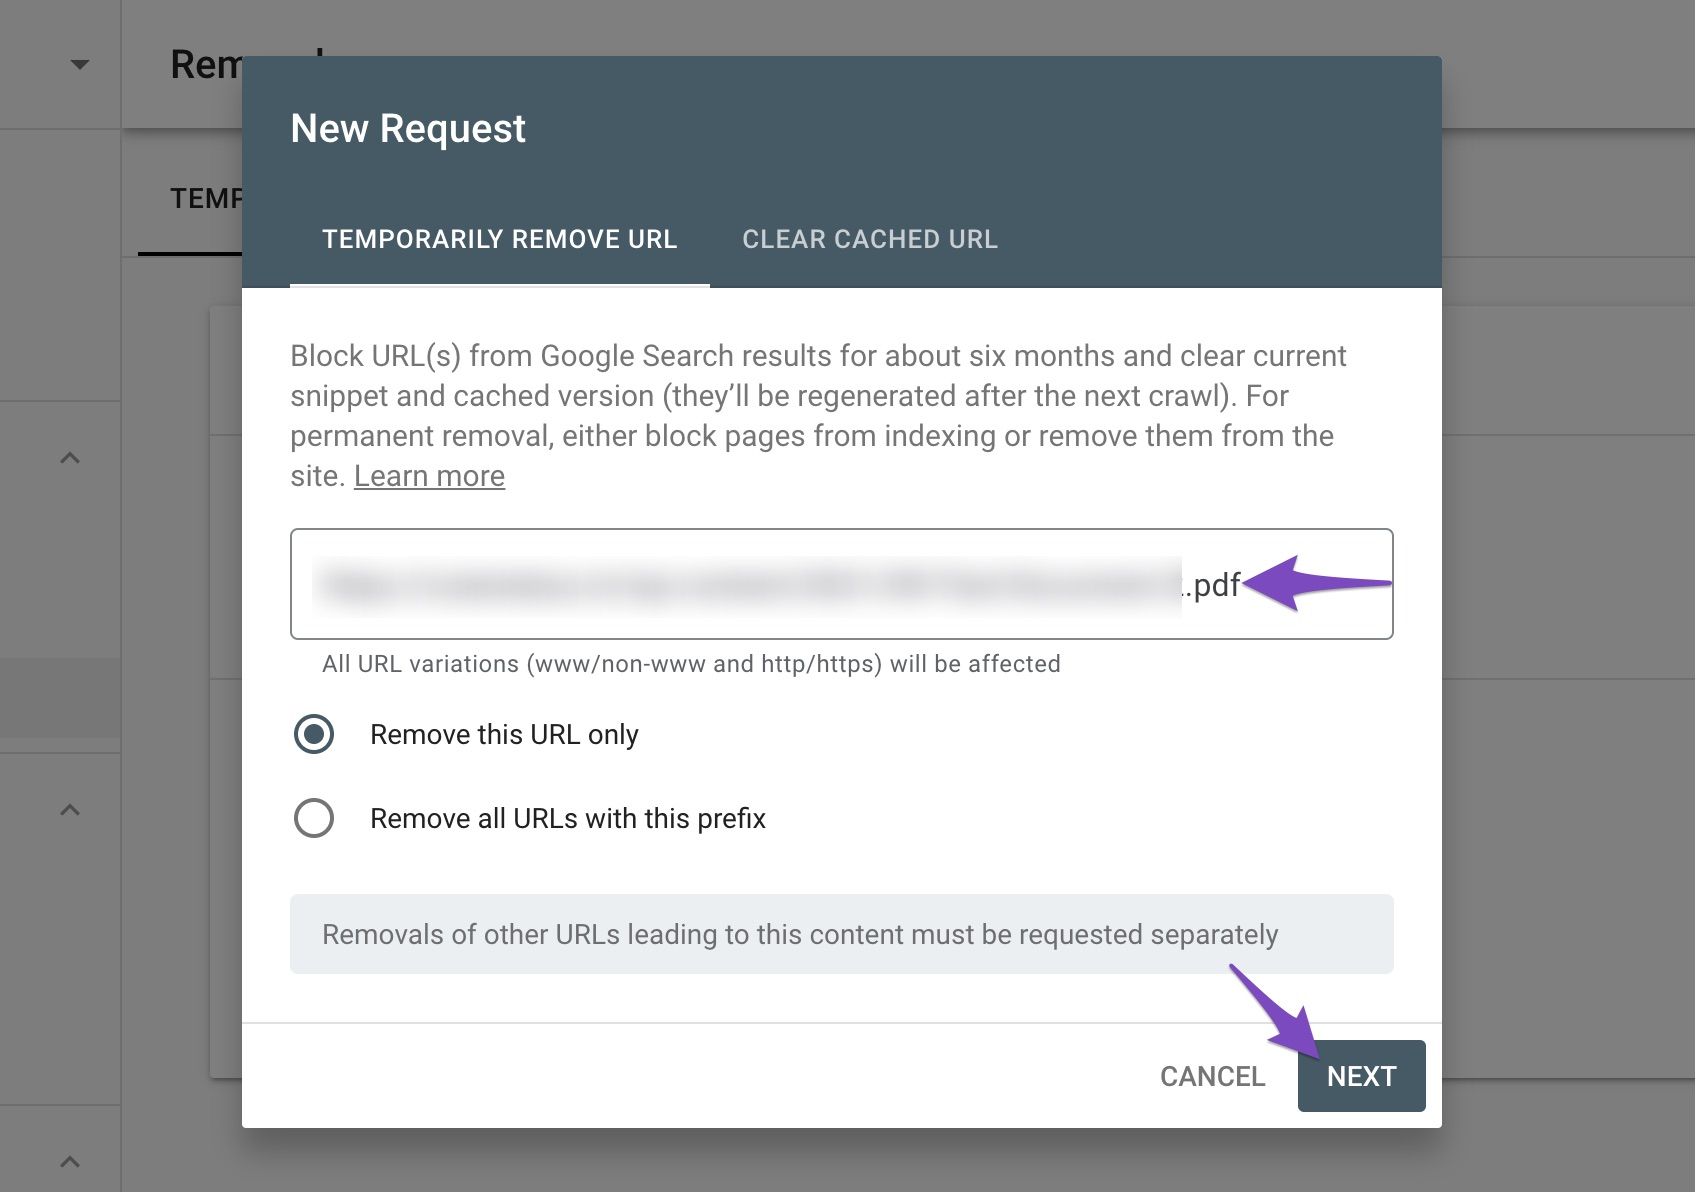
In the next screen, confirm removing the URL by clicking the Submit Request button.

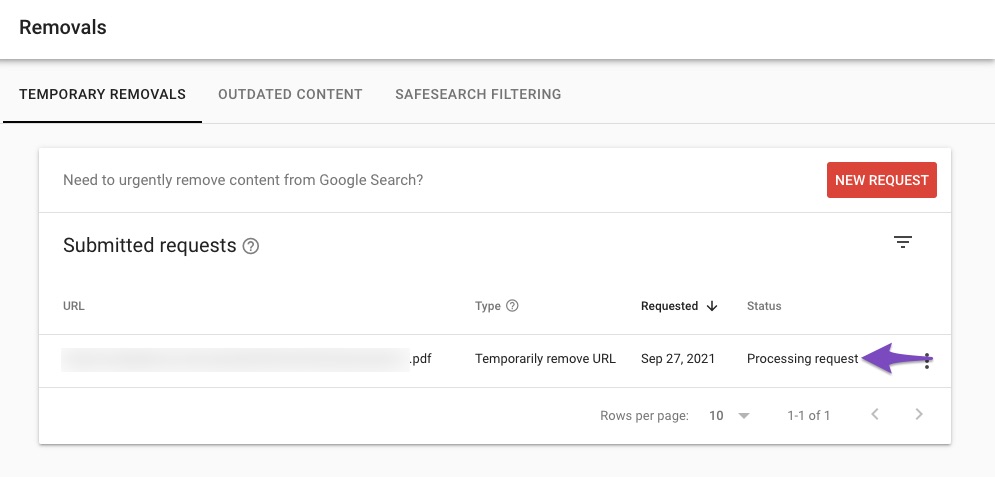
Once the request has been submitted, you can check the removal status in the Google Search Console.

Disallow PDF Files Using robots.txt
By using robots.txt, you can prevent your PDF file from being crawled. However, this will only prevent your page from being crawled and not indexing.
Only when someone links to your PDF file from an external site, search engines will go ahead to index your file. Unless someone explicitly links, Google will not crawl your PDF and index your file. Now, let’s look at how to prevent your PDF from being crawled using robots.txt.
Navigate to Your Robots.txt
Head over to WordPress Dashboard > Rank Math > General Settings > Edit Robots.txt. If the Edit Robots.txt option isn’t available for you, then ensure you’re using the Advanced Mode in Rank Math.
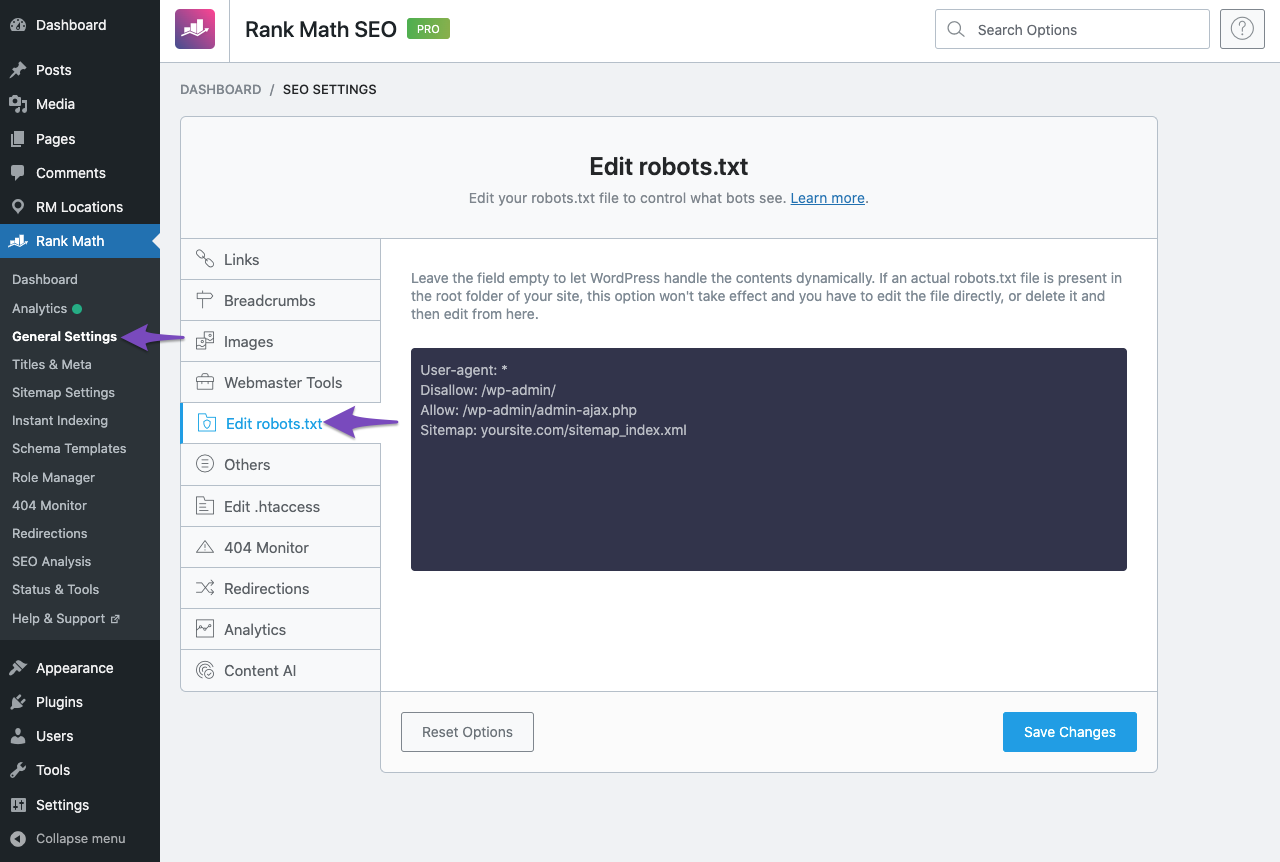
Edit Robots.txt
And then copy and paste the following code in the code editor. Make sure to replace yoursite.com with your domain name. The Disallow: *.pdf rule added here will instruct search engines not to crawl PDF files.
User-agent: *
Disallow: /wp-admin/
Disallow: *.pdf
Allow: /wp-admin/admin-ajax.php

Sitemap: https://yoursite.com/sitemap_index.xml
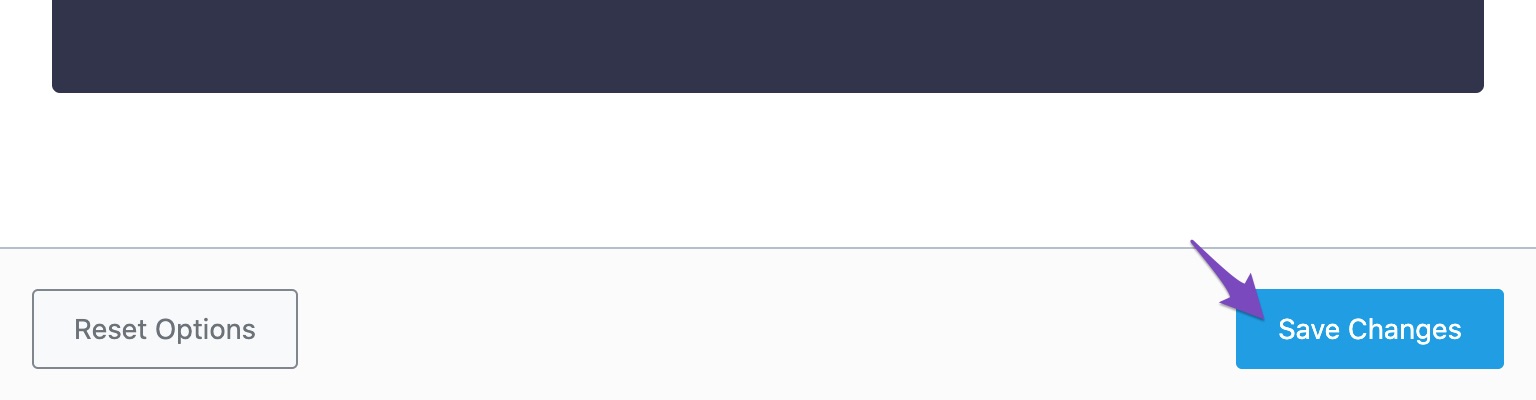
Save Changes
Now click the Save Changes button at the bottom of the screen to reflect the changes. You can further test and confirm using robots.txt Tester to see if Googlebot is able to crawl and access your PDF file.
And, that’s it! We hope the above methods helped you prevent your PDF files from being crawled and get them dropped out of the search index.
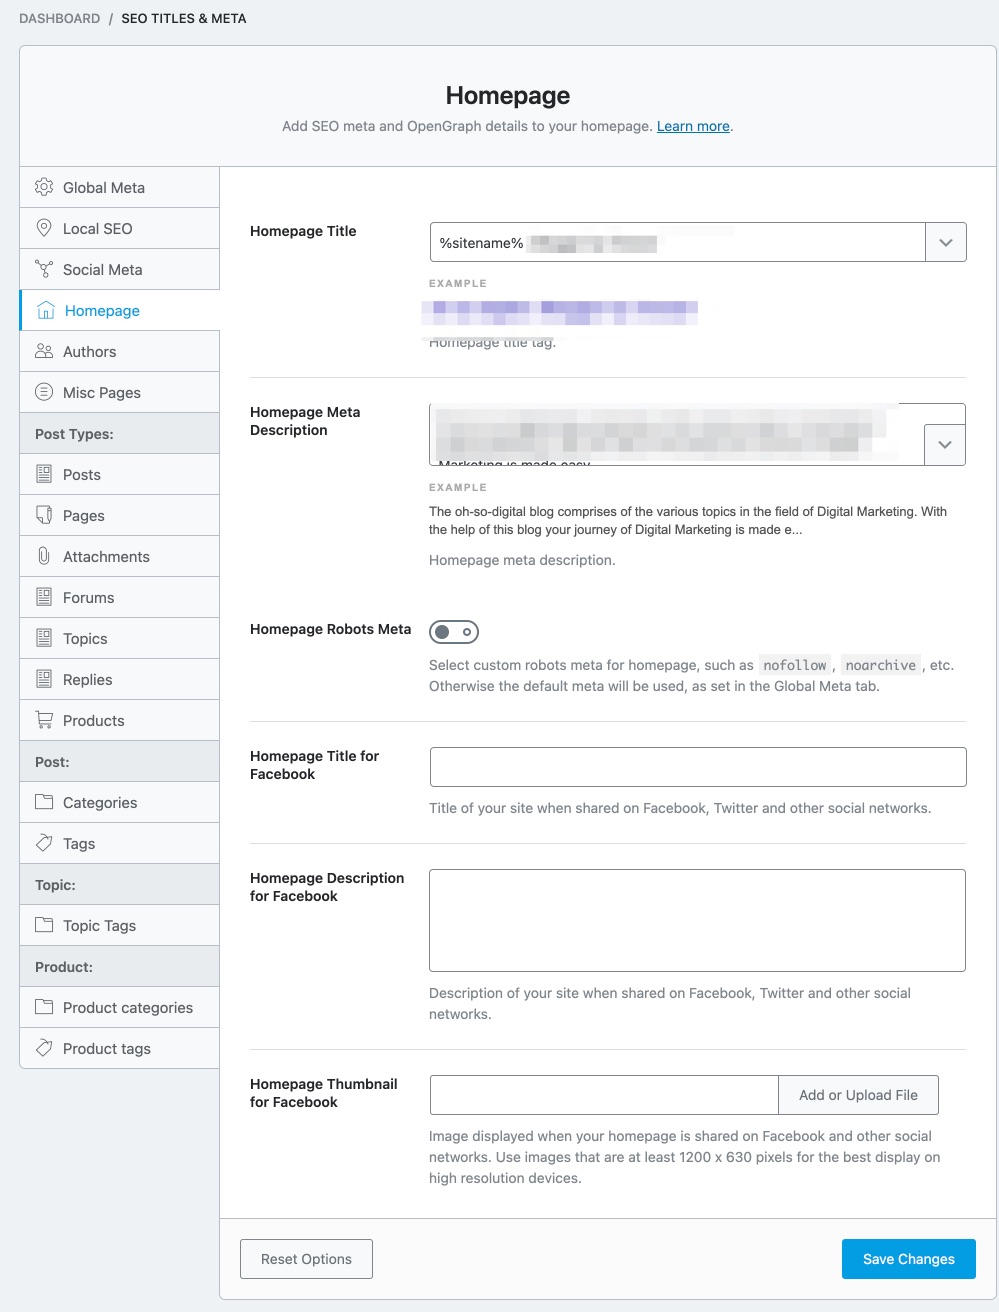
Homepage Titles & Meta Settings
As you probably guessed, the Homepage section contains all the Title and Meta settings related to the homepage.
Authors Titles & Meta Settings
Just as WordPress creates category and date archives, WordPress also creates Author Archives. The Authors section contains all the settings that relate to the author archives. Here are all the available options.
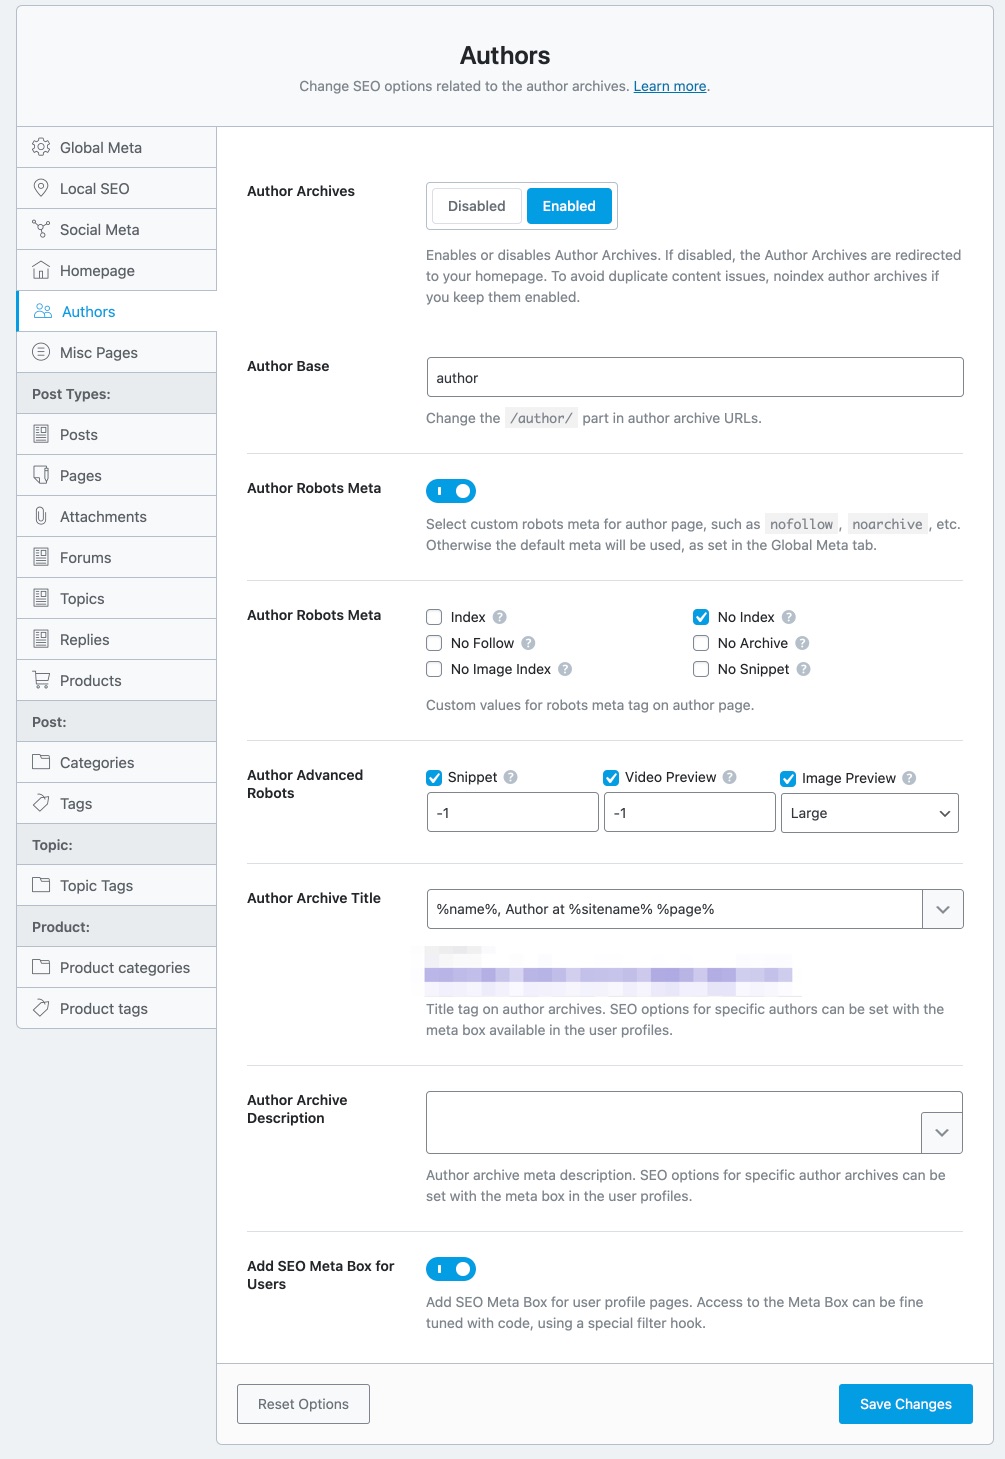
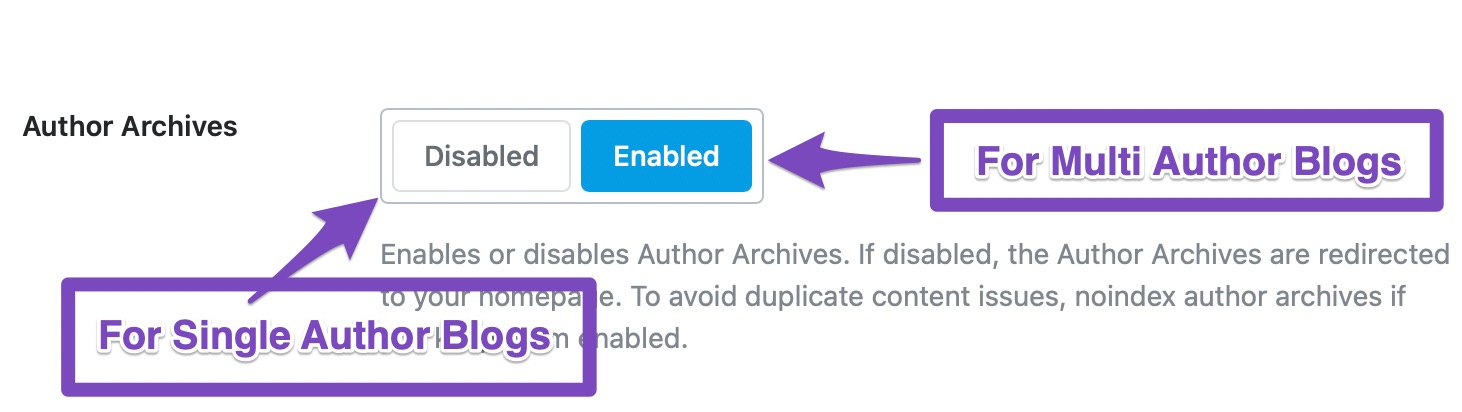
Author Archives
This option enables or disables the author archives entirely. Depending on how you set up your website and Rank Math, this option might be disabled for you. If that is the case, you will not see the rest of the settings, and you’ll need to enable Author Archives to see the rest of the settings.
For single-author blogs, there is no need to keep author archives enabled as it just leads to duplicate content. If you’re planning to add new authors later, you can keep Author Archives enabled but no-index them to avoid the same content being indexed more than once. We’ll show you how to do it a little later. Note that if you disable the Author Archives, then they will not magically disappear from your website, rather, they will be redirected to the homepage of your website.
Author Base
By default, the author archive pages have the term “/author/” in them. For example, an author archive for a user might be www.mysite.com/author/author1.
This option lets you rename the “author” part to the text of your choice.

Author Robots Meta
This option lets you configure Robots Meta for author archives. You can either choose the default meta that you’ve set for your website, for your author archives too or choose Custom Meta.
If you choose the Custom option, new settings will appear below it.
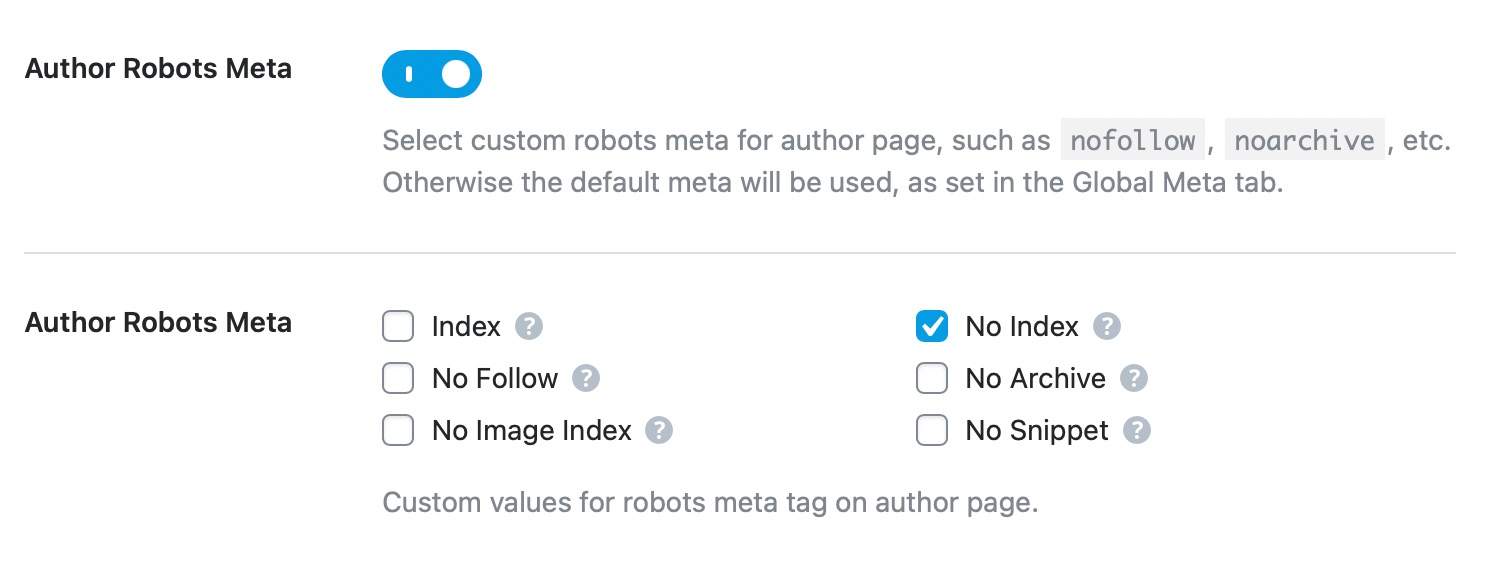
You can then choose all the Meta Robot tags that you want to apply to your author archives. We would recommend that you at least No Index your author archives to avoid indexing duplicated content. You won’t get penalized for duplicate content, but it will waste your crawl budget.
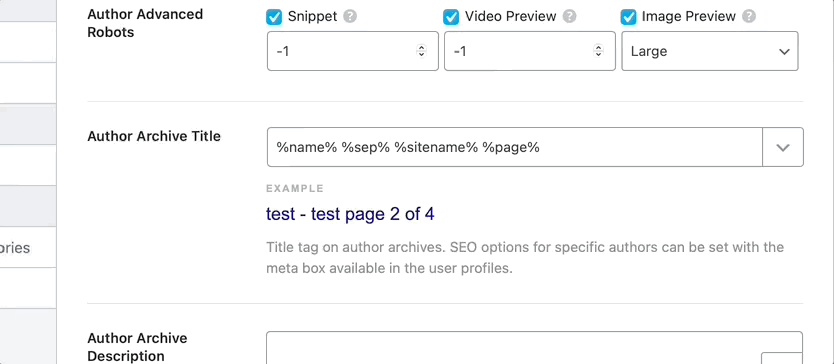
Author Advanced Robots
This option lets you configure the Advanced Robots Meta for all your archive pages. You can configure these meta directives to control how the snippets of your author pages should appear on search results.

Author Archive Title
This option lets you create a template for author archive pages. You can enter static text or create a template based on variables. A sample template is already created for you to see.

To see all the available variables, click the drop-down button present on the top right of the text field. Here is an image showcasing all the variables. As you’ll see in the image, you can also type in some words to search through the variables.
Author Archive Description
This option lets you create a description for the author archive pages. Similar to the Author Archive Title, you can enter static text or create a dynamic text using variables.

Slack Enhanced Sharing
This option is enabled by default and when you share your author pages on Slack, the link preview will include additional data such as the name of the author and count of posts associated with the author.

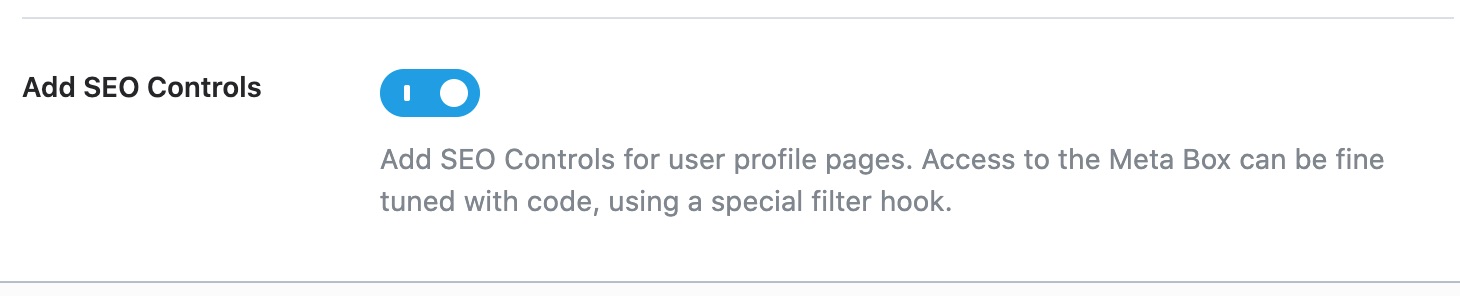
Add SEO Controls
This option adds an SEO meta box for user profile pages. What that does is give you an option to optimize your author page’s title, meta description, and social sharing meta on an individual level instead of using default settings for each of them. If you’re running an authority website with multiple authors, then you might find this useful.
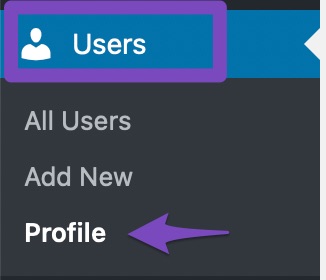
To see the Meta Box in action, head over to your user profile in WordPress by heading over to Users > Profile.
Once you’re on your profile page, you’ll have to scroll down until you see the familiar Rank Math Meta Box.
You might see a warning on the Meta Box similar to the one in the image below—which will also disable the Meta Box effectively.
If that’s the case, go back to the Author Robots Meta and see if you’ve set it up in a way that search engines won’t see or index Author Archives.

If your Author Robots Meta is set to default, then you might have no-indexed archives or all the pages on your website. Check the other settings to disable those settings first.
After making those changes, don’t forget to save your settings.

Then, when you come back to the snippet, you will see that all the options are enabled.
The optimization process that you would follow here would be the same as the one you follow while optimizing your posts. Rank Math’s Meta Box guide will help you in that process.
This covers all the settings in the Authors section. Let us discuss the next section.
Google Shows A Different Meta Title/Description For My Site
Check What You Have Set Using Rank Math
To begin with, it’s important to check if you’ve already changed the SEO Meta Title & Description with the help of the Rank Math WordPress SEO plugin. Here’s how to do so if you’re using the Classic Editor:
And, this is how you add a title and description in Gutenberg:
Ensure Your Schema Settings Are Valid
Next, make sure that the settings shown below (in Rank Math’s Schema tab) for the post or page you’re referring to are as follows:
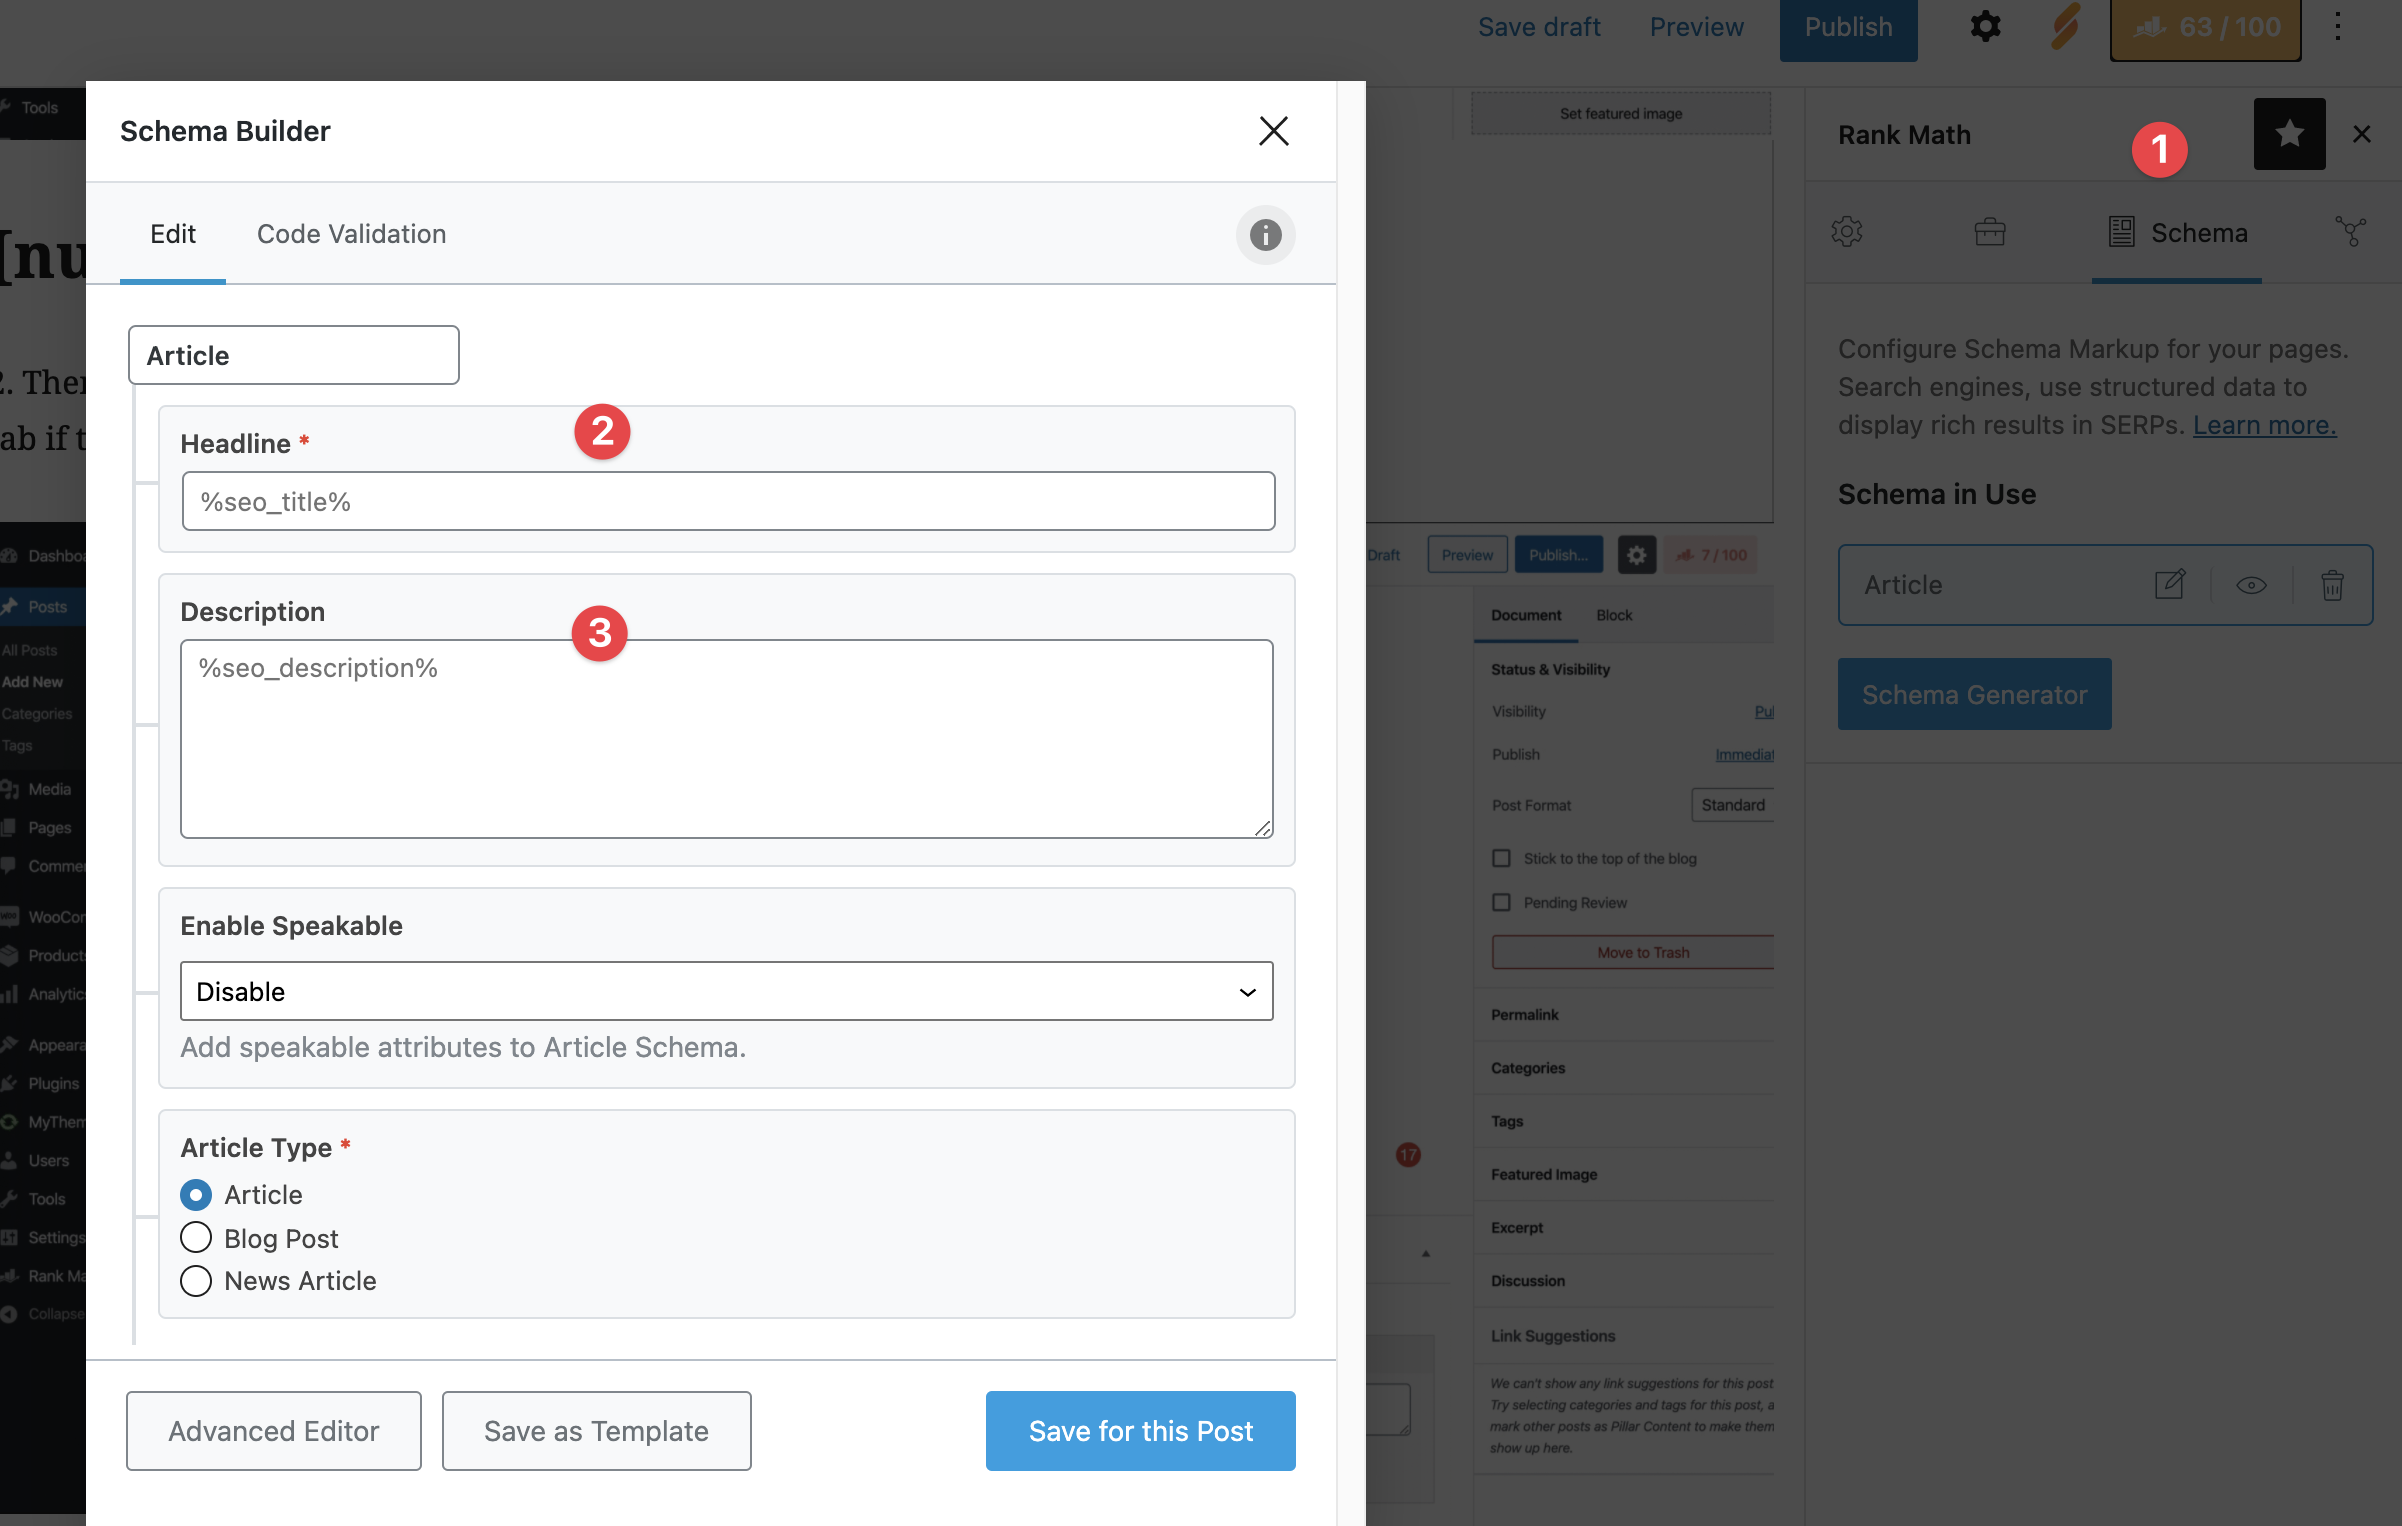
That is, the Headline in the Schema Builder itself must show %seo_title% and the Description should show %seo_description%. This will ensure that your SEO title and SEO Description that you have set up via Rank Math are also used for this page’s structured data.
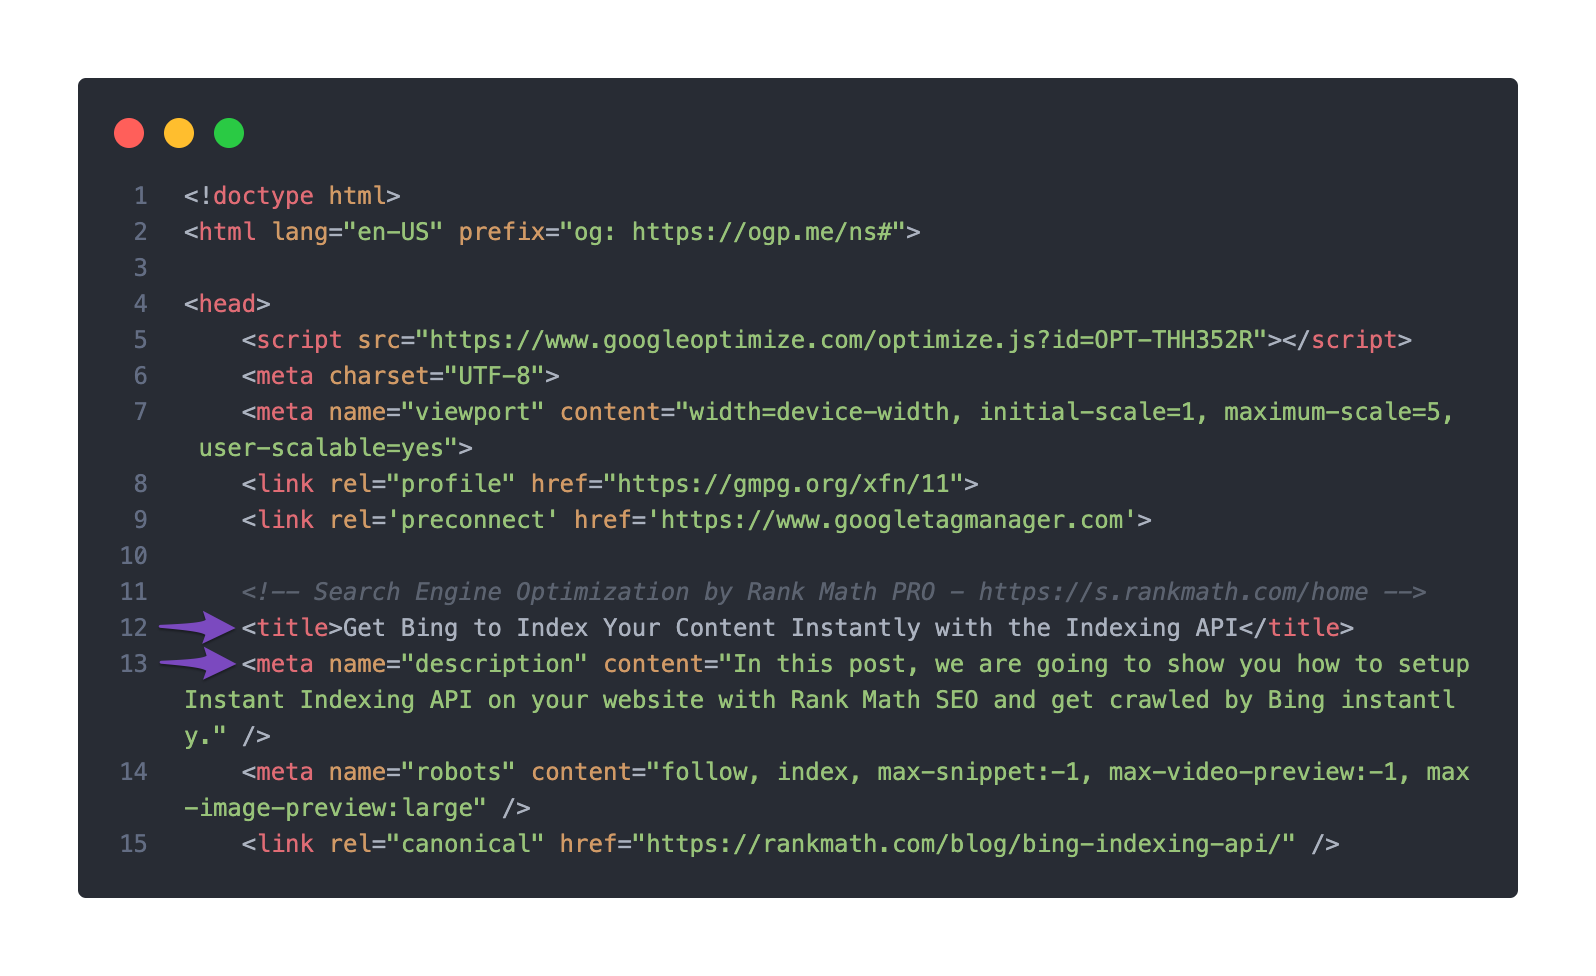
Check the Title/Description Set in the Page’s Source Code
Then proceed to check if your title/description has been set up properly in the page source. This can be done by right-clicking on your page and clicking View page source in the menu that appears.
As an alternative – instead of viewing your page source using the method described above, you can also use this online tool.
The Latest Version of Your Page Hasn’t Been Indexed
Now that you’ve confirmed that the meta description you have set is actually what is shown in your page’s source, you can also proceed to check whether Google has picked up on the changes. To do so, please check when Google’s cache was last updated for the page:
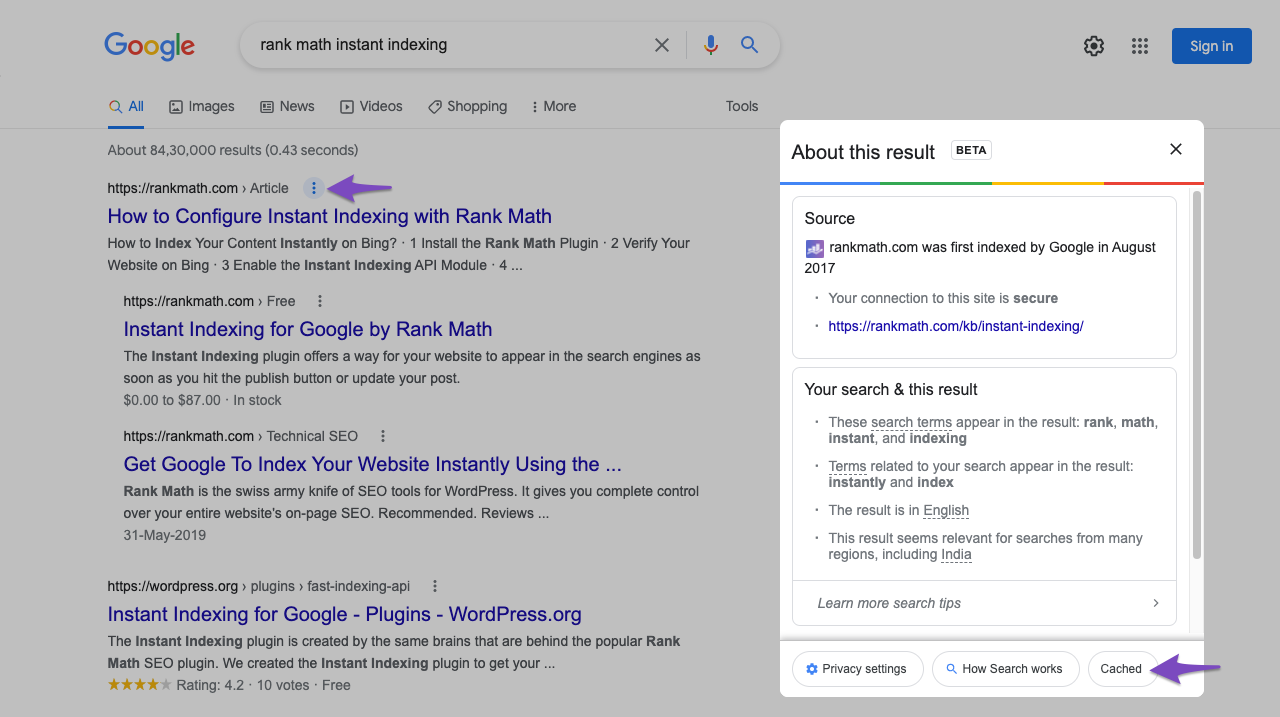
After clicking the small, downwards-pointing arrow next to the domain (on the right of rankmath.com above), you can click on Cached to view the following details:

If the cache date is from before adding the new meta description, then you just have to wait for Google to re-crawl and re-index the page with your new updated meta title and description.
Now that you’ve carried out all of those checks and can be sure that everything is fine – it is still possible for Google to choose to show a different meta title/description for your search keyword. There is nothing you can do as Google sometimes ignores the custom meta information altogether and show something from the page’s content that matches the search intent better. Next, we’ll cover why this might be the case…
Why Google Might Choose Not to Use Your Meta Description
Since the description acts as a preview for the user on how best the page is relevant to the search query, Google might change the description for different search queries.
At the end of the day, as you’ll come to realize, is the case in the industry – search engines choose what they display. Given that this process takes place automatically, behind-the-scenes at Google – there is little that we (or you) can do to ensure that Google does, in fact, use the meta description you’ve written.
That being said, here are some of the most common reasons Google might not use the meta description you’ve provided:
- The meta description is not relevant or useful or lacks quality (ie, just a collection of keywords).
- The exact same meta description is provided across a large number of pages.
- The meta description doesn’t match what the user is searching for, but other content on the page does.
In the past, Google has also made various suggestions with regard to how to avoid meta description rewrites…
Why Google Might Choose Not to Use Your Title
The title of a search result (also known as title link) is a critical element, as users get to know how relevant the search result is for the query, and get to decide whether to click the result or not.
Google uses a number of signals to determine the title that will be shown to users, while the Title tag being the most preferred. But for some pages, Google’s algorithms would generate alternative titles to help users recognize relevant pages.
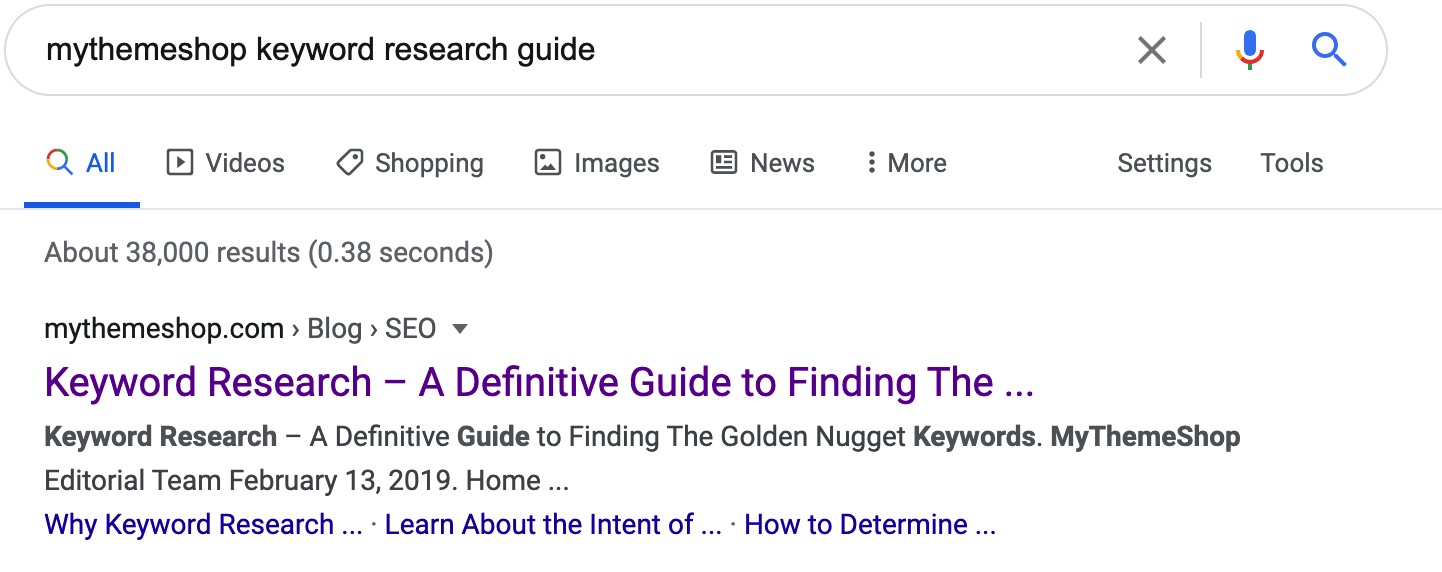
Let’s take a look at an example where Google is dynamically changing the title depending on the search terms used by searchers.
Here the keyword used is “mythemeshop keyword research”. As you’d expect, Google correctly shows MyThemeShop’s keyword research guide as the first result.

Now, if we repeat this search with the terms “mythemeshop keyword research guide” – you’ll notice that the title of the exact same page shown by Google has changed this time:
Google tries to adjust the title according to the search intent, but there are other causes that could trigger the search engine to rewrite titles, such as:
- The page does not specify a descriptive title or title tag
- The website has a number of pages sharing the same title or only with minor variations
- The title is being stuffed with keywords making it less useful for searchers
- The page might include a title that is unncessarily long and heard to read
- The search crawlers are blocked from crawling the page using robots.txt, hence Google would use the anchor text linking to the page for determining titles
If your pages fall into any of the above cases, fixing them could help reduce the chances of page title rewrites. But at the end of the day, it is at the complete discretion of Google to display the title you’ve provided.
And Google believes, at times, alternative text provided on your page might be more relevant & useful, and they might prefer to use it instead of the provided title. Having said that, Google has also provided the sources they would use for generating alternative titles:
- Content in
<title>elements - Main visual title or headline shown on a page
- Heading elements, such as
<h1>elements - Other content that’s large and prominent through the use of style treatments
- Other text contained in the page
- Anchor text on the page
- Text within links that point to the page
URL Inspection Tool
Search Console’s URL Inspection tool can be used to request reindexing, the only caveat is that this method works for one page at a time.
For enterprises, the one-page-at-a-time method is hardly ever viable.
In this circumstance, though, where you caught and reverted page changes for one URL specifically, it could work just fine.
Here’s Google’s quick two-step process:
1. Inspect the page URL
Enter in your URL under the “URL Prefix” portion of the inspect tool.
2. Request reindexing
After the URL has been tested for indexing errors, it gets added to Google’s indexing queue.
 Overview and pricing of this feature. Click here
 Looking for the user guide for this feature? Click here
Related Articles
Rank Math SEO - User Guide
For pricing and how to add to your website see at the bottom of the page. Starting the Setup Wizard WordPress Dashboard > Rank Math > Dashboard > Setup Wizard tab. Once you open the tab, the setup process will begin, and you will see a screen similar ...Rank Math SEO - Features
View Guide Links at the bottom of the page Installation 1 CRU CREDIT Setup (optional) 1 CRU CREDIT Ease Of Use Easy Want this feature? Request Here Purchase CREDITS Here SEO is the most consistent source of traffic for any website. We created Rank ...SEO, Google Analytics, Pixel Tracking and Tag Manager Policy
We have had an increased request for pixels and tracking codes to be added to client websites to track both Google, Facebook and the like. As we continue to improve our website development operations and implement further controls to ensure site ...How to find your Google Tag Manager Code
CRU's policy is for all tagging, tracking and pixels to be managed on your Google Tag Manager account. For more information please see here. As CRU does not manage or support Google Services, clients' are expected to either manage this themselves or ...How to Ask Google to Recrawl URLs of Your WordPress Site
Do you want to get Google to recrawl specific URLs? If your website is new, then Google will take some time to crawl and index it. When you create new content or modify old content, Google will need to recrawl those pages. In this article, we will ...