WooCommerce Instagram - User Guide
Connect your store
Prepare your Instagram account
Before starting to configure and use this extension, it’s necessary to have an Instagram Business account connected to a Facebook Page. If you already have one, you can skip this section and continue with the next one. Otherwise, follow these steps:
- Go to Facebook and Create a Page for your Business.
- Create a new Instagram account for your business or use your personal account.
- Connect the Instagram Account to the Facebook Page.
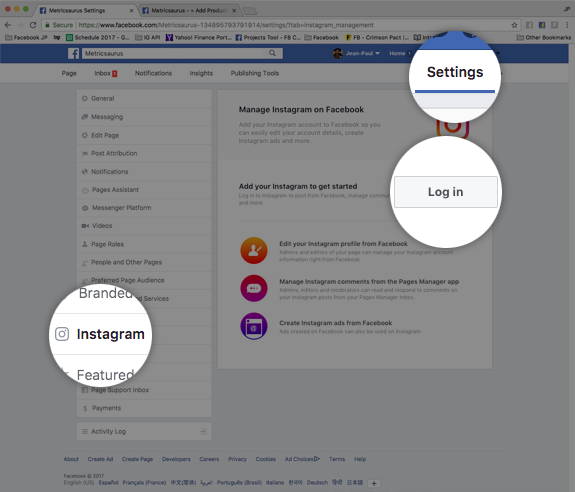
In order to connect the Instagram Account to the Facebook Page, go to your Facebook Page’s Settings and click Instagram, then log into your Instagram account:
If the account is not an Instagram Business Account, you will be prompted to set up your Business Profile:
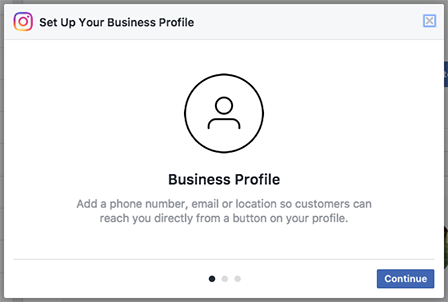
Continue through the steps to convert the account to an Instagram Business Account. When you are done, you will have successfully connected the Facebook Page to the Instagram Business Account and you can start using the WooCommerce Instagram extension.
Connect Instagram
Once the extension is activated and you have an Instagram Business account connected to a Facebook Page, go to “WooCommerce > Settings > Integrations > Instagram” to proceed to connect your store with Instagram.
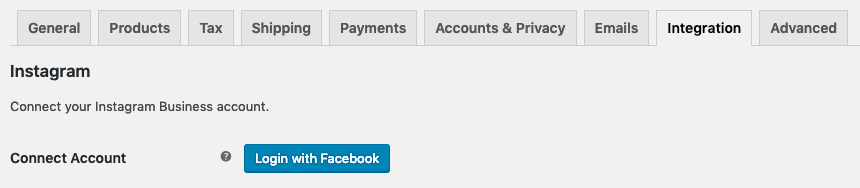
Click on the “Login with Facebook” button and log in with the Facebook account in which you created the Facebook Page for your business.
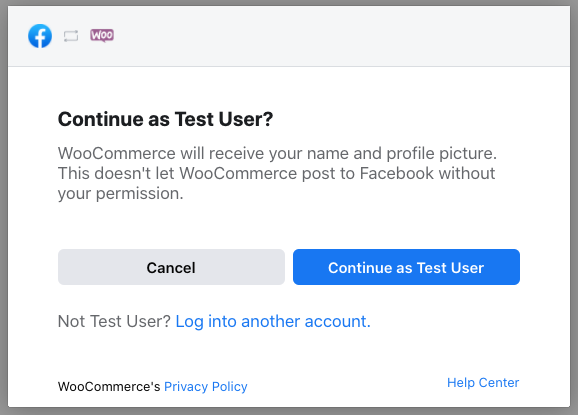
You will be redirected to Facebook to complete the connection.
First, it will ask for the account that will be used, you can continue with your current user if already was logged in or change your account.
You will see a list of Instagram Business Accounts. Check the account that will be used in your store and press “Next”.
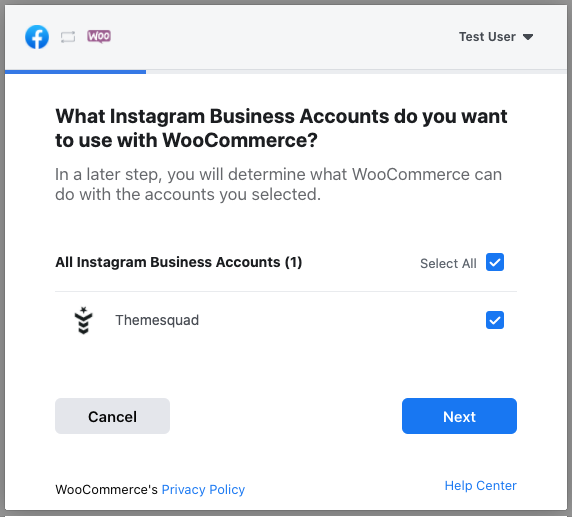
In the next step, you will see a list of pages available to use with WooCommerce. Check the page that you want to use with your store.

Before the connection is done, you will be asked to select what WooCommerce Instagram is allowed to do. Removing permissions may cause the application to stop working.

After accepting the permissions, you will be redirected to your store automatically:
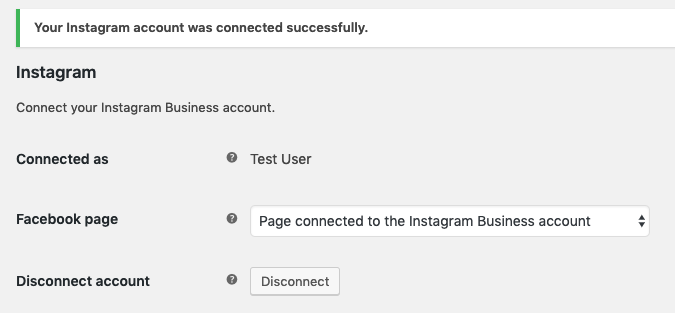
The last step is to select the Facebook Page connected to the Instagram Business account from the list displayed by the “Facebook page” setting and save the settings.
Optionally, you can also set the other available settings.
If a successful message appears after saving the settings, congratulations!! You’ve connected Instagram with your store and you can start using the extension.
Renewing access
After connecting your Instagram account to your store, It will be necessary to renew the access credentials periodically to continue using the Instagram API. But don’t worry, we have automated the process to renew your access credentials and it doesn’t require the intervention of the store owner.
In rare cases, Facebook could invalidate your current credentials (for security reasons, recent changes in its API, strange activity in your account, etc) and it will require to re-connect your Instagram account with your store manually.
Additionally, your access credentials could expire due to large periods of inactivity or a problem with the renewal process. All these cases will be detected by our extension and it will display a notification to the store owner requesting him to re-connect the account manually.

If you see this notice on your admin screen, just click on the “Renew access” button and follow the steps.
Instagram Shopping
Since version 3.0, our extension supports Instagram Shopping, this integration requires some extra steps in order to enable it. If you are interested in this functionality, please, take a look at this tutorial and follow its steps.
Otherwise, if you want to start using the product hashtags and showcase how your customers are using your products, continue reading this article.
Setup and Configuration
Once you’ve connected your Instagram account with your store, new settings will appear and you can start the extension set up.
Product settings
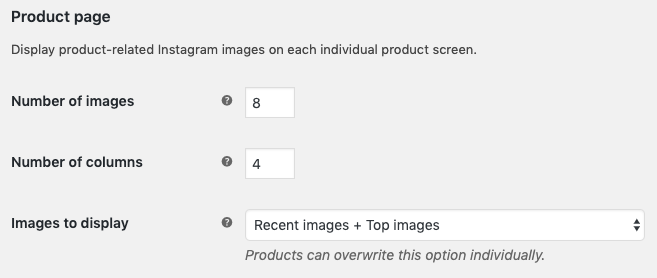
This section allows you to set up different aspects of the images displayed on product pages. The settings are the following:
- Number of images: As its name says, sets the maximum number of images to display.
- Number of columns: The number of columns to distribute the images.
- Images to display: This option sets the type of images to display. This is the global setting, but it can be configured individually for each product. Continue reading for more info about this option.
Images to display
Instagram allows you to fetch two types of images for a hashtag, the most recent images and the top images (The images with more likes, comments, etc).
When fetching the most recent images, Instagram only returns the images published in the last 24h at the moment we make the request. This may cause no new images are retrieved with the request. To avoid displaying an empty image list on product pages, we store the images from previous days and append them to the new ones. This way, we will have enough images to display with each new day.
Combining the recent images from previous days works fine, but, if the first day we set up the product hashtag there are no recent images to retrieve, how we avoid displaying an empty image list? Well, we append the top images at the end to complete the image list.
This is how the extension works by default, but if you want to implement a different behavior, we have defined other options in the setting “Images to display“:
- Recent images + Top images: Default. Uses the behavior described above.
- Recent images: Only uses the recent images. It will append the recent images from previous days if necessary, but it won’t complete the list with the top images.
- Top images: Always uses the top images sorted by popularity.
As we mentioned before, the type of images to display may be set up individually for each product. That means you can use the option “Recent images + Top images” by default and set a specific product with the option “Top images“.
Add a Hashtag to a Product
To add an Instagram hashtag to a product:
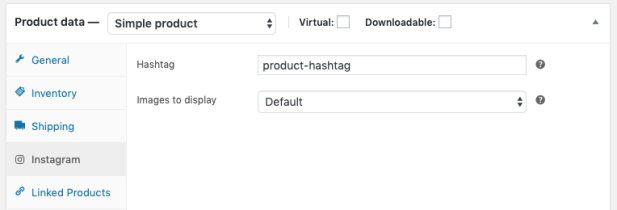
- Go to WooCommerce > Products and select a product from the list.
- Select the Instagram tab in the Product Data meta box.
- Add a hashtag and update the product.
- Optional. Set the type of images to display or use the global behavior.
Images tagged with the supplied hashtag are then outputted on the product listing screens in the frontend of your website.
 Note: The hashtag is not filtered by any account. It shows the images (even from other users) tagged with this hashtag. So, in order to only displays images related to your products, it’s recommended to be as specific as you can when defining the hashtag. A combination of your store name + the product name could be fine.
FAQ
Why Facebook login?
To access the images published by other people and tagged with each product hashtag, it’s necessary to use the new Instagram Hashtag Search API (older has been deprecated).
This new Instagram API has been built over the Facebook Graph API and it requires logging in with a Facebook account instead of an Instagram account. There is no other way to access this information.
Can I post content to my Instagram account?
Our extension doesn’t post any content to your Instagram account or synchronise your current Instagram profile with your store.
How many hashtags can I use?
Unfortunately, there are some limitations imposed by Facebook in the use of the Instagram Hashtag Search API. You can query a maximum of 30 unique hashtags every 7 days.
Our extension cache all the queries results to reduce your quota consumption. So, this limit might be exceeded (although it isn’t guaranteed) past the first 7 days.
If you have more than 30 products and you are experiencing troubles with the hashtags limit, we recommend you to prioritise the products with this feature or share the same hashtag between very similar products.
Can I use a different hashtag per product variation?
No, and it isn’t recommended due to limitations explained in the previous question/answer.
Can I change the image size?
At this moment, no. The Instagram API only returns the real size of the images. We’re working to create thumbnails with the same aspect ratio for the displayed images.
How do I refresh the product images?
In order to improve the performance of your store and not to exceed the quota consumption of the Instagram API, our extension caches the images and the results of the API requests for 24h.
If you want to force a refresh of the images displayed on product pages, you can go to “WooCommerce > Status > Tools > Instagram image transients” and click on the “Clear transients” button.
How to deauthorise our application?
If you want to reset the connection between your store and Instagram or you just want to disconnect it. Follow these steps:
- Disconnect the account in the “WooCommerce Instagram” settings page.
- In your Facebook account. Go to “Settings > Business Integrations” and select the WooCommerce app. After that, click on the “remove” button.


Related Articles
WooCommerce Instagram - Features
View Guide Links at the bottom of the page Installation 1 CRU CREDIT Setup (optional) N/A Ease Of Use Easy Want this feature? Request Here Purchase CREDITS Here Use all the power of Instagram to increase your sales We all love Instagram. We ...Woocommerce Social Login - Troubleshooting Guide
Troubleshooting Having trouble? Follow these steps to make sure everything is setup correctly before posting a support request: Check that your App / Client IDs or keys are correct Double-check that your App / Client IDs or keys are correct Go to ...WooCommerce Instagram - Troubleshoot Guide
Instagram Business account not found If you receive this error when saving your settings it means that the selected page in the “Facebook Page” setting doesn’t have an Instagram Business account connected to it. Please, go to the Prepare your ...Woocommerce Social Login - User Guide
For pricing and how to add to your website see at the bottom of the page. Setup and Configuration Installing the plugin will allow you to set some general settings for all social buttons, then enable settings for each social network. Let’s start with ...Adding and Managing Products
Adding a product Before adding your first product, let’s get familiar with how product categories, tags, and attributes work. Product Categories Product categories and tags work in much the same way as normal categories and tags you have when writing ...