SEO - All in One SEO
CRU uses the All in One SEO plugin for the Search Engine Optimisation on our clients' sites. As a client, you have the ability to update all features of your SEO. We highly suggest reading the documentation through the below link.
To view the documentation, please visit https://semperplugins.com/documentation/
For some quick links to articles CRU recommends to familiarise yourself with, please see below:
Beginners Guide for All in One SEO Pack
All in One SEO Pack works very well out of the box with the default settings, however, the steps below will guide you through some important configuration settings that every site owner should follow.
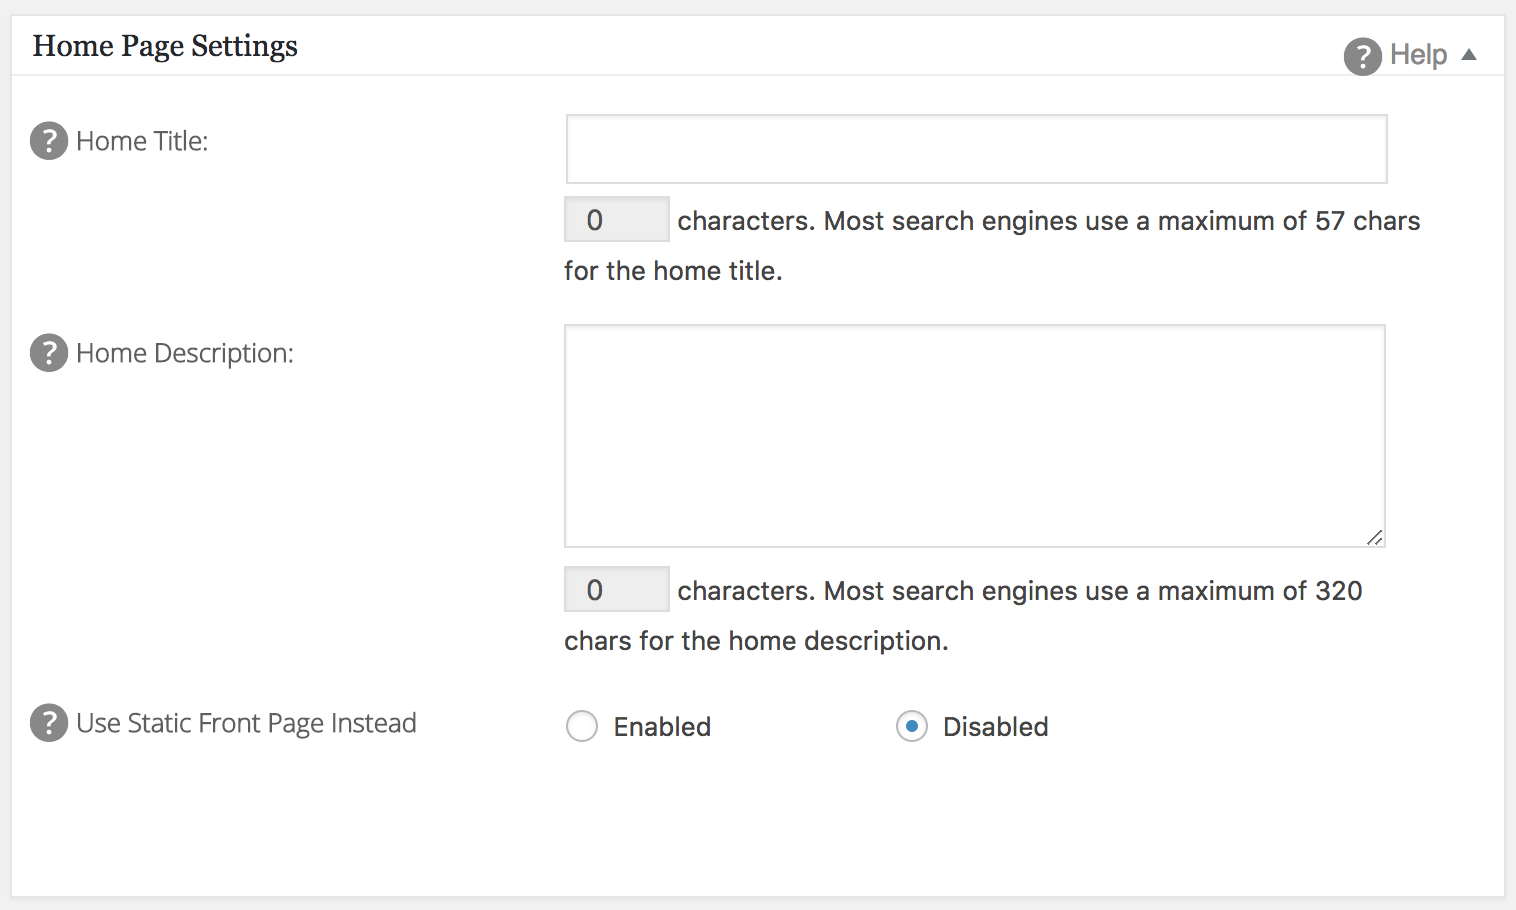
Step 1 – Setting your Home Page SEO meta
Where you set the title and description for your homepage depends on your WordPress settings. So first you need to go to Settings > Reading in WordPress and check the setting for Front page displays. Then based on this setting follow the instructions below:
If Front page displays is set to “A static page”: Go to All in One SEO Pack > General Settings > Home Page Settings and select Enabled next to Use Static Front Page Instead and then click Update Options. You can now set your title and description on your home page by going to Pages, edit your home page and scroll down to the All in One SEO Pack section.
If Front page displays is set to “Your latest posts”: Go to All in One SEO Pack > General Settings > Home Page Settings and set your title and description in the Home Title and Home Description fields.
Leave Use Static Front Page Instead set to Disabled.
Step 2 – Enabling All in One SEO Pack for your content
By default, WordPress has two types of content that most people are likely to use – Posts and Pages. However, your site may also contain other types of content added by plugins or your theme. Examples of these could be products, FAQs or testimonials. You probably want to use All in One SEO Pack to manage the SEO for all the content on your site so you should enable SEO for any content types added by plugins or your theme. Here are the instructions on how to do this:
- Log in to your WordPress site and go to All in One SEO > General Settings > Content Type Settings
- In the section for SEO on only these Content Types, check the boxes next to the post types you want to manage SEO for. You will see that Posts and Pages should already be checked
- Click the Update Options button to save your settings
If you are using All in One SEO Pack Pro (yes CRU Clients are) then you can also manage SEO for taxonomies such as categories and tags.

Step 3 – Setting up Google Analytics
Google Analytics is a great free tool for tracking your visitors behavior. All in One SEO Pack offers a simple way of integrating with Google Analytics.
- The first thing to do is set up your Google Analytics account. Follow the instructions on our Google Analytics documentation page to do this
- Once you have set up your Google Analytics account you will need to obtain your Google Analytics Tracking ID by logging into your Google Analytics account and clicking on Admin then select an account from the dropdown in the Account column then select a property from the dropdown in the Property column and then click on Property Settings. Your Tracking ID will be show at the top of this screen
- Copy your Tracking ID and then log in to your WordPress site and go to All in One SEO > General Settings > Google Analytics and paste your Tracking ID in the Google Analytics ID box
- Now click the Update Options button to save your settings

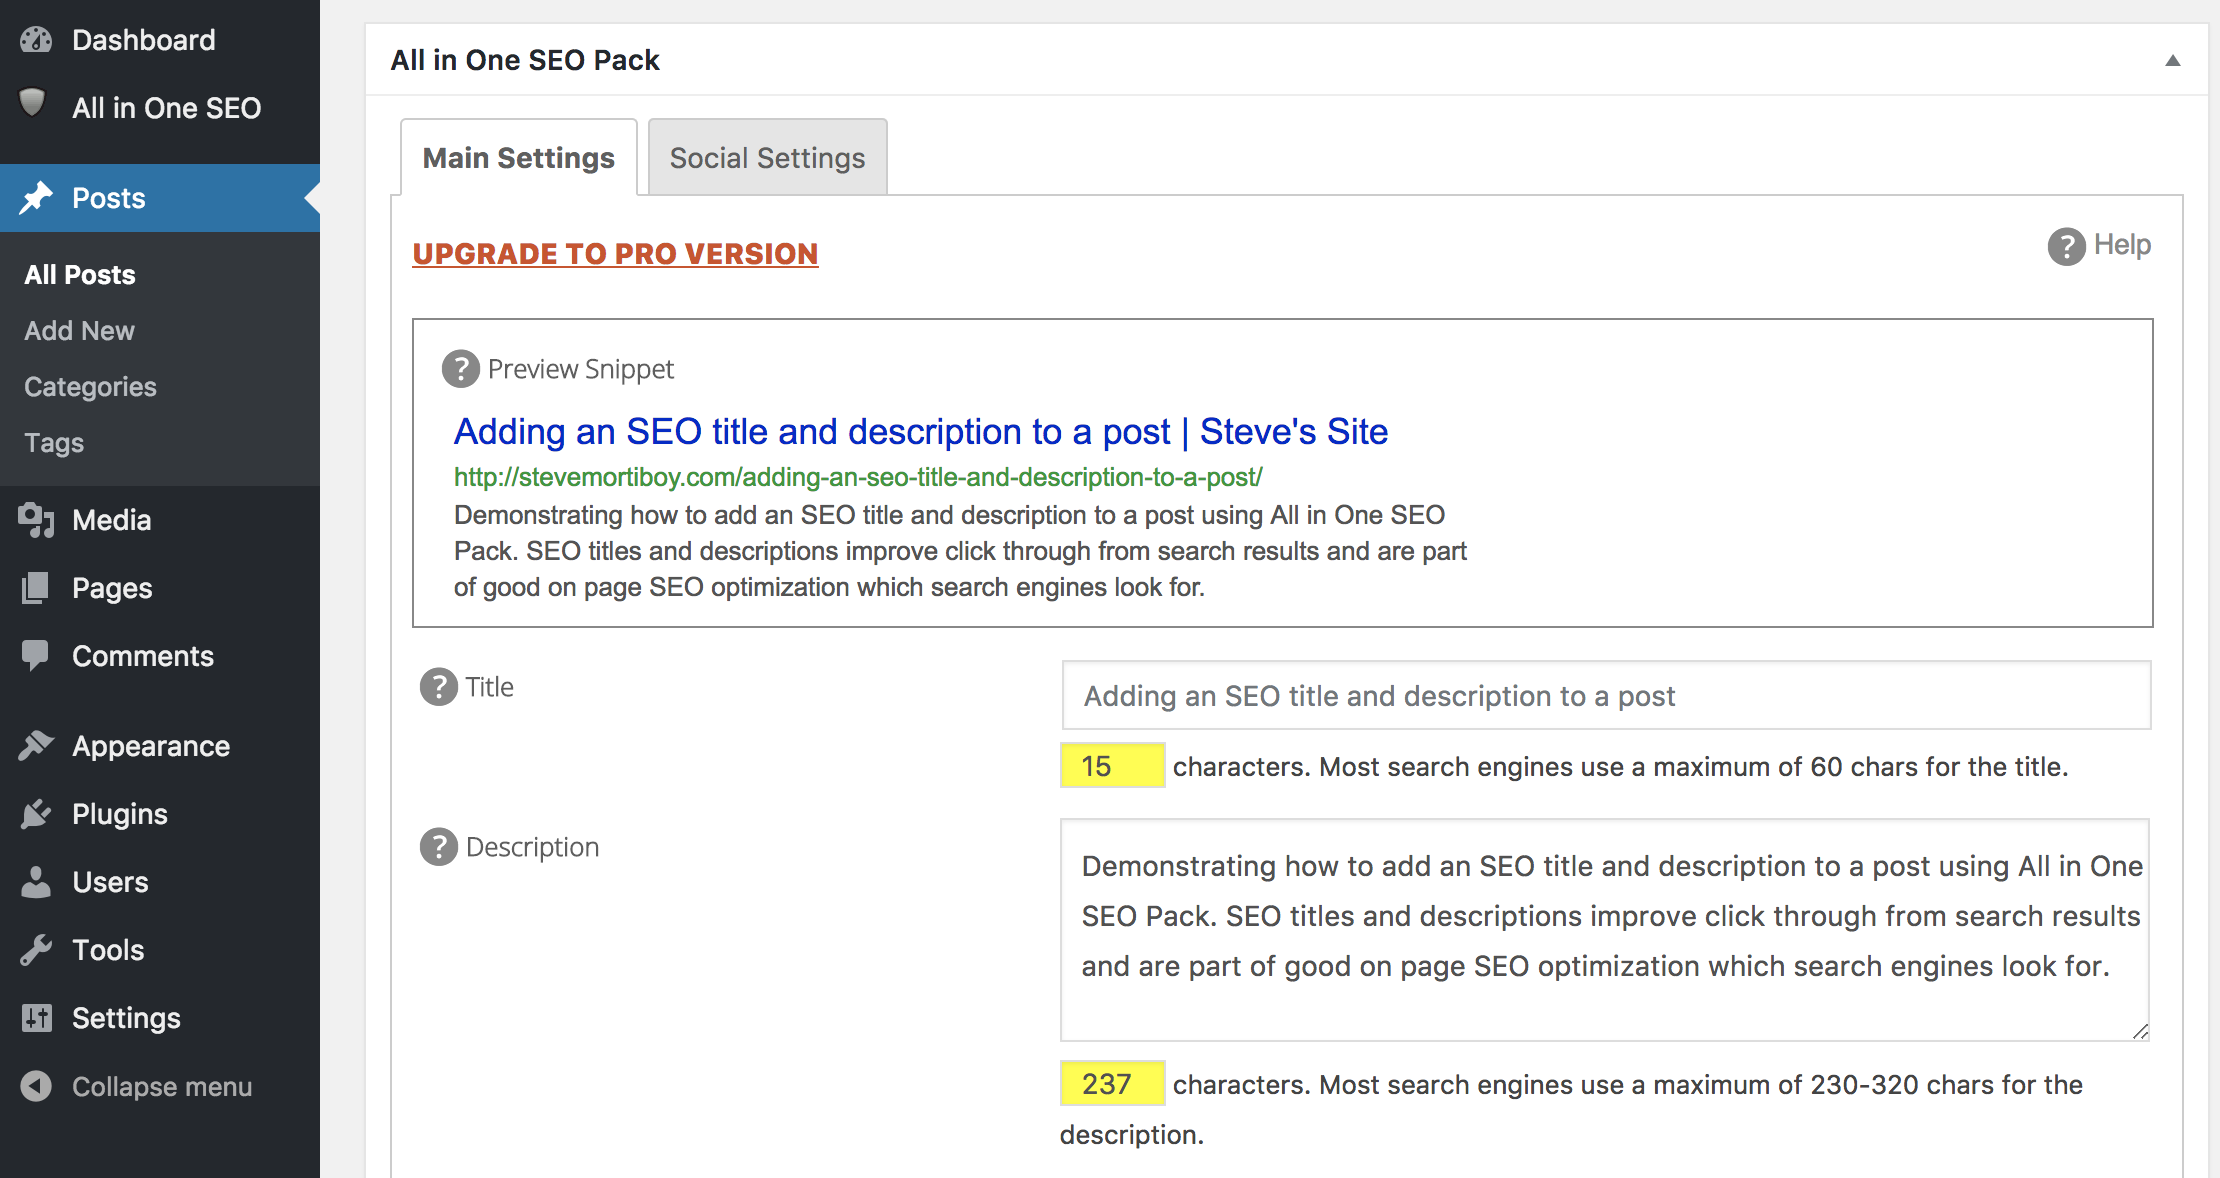
Step 4 – Adding SEO meta to your content
We’ve already set the SEO title and description for our homepage in Step 1 so the final step in our Beginners Guide is to set the SEO title and description for each of our pages and/or posts.
Let’s start with titles:
By default All in One SEO Pack will use the Page Title or Post Title as the SEO title that will appear in Google search results. For example, if you have a page called Contact Me and you’re happy for the SEO title to say Contact Me then you do not need to do anything. However, you can change the SEO title that will appear in Google search results for each page or post on your site by following the instructions below:
- Log in to your WordPress site and click on Pages or Posts in the left hand WordPress menu
- Locate the page or post you want to set the SEO title for and edit it
- Scroll down to the All in One SEO Pack box and enter your title in the Title box
- Now Publish or Update to save your new SEO title
Note how All in One SEO Pack automatically adds your Site Title after your SEO title. This is controlled under All in One SEO > General Settings >Title Settings.
See our documentation on Title Settings.
It is important to remember to keep your SEO title to 60 characters or less as Google may only display the first 60 characters. Also make sure that every SEO title on your site is unique. Search engines can penalize you for having duplicate SEO titles.
Now let’s set our description:
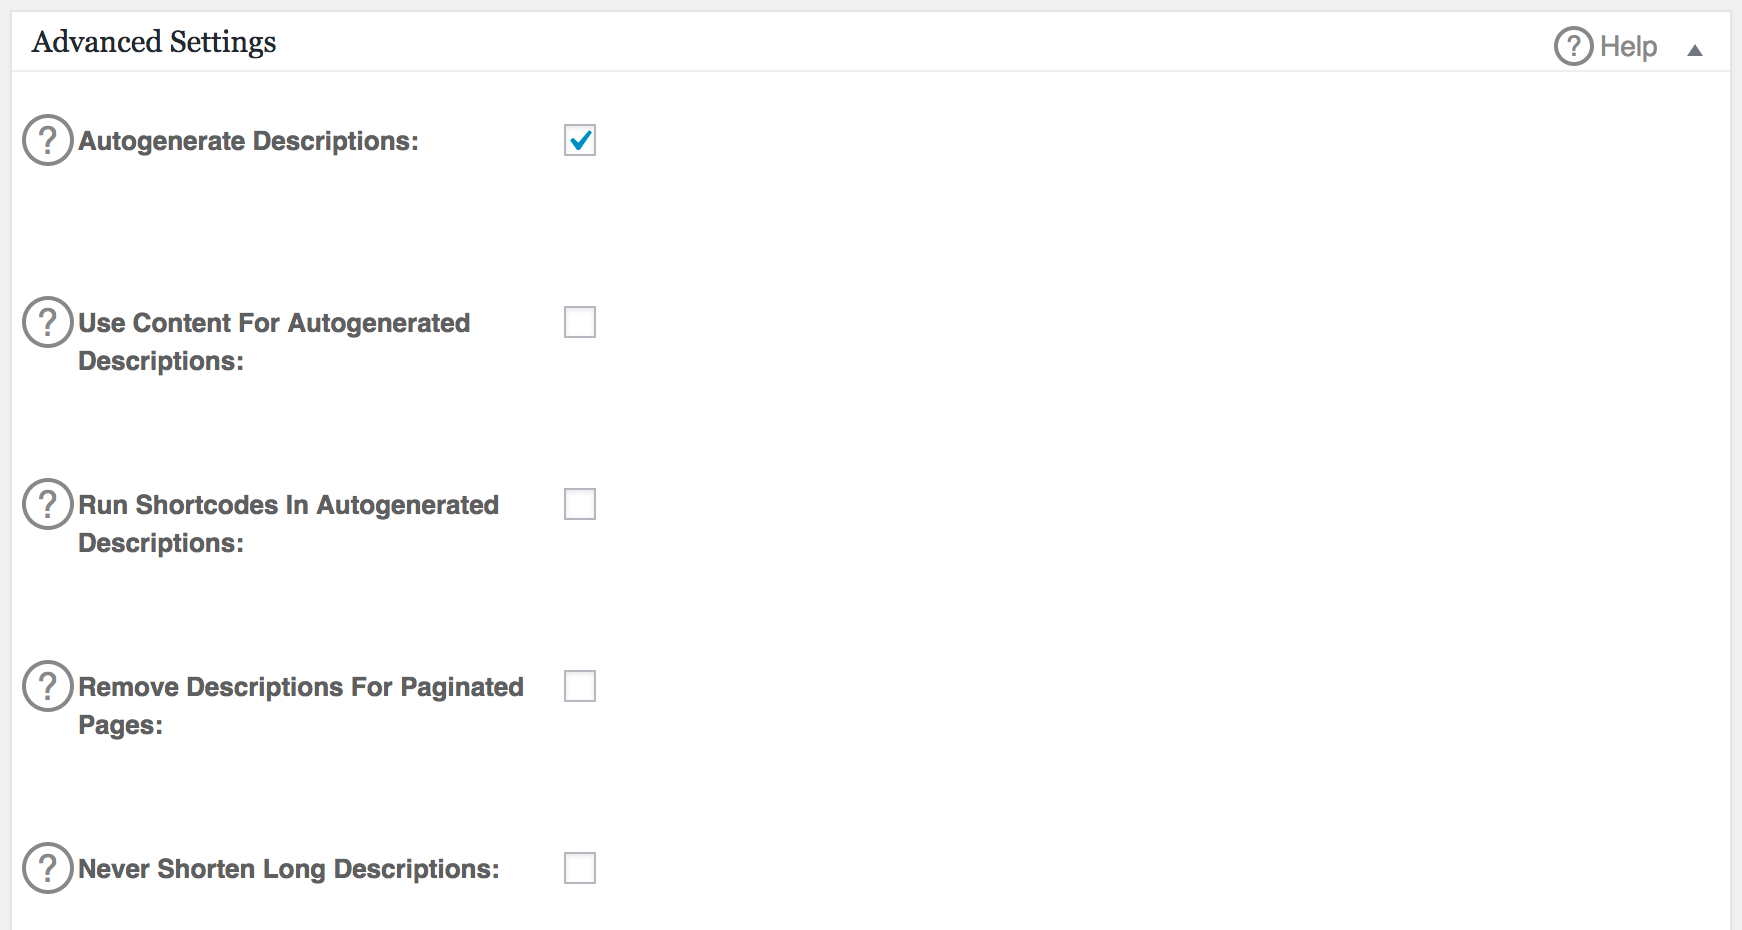
By default All in One SEO Pack will not output a description. However, there is a setting to change this under All in One SEO > General Settings > Advanced Settings > Autogenerate Descriptions. If you check this box,All in One SEO Pack will use your post excerpt for the auto generated meta description. If there is no post excerpt then it will use the first 160 characters of your post content. This can be especially useful if you have a lot of content and don’t want to input a meta description for every page or post. You can overwrite any auto-generated Meta Description by editing the page or post.

Note: It is strongly recommended that you handcraft your descriptions so that you can control what is provided to search engines.
To set the SEO description for each page or post on your site follow the instructions below:
- Log in to your WordPress site and click on Pages or Posts in the left hand WordPress menu
- Locate the page or post you want to set the SEO description for and edit it
- Scroll down to the All in One SEO Pack box and enter your description in the Description box
- Now Publish or Update to save your new SEO description
It is important to remember to keep your SEO description to less than 160 characters as Google may only display the first 160 characters. Also make sure that every SEO description on your site is unique. Search engines can penalize you for having duplicate SEO descriptions.
An important note about titles and descriptions
Some search engines such as Google decide on a case by case basis whether or not to display the SEO title and SEO description that you have provided. They may decide to display their own title and description which they can get from your content or another source. You cannot force search engines to display your SEO title and SEO description, you can only influence them. This does not mean you should ignore the SEO title and SEO description, you should still complete these fields as it shows search engines that you have thought about this aspect of search engine optimization.
Top Tips for Good On-Page SEO
SEO is all about optimizing your site so that search engines such as Google rank your content highly for specific search terms. On-page SEO is the term given to the optimizations you make to the content on your website.
There are many factors that determine your ranking and these are closely guarded secrets of companies such as Google and Bing. These factors change over time as search engines improve the way they calculate rankings. The goal of the search engines is to provide the most relevant results to the term that the user is searching for. The way they go about this may change but the principles are generally the same.
The important thing to remember is that search engines are in the business of providing search results ranked based on the relevancy of the content to the search term.
Here we will discuss the Best Practices for On-Page SEO.
1. URLs
We’ll divide this into two parts – the domain name and the page URL. Both are extremely important to search engines and visitors.
The domain name is an important factor in SEO. It is the basic building block for the URL and a well chosen domain name can make a big difference.
Consider the following example:
abcplumbingandheating.com
abc-sons.com
Of the two domain names the first would do better on search engines if we’re looking to rank for the term “plumbing and heating”. The term appears right there in the domain name.
The page URL is equally important to search engines. It typically contains the name of the page and and reflects any structure. For example:
The URL above not only contains plumbing and heating in the domain name but the page URL tells search engines that this is the heating repair page and that it’s parent page is the services page. If the purpose of this page is to rank for the term “heating repair services” then this should do well. It would certainly do much better than the example below:
The great thing about WordPress is that typically we don’t have to think about the URL, as long as we follow some simple rules:
- Set your permalink structure – We recommend a custom permalink structure of /%category%/%postname%/
- Create pages with good page names
- Make sure you create page structure where applicable
- Don’t use special characters in your page name that could end up in your URL. URLs should preferably be lowercase words, no special characters, and hyphens in place of spaces
Further reading:
2. Page Titles
When you create a page or post you give it a title, this is the name of the page. This title is used to generate the page URL. In our example above we used Heating Repair as our page title, it was also used to create the URL. This title is the most important title on the page, it describes what the page is about.
When creating page titles you should follow these rules:
- Your page title should be relevant to the content on the page, describing what the page is about
- It should be short, descriptive and to the point. If this is a blog post then it can be more descriptive, think of a news headline rather than a page title
- It should be wrapped in H1 heading tags
- It should be the only H1 heading on the page
3. SEO Titles
This is different from the page title, this is the SEO title that you set using All in One SEO Pack. The SEO title is output in the source code of your page wrapped in title tags. It’s what search engines may use for the title in search results., some search engines may use this or your H1 heading tag.
When creating SEO titles you should follow these rules:
- Your SEO title should be short, typically under 65 characters. Google will cut it off if it’s too long
- It should be relevant to the page, you don’t want someone clicking on this in search results only to find the page they land on has nothing to do with the title you provided
- Use the pipe symbol (|) to separate sections of your title if necessary. by default, All in One SEO Pack will output your site name after your SEO title separated by a pipe symbol. For example:
Heating Repair Services, Durham NC | ABC Plumbing and Heating
4. SEO Descriptions
The SEO description can be set in All in One SEO Pack. This is output as the Meta Description tag in the source code of your page. Search engines may use this as the description of the page in search results. Although search engines such as Google will most likely create their own description from the content on your page and other sources, it is still important to create these as it tells search engines you’ve given thought to how to describe your page.
When creating SEO descriptions you should follow these rules:
- Make the description relevant to your page, this of this as a brief description of what the page is about. Combined with the SEO title, this is what will appear in search results and is what will influence someone to visit your page
- Keep the description less than 160 characters, Google may cut it off if it’s too long
- Be descriptive, don’t just include a series of keywords, make this a legitimate sentence
https://semperplugins.com/documentation/post-settings/https://semperplugins.com/documentation/post-settings/
5. Content
Well written content is by far the easiest way to improve your rankings. In the introduction to this page I said that search engines provide results ranked by the relevancy of the content to the search term. Search engines have become very smart at reading content. They are no longer looking to see if you included keywords in the first and last paragraphs, or if you are using your keywords based on some frequency algorithm. These days you should consider that search engines read understand content and can recognize when content is coherent, well written, on point and informative.
Here are some simple rules to follow when writing content:
- Write your content for humans, not for search engines, it’s humans who are going to read your content
- The first paragraph is typically the most read paragraph on the page, it should contain the most relevant content and summarize what the page is about
- Make sure your content is relevant to the subject of the page, stay on point and be succinct
- Don’t go overboard with your content, you’re not writing a book and visitors will leave if they see too much text
- Read what you’re written, is it informative and well-written, would you be interested if visiting this page for the first time, would you get bored and leave the page before reading everything
- Break up your content with good titles, use H2 tags for headings and H3 tags for sub-headings
- Use bulleted lists instead of comma-separated lists, they are easier to read
- Only use bold text for content that is important, and don’t overdo this, not every paragraph contains important text
6. Images
We’ve all heard the adage “A picture is worth a thousand words” well it’s true. Good quality images can make a huge difference on a website. People love visual content whether it’s an image or graphic or a short video. These can sometimes get the point across better than a paragraph of text. Images help visitors both by breaking up text content but also by providing a visual illustration of what we’re writing about.
When adding images to your content you should follow these rules:
- Rename your images before uploading them. The image filename matters to search engines. Which of the image file names below do you think would make more sense to Google:
- DSC12134558.jpg
improving-on-page-seo-in-wordpress.jpg - Set the image Alt tag, this tells search engines what the image is about
- Set a caption or image title if you want to provide useful information to visitors about the image
- Make sure you keep image file sizes small, below 100KB if possible, you don’t want images to slow down the page load times especially for visitors on mobile devices
7. Links
When someone visits your page they aren’t there to read one page and leave, you want them to discover the other content on your site and ultimately capture their information so that you can engage with them in some way. Linking your content within your site is important and the way you link it makes a difference to search engines. Most websites these days have a menu, a navigation bar across the top of the site that enables a visitor to navigate through your site. A good menu which matches the structure of your site is important but so are links within your content.
Here are some rules for internal linking:
- The main navigation menu should match the structure of your site, important top-level pages go across the menu with sub-pages displayed as drop-down menus off of their parent page
- Links within content should build a pathway through your site that you want your visitor to follow
- Links should appear as a different colour font from other text so that visitors can tell these are links
- Consider using buttons instead of text links, especially when you want someone to perform an action on your site
- Links to external sites should be relevant to your content and add value, make sure external links open in a new browser tab
- External links should be to sites with a good ranking, preferably a higher ranking than your site. Use the NOFOLLOW meta tag when links are to sites with a lower ranking
Further reading:
Meta Descriptions
We get a lot of questions regarding Meta Descriptions, how to create them in All in One SEO Pack and the way that search engines (especially Google) handle them. It is important to note that no plugin can force search engines such as Google to display something in the search results that they don’t want to display. Google may decide it will use it’s own description based on the term that has been searched for and the relevant content on your site. More often, their description will be more relevant to the searcher than a Meta Description you write.
Your Meta Description serves two purposes:
- It tells search engines what each page of content is about
- It shows up in search results, which tells people what your content is about
Your Meta Description doesn’t actually affect your placement or ranking in the search engine results, but it is extremely important for what appears on the Search Engine Results Pages (SERPs). The Meta Description is what people see and it helps them determine whether or not to visit your site. Remember, high rankings are meaningless if nobody clicks on the links because the description isn’t appropriate or is meaningless.

Quality Guidelines for Meta Descriptions
Google has some important quality guidelines for meta descriptions. Complying with these is very important in increases the chance that they will use your meta description. Here are their guidelines:
- Make sure every page of content (this includes pages, posts and custom post types) has a meta description.
- Each meta description must be unique, absolutely no duplicates are permitted.
- Each meta description should be less than 160 characters long (All in One SEO Pack has a character counter and visual color warning to help you comply).
- Descriptions must be descriptive, avoid keyword stuffing.
Here is a link to the full quality guide posted by Google – https://support.google.com/webmasters/answer/35624?hl=en
Meta Description Advanced Settings
You can find some settings for meta descriptions by going to All in One SEO > General Settings > Advanced Settings. Please read the Advanced Settings documentation for information on these settings.
Quality Guidelines for SEO Titles and Descriptions - https://semperplugins.com/documentation/quality-guidelines-for-seo-titles-and-descriptions/
The major search engines pay a lot of attention to the SEO titles and descriptions for your content. You create these for each page/post using All in One SEO Pack (http://semperplugins.com/documentation/post-settings/). All in One SEO Pack makes it easy to create these and to comply with the quality guidelines from the major search engines.
We get a lot of questions about using All in One SEO Pack to auto generate these titles and descriptions. Whilst All in One SEO Pack will auto generate these for you, we do not recommend this. The reason is because software cannot create a title and description as well as a human being. This results in issues with quality. For this reason, we always recommend that you hand write every title and description.
Here are the quality guidelines you need to be aware of when writing your titles and descriptions:
- Make sure every page of content (this includes pages, posts and custom post types) has a title and description.
- Each title and description must be unique, absolutely no duplicates are permitted.
- Each title must be less than 70 characters long (All in One SEO Pack has a character counter and visual colour warning to help you comply).
- Each description must be less than 160 characters long (All in One SEO Pack has a character counter and visual colour warning to help you comply).
- Add your brand (business/site name) to your title (All in One SEO Pack does this automatically for you).
- Titles and descriptions must be descriptive.
- Avoid keyword stuffing.
- Here is a link to the full quality guide posted by Google – https://support.google.com/webmasters/answer/35624?hl=en
Related Articles
Groups/Dynamic Pricing
The way we assign groups to users for discounts be it members or special privileges groups is by using a Groups plugin. This, in conjunction with Dynamic pricing (see below), not only allows you to assign membership pricing for ad hoc purchases but ...Coupons
Adding a coupon To add a coupon: Go to: WooCommerce > Coupons. A fresh installation of WooCommerce will show you an initial screen to create a coupon or to learn more. Existing stores start on the Coupons screen. Create a new coupon by selecting Add ...Manually Creating Subscription via Admin
Add the user to the site first by going to Users > Add New. Fill out the users' details: User Role is Subscriber, for the Send User Notification Checkbox, CRU recommends unchecking this so the customer DOES NOT get sent an automated email - This is a ...PDF Vouchers
Creating a voucher template Follow the steps below to create a voucher template: Go to WooCommerce > Vouchers > Voucher Templates. Click Add Voucher Template. On the General tab, determine the template name, voucher type, whether the voucher can ...Product Add-Ons - User Guide
Setup and configuration Product Add-ons allows you to add options to multiple products in bulk, or to individual products in your catalog. These are not treated as individual products and thus don’t have their own SKU for inventory tracking. Also ...