Mailchimp for Woocommerce - User Guide
For pricing and how to add to your website see at the bottom of the page.
Connect or Disconnect Mailchimp for WooCommerce
As you move through each step, new tabs will appear with different configuration options.
To connect your WooCommerce store to a Mailchimp audience and configure your settings, follow these steps.
- In your WooCommerce Dashboard, click the WooCommerce icon.

- Click Mailchimp.

- Click Connect Account.

- In the pop up modal, enter your Mailchimp credentials and click Log In.

- Click Allow to authorise the integration to connect.

- On the Store step, enter the store and locale settings for your WooCommerce store and click Next Step.

- On the Audience step, choose the audience you want to sync to, and the default settings you want to assign to your audience. Choose a default from name, from email, subject line, language, and reminder message.

- When you're ready, click Start Sync to sync your store to Mailchimp.
That's it! We'll start syncing your WooCommerce store to Mailchimp. The time it takes to sync will depend on your store data. To view our progress, check the Overview tab.

If you have issues with your connection, you can resync your audience without losing any e-commerce data. To resync your audience, click the Resync Now button.

View site details
After you connect Mailchimp for WooCommerce, you can visit the Integrations page in your account to view the details for your WooCommerce store. You'll be able to see the status of the integration or add and manage e-commerce features.
Next steps
After the sync is complete, you'll have access to all of Mailchimp's powerful e-commerce features.
For example, you can:
Create purchase-based segments to use with targeted campaigns.
Send receipts, invoices, shipping confirmations, and more with our Order Notifications automation.
Add product recommendations to abandoned cart emails.
Add a customised pop-up signup form to your WooCommerce site.
Find out everything Mailchimp has to offer in our article, Sell More Stuff with Mailchimp.
Create a New Audience Group
Groups are specialized audience fields that let contacts self-categorize based on interests or preferences using uniform responses you set. Groups can be used for any data you want to collect about a contact, like favorite foods, preferred store locations, or anything else you want to know.
Before you start
Here are some things to know before you begin this process.
- Groups work best if you need contacts to self-categorize when they subscribe to your email marketing. For internal audience organization, consider using tags.
- Group fields can be required on pop-up signup forms, and the Signup Form content block on landing pages, but not on hosted or embedded signup forms. Advanced, paid users can use the Advanced Forms option to custom-code a required group field.
- Group fields appear at the bottom of your audience's signup form, because they work different than regular audience fields.
- Each audience can have up to 60 group names. Group categories don't count toward the 60-group limit.
- You can also use group data to target contacts who are in a specific group or who are not currently in any group.
Create a group from the Groups page
To create a group from the Groups page, follow these steps.
- Click Audience.

- Click Audience dashboard.

- If you have more than one audience, click the Current audience drop-down and choose the one you want to work with.
- Click the Manage Audience drop-down and choose Manage contacts.
- Click Groups.
- Click Create Groups to expand the group options.
- Choose an option for how the groups will appear on your signup form.
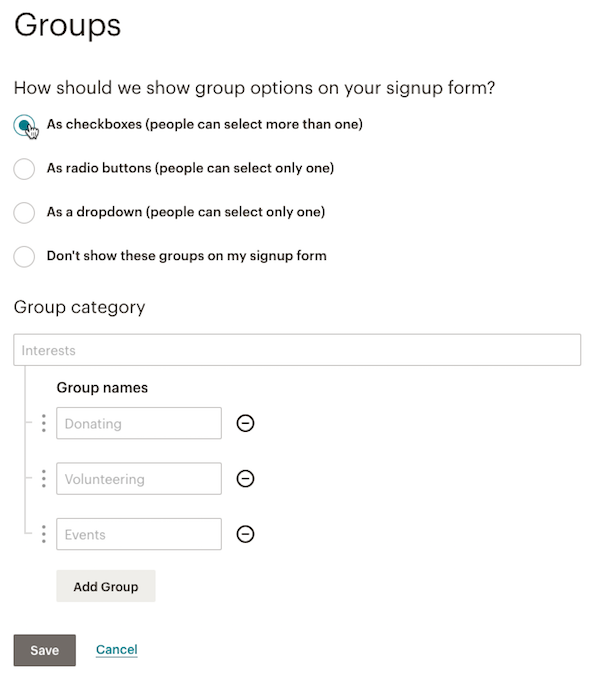
- Type in a Group category and at least one Group name. The Group category is the overall category or theme for your groups, and is visible to subscribers. Create something descriptive, like, "favorite food" and use the Group names to display different options.
- To add more Group names, click Add Group.
- Click Save.
A success message will display with the option to Import To These Groups, or click Done For Now.
Create a new Workflow
After successfully creating an audience group, you may proceed with creating a workflow.
You may refer to this article on how Automatewoo does this part: AutomateWoo - User Guide
The below is for manually created subscription
This one is for subscriptions created via front-end of the site
Then proceed with the steps below:
- Create a new action with Add to Group as action
- Select the list where the group belongs
- Select the group you want to add the subscriber
Exclude a Wine Club User from Welcome Email of Mailchimp
On Mailchimp, add the condition Tags with "Contact is not Tagged".
See below:
See below:
Enable or Disable Final Welcome Email
When you use Mailchimp's signup forms, you can choose to enable an optional final welcome email, which is sent after someone subscribes to your marketing. By default, the final welcome email is disabled.
In this article, you'll learn two ways to enable or disable your final welcome email.
From the form builder
To enable or disable the final welcome email from the Form Builder, follow these steps.
- Click Audience.
- Click Audience dashboard.
- Click the Manage Audience drop-down and choose Signup forms.
- Scroll to the Form builder tile, then click Manage forms.
- If you have more than one audience, click the Current audience drop-down and choose the one you want to work with.
- Click the Forms and response emails drop-down, and choose Final welcome email.
- Check the box next to Send a final welcome email to turn the final welcome email on, or uncheck the box to turn it off.

To view or edit the final welcome email, use the Form Builder.
From audience settings
To enable or disable the final welcome email from your audience settings, follow these steps.
- Click Audience.
- Click Audience dashboard.
- If you have more than one audience, click the Current audience drop-down and choose the one you want to work with.
- Click View Contacts.
- Click the Settings drop-down and choose Audience name and defaults.
- Check the box next to Send a final welcome email to turn the final welcome email on, or uncheck the box to turn it off.

- Scroll down and click Save Audience and Campaign Defaults.

To view or edit the final welcome email, use the Form Builder.
 Overview of this feature. Click here
Overview of this feature. Click here
 Troubleshooting this feature? Click here
Troubleshooting this feature? Click here
Related Articles
Mailchimp for Woocommerce - Features
View Guide Links at the bottom of the page Installation 1 CRU CREDIT Setup (optional) 1 CRU CREDIT Ease Of Use Easy Want this feature? Request Here Purchase CREDITS Here Join the 17 million customers who use Mailchimp, the world’s largest marketing ...Mailchimp for Woocommerce - Troubleshoot Guide
Host Your Own Signup Forms To use a custom signup form on your website that transmits subscriber data to your Mailchimp audience, you'll need to add some Mailchimp information to your form code. You'll locate the form action, user ID, audience ID, ...Gravity Forms Mailchimp Add-on - Features
View Guide Links at the bottom of the page Installation 1 CRU CREDIT Setup (optional) 1 CRU CREDIT Ease Of Use Easy Want this feature? Request Here Purchase CREDITS Here The Gravity Forms Mailchimp Add-On gives you an easy way to integrate all of ...Gravity Forms Mailchimp Add-on - User Guide
For pricing and how to add to your website see at the bottom of the page. Setting Up the Mailchimp Add-On Where to Find These Settings The Mailchimp settings page can be found within your WordPress admin dashboard. From within the left side ...AutomateWoo - User Guide
For pricing and how to add to your website see at the bottom of the page. AutomateWoo is a marketing automation plugin which integrates directly with your WooCommerce store. Using automated marketing campaigns and a unique set of tools, AutomateWoo ...